A modern & popular promise-based HTTP client which we use to perform HTTP requests is Axios. It supports all modern browsers, including the old ones also. It allows users to make XMLHttpRequests interact with servers. Also allows request and response interception, allows users to set response timeout, Offers protection against XSRF at the client-side, Supports the Promise API, Allows request cancellation, Allows request and response data transformation, and Offers automatic transformation for JSON data.
Axios have many other features, including configuration defaults, error handling, canceling of requests, serializing JavaScript objects to JSON automatically, and many more. In this article, we will learn to set up axios interceptor for HTTP calls with the refresh token.
# Using NPM
npm install --save axios

# Using Yarn
yarn add axios
Generally, an interceptor is a function called for every HTTP request, and the application receives the response. In another word, the Axios interceptor is a function called by Axios to update/transform each request before forwarding it & check/filter the response before returning it. In short, you can intercept the requests or responses before they are handled by then or caught.
Before being handled by the .then() or the .catch(), interceptors have a feature that allows an application to intercept requests or responses.
To access data, every HTTP request needs a header property to verify the application requesting data is allowed.
Sometimes the returned HTTP response is a 400 or 500 Bad Response Code status. At those times, you might want to automatically retry the request or verify that the rejected authorization is still valid.
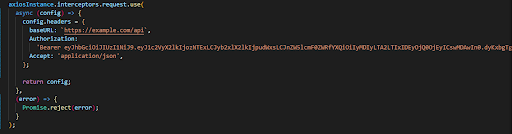
The below example shows how to set up an Axios request interceptor. Generally, two functions accept an Axios interceptor. If it’s a valid, successful request the first function of the request interceptor modifies the request, and the second function works when the request is invalid and throws an error, etc.
Mainly use of this particular interceptor is whenever the application makes an HTTP request to one of the supporting service’s URLs. Axios robotically attaches a header to the request with the username kept within the state. If the HTTP request isn’t always approximately going to one of the services, the interceptor does not do anything to alter the request and lets it cross on its way unaltered.
In some cases, if the request is malformed, the second error() function will start in and throw an error rejecting the request, which gives why it happens.
Axios is importing at the top of the file with ES6 import syntax, and it’s ready to be used. Here we are using ES6 arrow functions in this example.
![]()
![]()
There are two perform arguments within response interceptors that it accept. The primary function is once the response comes back, maybe a 200 or 201 status code HTTP response, and therefore the second function is when it’s a standing status code that falls outside of the 200 or 201 status code range.
An HTTP response comes returned from a service with a 401 unauthorized error; therefore, the motive is that the primary argument handed interior to the response interceptor is undefined. If the response is some 200 responses, the Axios interceptor doesn’t care.
If the HTTP response is 401, the secondary function (originalRequestRetry() function) is triggered and checks if the logged-in user’s credentials are still valid since a 401 indicates the user’s authorization token, cookie, or session user has expired. Suppose the user’s session has indeed expired.
In that case, the session will be terminated by the application logging the user out and prompting them to log in again if that is not the reason for the 401, and the user will be able to continue their session.
Sometimes there was throwing internal server error in which status codes were 500/ 501/502/503. In this situation, we must show a message through an internal server error message inside the application.
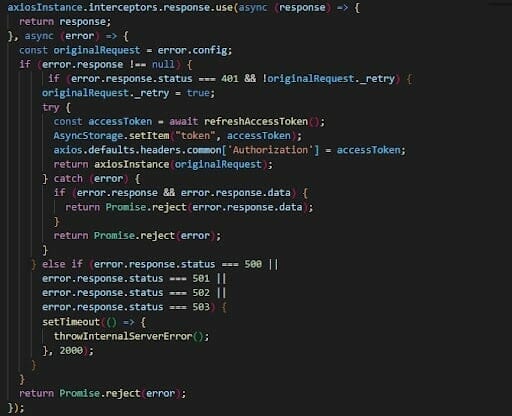
If the request fails again and the server continues to come back with the 401 status code, it will head to the Infinite loop. For handling this, we tend to use a flag decision _retry on the initial Request (config). _retry is about to true right the first time we meet 401 status.
Refresh token means when our request failed with status code 401 at this time, applications show an error and do not run at that time due to Session Timeout.
For that issue, we have issued refresh_Token by calling our reAuth API and got our new access_token by giving the device_token to the API.

By this HttpService call, we have to give the API_URL and params, which are used to call our API for getting data and showing it to our application or post from our application. In this HttpService call, we have to write our Axios function, which calls CRUD operation to create/post, read/get, update, and delete.
On there, we are already given our header in the interceptor, so we don’t need all of these. We have only to pass our parameters to get our responses.
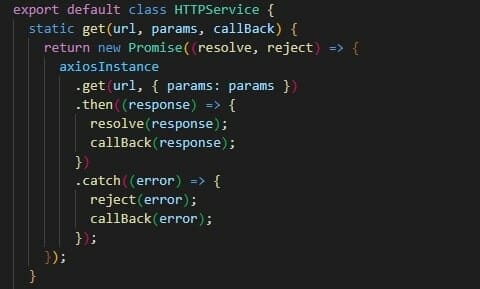
In this below function, we are passing our API_URL and necessary required params to the function, and by giving that API_URL and params. This gives responses and errors.
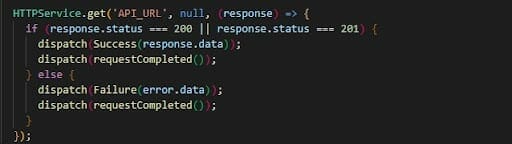
So in our action, we have to get our responses to pass our components. When response status code 200 or 201 at that time, we know that the API call was a success, and by succeeding in this API call, we are getting our required responses for use.

In this blog, we saw how we could use the Axios interceptor functions to intercept every request, update the request with authorization header, API key, etc. If everything is set up like this, we can forward the request. Once the request is resolved, take the response, and perform operations inside the application.

I'm thrilled to be partnering with Mindbowser on our journey with TravelRite. The collaboration has been exceptional, and I’m truly grateful for the dedication and expertise the team has brought to the development process. Their commitment to our mission is...

Founder & CEO, TravelRite
The Mindbowser team's professionalism consistently impressed me. Their commitment to quality shone through in every aspect of the project. They truly went the extra mile, ensuring they understood our needs perfectly and were always willing to invest the time to...

CTO, New Day Therapeutics
I collaborated with Mindbowser for several years on a complex SaaS platform project. They took over a partially completed project and successfully transformed it into a fully functional and robust platform. Throughout the entire process, the quality of their work...

President, E.B. Carlson
Mindbowser and team are professional, talented and very responsive. They got us through a challenging situation with our IOT product successfully. They will be our go to dev team going forward.
Founder, Cascada
Amazing team to work with. Very responsive and very skilled in both front and backend engineering. Looking forward to our next project together.

Co-Founder, Emerge
The team is great to work with. Very professional, on task, and efficient.

Founder, PeriopMD
I can not express enough how pleased we are with the whole team. From the first call and meeting, they took our vision and ran with it. Communication was easy and everyone was flexible to our schedule. I’m excited to...

Founder, Seeke
Mindbowser has truly been foundational in my journey from concept to design and onto that final launch phase.

CEO, KickSnap
We had very close go live timeline and Mindbowser team got us live a month before.

CEO, BuyNow WorldWide
If you want a team of great developers, I recommend them for the next project.

Founder, Teach Reach
Mindbowser built both iOS and Android apps for Mindworks, that have stood the test of time. 5 years later they still function quite beautifully. Their team always met their objectives and I'm very happy with the end result. Thank you!

Founder, Mindworks
Mindbowser has delivered a much better quality product than our previous tech vendors. Our product is stable and passed Well Architected Framework Review from AWS.

CEO, PurpleAnt
I am happy to share that we got USD 10k in cloud credits courtesy of our friends at Mindbowser. Thank you Pravin and Ayush, this means a lot to us.

CTO, Shortlist
Mindbowser is one of the reasons that our app is successful. These guys have been a great team.

Founder & CEO, MangoMirror
Kudos for all your hard work and diligence on the Telehealth platform project. You made it possible.

CEO, ThriveHealth
Mindbowser helped us build an awesome iOS app to bring balance to people’s lives.

CEO, SMILINGMIND
They were a very responsive team! Extremely easy to communicate and work with!

Founder & CEO, TotTech
We’ve had very little-to-no hiccups at all—it’s been a really pleasurable experience.

Co-Founder, TEAM8s
Mindbowser was very helpful with explaining the development process and started quickly on the project.

Executive Director of Product Development, Innovation Lab
The greatest benefit we got from Mindbowser is the expertise. Their team has developed apps in all different industries with all types of social proofs.

Co-Founder, Vesica
Mindbowser is professional, efficient and thorough.

Consultant, XPRIZE
Very committed, they create beautiful apps and are very benevolent. They have brilliant Ideas.

Founder, S.T.A.R.S of Wellness
Mindbowser was great; they listened to us a lot and helped us hone in on the actual idea of the app. They had put together fantastic wireframes for us.

Co-Founder, Flat Earth
Ayush was responsive and paired me with the best team member possible, to complete my complex vision and project. Could not be happier.

Founder, Child Life On Call
The team from Mindbowser stayed on task, asked the right questions, and completed the required tasks in a timely fashion! Strong work team!

CEO, SDOH2Health LLC
Mindbowser was easy to work with and hit the ground running, immediately feeling like part of our team.

CEO, Stealth Startup
Mindbowser was an excellent partner in developing my fitness app. They were patient, attentive, & understood my business needs. The end product exceeded my expectations. Thrilled to share it globally.

Owner, Phalanx
Mindbowser's expertise in tech, process & mobile development made them our choice for our app. The team was dedicated to the process & delivered high-quality features on time. They also gave valuable industry advice. Highly recommend them for app development...

Co-Founder, Fox&Fork