Multi-tenancy refers to a software architecture that allows multiple users or tenants to share a single instance of an application or system while keeping their data and resources separate and isolated from each other.
It is commonly used in Software-as-a-Service (SaaS) environments, where multiple organizations or users access and utilize the same application over the internet.
The concept of multi-tenancy is particularly valuable in situations where a service provider aims to deliver a scalable and cost-effective solution to serve a large number of customers efficiently. By leveraging multi-tenancy, organizations can avoid the need for separate infrastructure and application instances for each customer, reducing maintenance and operational costs.
In a multi-tenant architecture, tenants typically share the same physical or virtual infrastructure, including servers, databases, storage, and networking resources. However, their data is logically separated, and access to resources is controlled to maintain privacy and security. Each tenant is provided with a dedicated space or partition within the system, ensuring that their data is isolated and inaccessible to other tenants.
Before proceeding further, it is important to have knowledge of the following technologies:
➡️ Django Framework
➡️ PostgreSQL
➡️ Python Programming
There are multiple techniques for building multi-tenancy applications, depending on the specific requirements and constraints of the system. Here are a few common techniques:
1. Shared Database with Shared Schemas: In a shared database with a shared schema approach, multiple tenants share a common database instance, and all tenant’s data resides within the same set of database tables and schemas. This approach offers a balance between resource efficiency and data isolation.
2. Shared Database with Isolated Schemas: In a shared database with isolated schemas approach, each tenant is assigned its own dedicated schema within the shared database. This provides a higher level of data isolation compared to shared schemas, as each tenant’s data resides in separate schema structures.
3. Isolated Database with Shared App Server: In the isolated database with a shared app server approach, each tenant has its own dedicated database instance, while the application server or application code is shared among all tenants. This approach provides the highest level of data isolation, ensuring that each tenant’s data is completely separate from others.
4. Complete Isolated Tenants Using Docker: Using Docker containers can provide a complete isolation solution for multi-tenancy applications. Each tenant can be assigned their own isolated Docker container, ensuring that their application, dependencies, and data are fully separated from other tenants.
The above techniques are dependent on your requirements and system specifications. Each of these techniques deserves its own dedicated topic, so we will now explain the second technique using the django_tenants package which is a shared database with isolated schemas.
The django-tenants package is a powerful tool for implementing multi-tenancy in Django applications. It provides a set of tools, utilities, and middleware to enable easy management of multiple tenants within a single Django project. Here’s an overview of the django-tenants package:
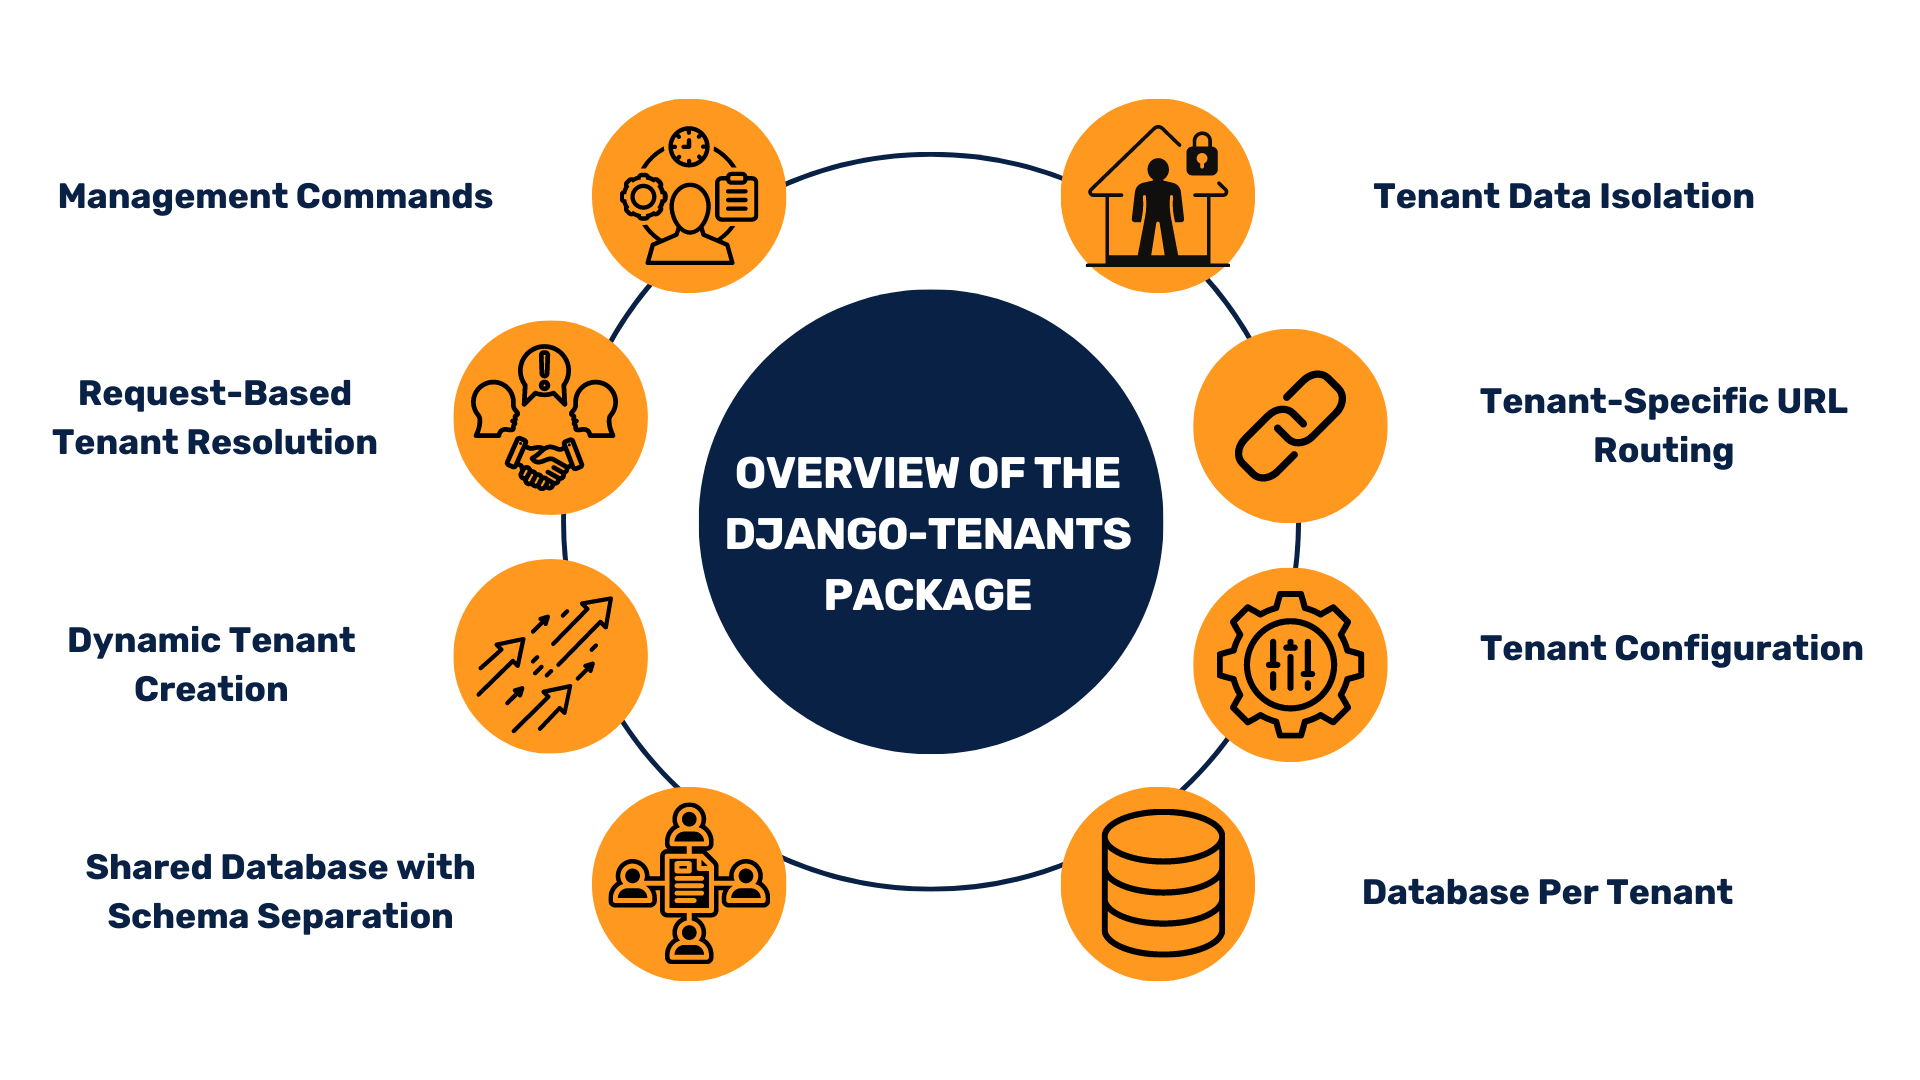
1. Tenant Data Isolation: The package allows you to isolate data for each tenant, ensuring that tenant-specific data is stored separately and inaccessible to other tenants.
2. Tenant-Specific URL Routing: The django-tenants provide URL routing based on tenant-specific subdomains or prefixes. This enables you to differentiate and route requests to the appropriate tenant’s views and functionality.
3. Tenant Configuration: The package offers mechanisms to store and manage tenant-specific configurations, allowing you to customize behaviour or settings for individual tenants.
4. Database Per Tenant: The django-tenants support the creation of a separate database for each tenant, ensuring strong data isolation and scalability. It handles the creation, deletion, and management of tenant databases.
5. Shared Database with Schema Separation: Alternatively, the package also supports shared database multi-tenancy using schema separation. It allows you to create a separate schema for each tenant within a shared database, ensuring data separation and isolation.
6. Dynamic Tenant Creation: The django-tenants provide the utilities for dynamically creating tenants programmatically, making it easier to onboard new tenants in an automated manner.
7. Request-Based Tenant Resolution: The package includes a middleware that resolves the current tenant based on the request, allowing you to access the correct tenant-specific data and configurations.
8. Management Commands: The django-tenants offer management commands to perform common tasks related to tenant management, such as creating tenants, migrating tenant databases, and executing commands on a per-tenant basis.
The package seamlessly integrates with Django’s Object-Relational Mapping (ORM), allowing you to work with tenant-specific models and query data within the context of a specific tenant.
Overall, django-tenants simplify the implementation of multi-tenancy in Django projects by providing a range of tools and utilities to manage multiple tenants efficiently. It offers flexibility in choosing between separate databases or shared databases with schema separation. With django-tenants, you can build scalable and secure multi-tenant applications while maintaining data isolation and customization for each tenant.
Related read: Building Scalable Applications with React Micro Frontends
After creating a Django project you can install django_tenants using the following instruction;
pip install django-tenants
You can see your install django_tenants version by using the following instructions;
pip freeze
django-tenants==3.4.8
Let’s modify and change the settings.py file.
The database configuration needs to change according to the configuration below;
DATABASES = {
'default': {
'ENGINE': 'django_tenants.postgresql_backend',
#....
}
}
To ensure that the correct apps are synced based on whether it’s for the shared or tenant database, you need to add django_tenants.routers.TenantSyncRouter to your DATABASE_ROUTERS setting. This router helps in managing database synchronization for multi-tenancy in Django.
DATABASE_ROUTERS = (
'django_tenants.routers.TenantSyncRouter',
)
class TenantSyncRouter(object):
"""
A router to control which applications will be synced,
depending if we are syncing the shared apps or the tenant apps.
"""

def app_in_list(self, app_label, apps_list):
"""
Is 'app_label' present in 'apps_list'?

apps_list is either settings.SHARED_APPS or settings.TENANT_APPS, a
list of app names.

We check the presence of the app's name or the full path to the apps
AppConfig class.
https://docs.djangoproject.com/en/1.8/ref/applications/#configuring-applications
"""
appconfig = django_apps.get_app_config(app_label)
appconfig_full_name = '{}.{}'.format(
appconfig.__module__, appconfig.__class__.__name__)
return (appconfig.name in apps_list) or (appconfig_full_name in apps_list)

def allow_migrate(self, db, app_label, model_name=None, **hints):
# the imports below need to be done here else django <1.5 goes crazy
# https://code.djangoproject.com/ticket/20704
from django.db import connections
from django_tenants.utils import get_public_schema_name, get_tenant_database_alias

if db != get_tenant_database_alias():
return False

connection = connections[db]
public_schema_name = get_public_schema_name()
if has_multi_type_tenants():
tenant_types = get_tenant_types()
if connection.schema_name == public_schema_name:
installed_apps = tenant_types[public_schema_name]['APPS']
else:
tenant_type = connection.tenant.get_tenant_type()
installed_apps = tenant_types[tenant_type]['APPS']
else:
if connection.schema_name == public_schema_name:
installed_apps = settings.SHARED_APPS
else:
installed_apps = settings.TENANT_APPS
if not self.app_in_list(app_label, installed_apps):
return False
return None
The TenantSyncRouter class is defined, which acts as a database router for controlling the syncing of applications.
The app_in_list method is defined to check if an app_label is present in the apps_list, which can be either settings.SHARED_APPS or settings.TENANT_APPS. It checks the presence of the app’s name or the full path to the app’s AppConfig class.
The allow_migrate method is implemented to determine whether a migration is allowed for a particular app in the given database. It returns False if the migration is not allowed and None otherwise.
The remaining part of the allow_migrate method includes logic to determine the appropriate list of installed apps (installed_apps) based on the current database connection and whether multi-type tenants are being used.
MIDDLEWARE = [
'django_tenants.middleware.TenantSubfolderMiddleware',
#....
]
By including the TenantSubfolderMiddleware in the MIDDLEWARE setting, it ensures that the multi-tenancy functionality provided by the django_tenants package is applied to the incoming requests. The TenantSubfolderMiddleware is responsible for selecting the proper tenant based on the subfolder prefix in the request path and setting up the necessary configurations and database connections for the selected tenant.
class TenantSubfolderMiddleware(TenantMainMiddleware):
"""
This middleware should be placed at the very top of the middleware stack.
Selects the proper tenant using the path subfolder prefix. Can fail in
various ways which are better than corrupting or revealing data.
"""
TENANT_NOT_FOUND_EXCEPTION = Http404

def __init__(self, get_response):
super().__init__(get_response)
self.get_response = get_response
if not get_subfolder_prefix():
raise ImproperlyConfigured(
'"TenantSubfolderMiddleware" requires "TENANT_SUBFOLDER_PREFIX" '
"present and non-empty in settings"
)

def process_request(self, request):
# Short circuit if the tenant is already set by another middleware.
# This allows for multiple tenant-resolving middleware chained together.
if hasattr(request, "tenant"):
return

connection.set_schema_to_public()

urlconf = None

tenant_model = get_tenant_model()
domain_model = get_tenant_domain_model()
hostname = self.hostname_from_request(request)
subfolder_prefix_path = "/{}/".format(get_subfolder_prefix())

# We are in the public tenant
if not request.path.startswith(subfolder_prefix_path):
try:
tenant = tenant_model.objects.get(schema_name=get_public_schema_name())
except tenant_model.DoesNotExist:
raise self.TENANT_NOT_FOUND_EXCEPTION("Unable to find public tenant")

self.setup_url_routing(request, force_public=True)

# We are in a specific tenant
else:
path_chunks = request.path[len(subfolder_prefix_path):].split("/")
tenant_subfolder = path_chunks[0]
try:
tenant = self.get_tenant(domain_model=domain_model, hostname=tenant_subfolder)
except domain_model.DoesNotExist:
return self.no_tenant_found(request, hostname)

tenant.domain_subfolder = tenant_subfolder
urlconf = get_subfolder_urlconf(tenant)

tenant.domain_url = hostname
request.tenant = tenant

connection.set_tenant(request.tenant)
clear_url_caches() # Required to remove previous tenant prefix from cache, if present

if urlconf:
request.urlconf = urlconf
set_urlconf(urlconf)

def no_tenant_found(self, request, hostname):
""" What should happen if no tenant is found.
This makes it easier if you want to override the default behavior """
raise self.TENANT_NOT_FOUND_EXCEPTION('No tenant for subfolder "%s"' % hostname)
This middleware is designed to be placed at the top of the middleware stack and is responsible for selecting the proper tenant based on the subfolder prefix in the request path.
The TenantSubfolderMiddleware class extends the TenantMainMiddleware class, which suggests that it is building upon or customizing the behaviour of the main multi-tenancy middleware.
To ensure that the tenant is available on the request object, make sure you have django.template.context_processors.request included in the context_processors option of the TEMPLATES setting. This allows the request object to be passed as a context variable to the templates, making the tenant information accessible within the templates.
TEMPLATES = [
{
'BACKEND': 'django.template.backends.django.DjangoTemplates',
'DIRS': [],
'APP_DIRS': True,
'OPTIONS': {
'context_processors': [
'django.template.context_processors.request',
#...
],
},
},
]
You can refer to this official document of django_tenant to know more.
To utilize shared and tenant-specific applications in your Django project with the django_tenants package, you need to configure the SHARED_APPS and TENANT_APPS settings.
SHARED_APPS = (
"tenant_model",
#.....
)
TENANT_APPS = (
"myapp",
#.....
)
The SHARED_APPS and TENANT_APPS settings are tuples of strings, similar to the INSTALLED_APPS setting. They define which applications should be synchronized to the public schema and individual tenant schemas, respectively. If SHARED_APPS is set, only those apps will be synced to the public schema, and if TENANT_APPS is set, only those apps will be synced to all tenant schemas.
In the above configuration, the shared app contains the apps that should be synced to the public schema, and the tenant app contains the apps that should be synced to all tenant schemas.
INSTALLED_APPS = list(SHARED_APPS) + [app for app in TENANT_APPS if app not in SHARED_APPS]
Then, a list comprehension is used to iterate over the TENANT_APPS tuple and add only those apps that are not already present in SHARED_APPS. This ensures that the final INSTALLED_APPS list contains all shared apps followed by any tenant-specific apps that are not duplicates.
Also, define your tenant model and domain model in the settings as shown in the below snippets;
TENANT_MODEL = "tenant_model.ClientModel"

TENANT_DOMAIN_MODEL = "tenant_model.DomainModel"
Hence you need to define TENANT_SUBFOLEDER_PREFIX in your settings files as shown below snippets;
TENANT_SUBFOLDER_PREFIX = "api"
By adding this configuration, you are specifying that the subfolder prefix for tenant URLs should be “api”. This means that all tenant-specific URLs will have the format “http://yourdomain.com/api/tenant-subfolder/…” where “tenant-subfolder” represents the unique identifier for each individual tenant.
Make sure to replace “api” with your desired subfolder prefix. This setting is essential for the TenantSubfolderMiddleware provided by the django_tenants package to correctly resolve tenant URLs and route requests to the appropriate tenant.
To configure the SHOW_PUBLIC_IF_NO_TENANT_FOUND setting to True in your Django project, you need to add the following line to your Django settings file;
SHOW_PUBLIC_IF_NO_TENANT_FOUND = True
By setting this configuration to True, you specify that if no matching tenant is found for a given subfolder or domain, the application should fall back to showing the content of the public tenant or public schema.
To create the shared apps on the public schema, run the migrate_schemas command with the –shared option. Please note that if this is the first time running the command, ensure that your database is empty.
python manage.py migrate_schemas --shared
And also migrate Tenant and Domain models and create tables in the public tenant.
The migrate_schemas command is provided by the django_tenants package and is used to apply database migrations to either shared or tenant-specific schemas.
By including the –shared option, you are specifying that the migrations should be applied only to the shared schema. This command will execute the necessary database migrations for the shared apps specified in the SHARED_APPS setting.
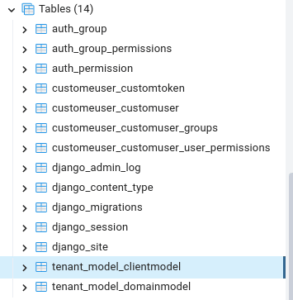
ClientModel and DomainModel. These models make use of the TenantMixin and DomainMixin classes provided by the django_tenants package as you can see below code snippets.
from django.db import models
from django_tenants.models import (
TenantMixin,
DomainMixin
)
class ClientModel(TenantMixin):
"""
Class for creating client models using TenantMixin.
"""
name = models.CharField(max_length=200, null=False, blank=False)
paid_until = models.DateField(null=True, blank=False)
on_trial = models.BooleanField(null=True, blank=False)
created_at = models.DateTimeField(auto_now_add=True)

auto_create_schema = True

class DomainModel(DomainMixin):
"""
Class for creating a domain for the tenant.
"""
domain_name = models.CharField(max_length=50, null=True, blank=False)
created_at = models.DateTimeField(auto_now_add=True)
In the ClientModel class, we defined fields such as name, paid_until, on_trial, and created_at using Django’s CharField, DateField, BooleanField, and DateTimeField, respectively. This model represents a client or tenant in the system. The auto_create_schema attribute is set to True, indicating that a new schema should be automatically created for each instance of this model.
The DomainModel class represents a domain associated with a specific tenant. It includes a domain_name field to store the domain name and a created_at field to track the creation time.
Both models inherit from the appropriate mixins provided by django_tenants, which provide the necessary functionality to manage tenants and domains in a multi-tenant architecture.
from tenant_model.models import ClientModel, DomainModel

# create your public tenant
tenant = ClientModel(schema_name='public',
name='Schemas Inc.',
paid_until='2016-12-05',
on_trial=False)
tenant.save()

# Add one or more domains for the tenant
domain = DomainModel()
domain.domain = 'localhost' # don't add your port or www here! on a local server you'll want to use localhost here
domain.tenant = tenant
domain.is_primary = True
domain.save()

# create your first real tenant
tenant = ClientModel(schema_name='tenant1',
name='Megatron',
paid_until='2014-12-05',
on_trial=True)
tenant.save() # migrate_schemas automatically called, your tenant is ready to be used!

# Add one or more domains for the tenant
domain = DomainModel()
domain.domain = 'Megatron.my-domain' # don't add your port or www here!
domain.tenant = tenant
domain.is_primary = True
domain.save()
In this code, we are going to create a public and tenant 1 schema object hence whenever a new instance is created migrate the database automatically and create a new schema.

The project is ready for use. You can create an app for tenant-specific or shared-specific. We also created a Client model and Tenant model for shared specific which is created in a public schema.
So let’s create a tenant-specific app and migrate with DummyModel in the tenant schema only.
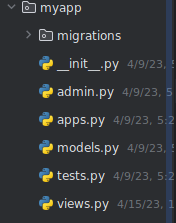
And create a model in the models.py file.
from django.db import models

class DummyModel(models.Model):
"""
Class for creating a Dummy model.
"""
name = models.CharField(max_length=100)
This is a simple model with the name attribute with CharField type.
Run the following commands;
Python3 manage.py makemigrations
For creating migrations files then run the following command;
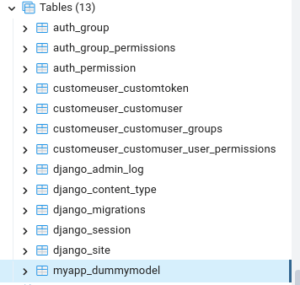
Python3 manage.py migrate_schemas

[standard:public] === Starting migration
[standard:public] Operations to perform:
[standard:public] Apply all migrations: admin, auth, contenttypes, customeuser, myapp, sessions, sites, tenant_model
[standard:public] Running migrations:
[standard:public] No migrations to apply.
[1/1 (100%) standard:tenant1] === Starting migration
[1/1 (100%) standard:tenant1] Operations to perform:
[1/1 (100%) standard:tenant1] Apply all migrations: admin, auth, contenttypes, customeuser, myapp, sessions, sites, tenant_model
[1/1 (100%) standard:tenant1] Running migrations:
[1/1 (100%) standard:tenant1] No migrations to apply.
You can successfully migrate the table in the database and check it in your PgAdmin application.
You can refer to my project on GitHub.

By using django_tenants, you can easily create and manage tenants, associate domains with them, and handle tenant-specific database operations. The package provides middleware, routers, and models that facilitate the handling of tenant requests, URL routing, database synchronization, and more.
With django_tenants, you can choose different approaches for multi-tenancy, such as a shared database with shared schemas, a shared database with isolated schemas, isolated databases with shared app servers, and complete isolation using Docker. These approaches provide flexibility and scalability based on your specific requirements.
The package also provides helpful utilities, such as the migrate_schemas command, which simplifies the process of applying database migrations to shared and tenant-specific schemas. Additionally, the integration with Django’s ORM allows you to write tenant-aware queries and leverage the full power of Django’s models and database operations.
Overall, django_tenants is a valuable tool for building multi-tenant applications in Django. It handles the complexities of managing multiple tenants and their data isolation, allowing you to focus on developing the core functionality of your application.
Leave your competitors behind! Become an EPIC integration pro, and boost your team's efficiency.
Register Here

The Mindbowser team's professionalism consistently impressed me. Their commitment to quality shone through in every aspect of the project. They truly went the extra mile, ensuring they understood our needs perfectly and were always willing to invest the time to...

CTO, New Day Therapeutics
I collaborated with Mindbowser for several years on a complex SaaS platform project. They took over a partially completed project and successfully transformed it into a fully functional and robust platform. Throughout the entire process, the quality of their work...

President, E.B. Carlson
Mindbowser and team are professional, talented and very responsive. They got us through a challenging situation with our IOT product successfully. They will be our go to dev team going forward.
Founder, Cascada
Amazing team to work with. Very responsive and very skilled in both front and backend engineering. Looking forward to our next project together.

Co-Founder, Emerge
The team is great to work with. Very professional, on task, and efficient.

Founder, PeriopMD
I can not express enough how pleased we are with the whole team. From the first call and meeting, they took our vision and ran with it. Communication was easy and everyone was flexible to our schedule. I’m excited to...

Founder, Seeke
Mindbowser has truly been foundational in my journey from concept to design and onto that final launch phase.
CEO, KickSnap
We had very close go live timeline and Mindbowser team got us live a month before.

CEO, BuyNow WorldWide
If you want a team of great developers, I recommend them for the next project.

Founder, Teach Reach
Mindbowser built both iOS and Android apps for Mindworks, that have stood the test of time. 5 years later they still function quite beautifully. Their team always met their objectives and I'm very happy with the end result. Thank you!

Founder, Mindworks
Mindbowser has delivered a much better quality product than our previous tech vendors. Our product is stable and passed Well Architected Framework Review from AWS.

CEO, PurpleAnt
I am happy to share that we got USD 10k in cloud credits courtesy of our friends at Mindbowser. Thank you Pravin and Ayush, this means a lot to us.

CTO, Shortlist
Mindbowser is one of the reasons that our app is successful. These guys have been a great team.

Founder & CEO, MangoMirror
Kudos for all your hard work and diligence on the Telehealth platform project. You made it possible.

CEO, ThriveHealth
Mindbowser helped us build an awesome iOS app to bring balance to people’s lives.

CEO, SMILINGMIND
They were a very responsive team! Extremely easy to communicate and work with!

Founder & CEO, TotTech
We’ve had very little-to-no hiccups at all—it’s been a really pleasurable experience.

Co-Founder, TEAM8s
Mindbowser was very helpful with explaining the development process and started quickly on the project.

Executive Director of Product Development, Innovation Lab
The greatest benefit we got from Mindbowser is the expertise. Their team has developed apps in all different industries with all types of social proofs.

Co-Founder, Vesica
Mindbowser is professional, efficient and thorough.

Consultant, XPRIZE
Very committed, they create beautiful apps and are very benevolent. They have brilliant Ideas.

Founder, S.T.A.R.S of Wellness
Mindbowser was great; they listened to us a lot and helped us hone in on the actual idea of the app. They had put together fantastic wireframes for us.

Co-Founder, Flat Earth
Ayush was responsive and paired me with the best team member possible, to complete my complex vision and project. Could not be happier.

Founder, Child Life On Call
The team from Mindbowser stayed on task, asked the right questions, and completed the required tasks in a timely fashion! Strong work team!

CEO, SDOH2Health LLC
Mindbowser was easy to work with and hit the ground running, immediately feeling like part of our team.

CEO, Stealth Startup
Mindbowser was an excellent partner in developing my fitness app. They were patient, attentive, & understood my business needs. The end product exceeded my expectations. Thrilled to share it globally.

Owner, Phalanx
Mindbowser's expertise in tech, process & mobile development made them our choice for our app. The team was dedicated to the process & delivered high-quality features on time. They also gave valuable industry advice. Highly recommend them for app development...

Co-Founder, Fox&Fork