Vue.js is a JavaScript framework used to create interactive web interfaces. Vue is unique in its ability to enhance existing HTML, unlike other frameworks. We can also use Vue to write complete single-page applications (SPAs).
This enables the creation of fully Vue-managed tags, which can improve the developer experience and productivity when working with complex applications. It can also allow client-side routing and state management libraries if needed. Additionally, Vue takes a middle-ground approach to tools like client-side routing and state management.
Moreover, Vue also provides a step-by-step approach to writing markup. Like most frameworks, Vue allows us to create reusable tag blocks across components. In most cases, Vue components are written using a unique HTML template syntax.
Vue.js uses the virtual DOM, which is additionally utilized by other systems such as Respond, Ash, etc. The changes are not made to the DOM instead, a copy of the DOM is created which is displayed within the frame of JavaScript information structures.
Whenever changes are made, they are first applied to the JavaScript information structures, which are then compared to the initial information structures. Subsequently, the final changes are updated to the real DOM, visible to the client.
You need the following installations to work with Vue.js:
The command to install Vue using NPM is provided below:
npm install vue
With the Vue CLI, we can quickly design entire Vue projects. Ready to monitor our Vue-related conditions like Vue Router and Vuex using CLI.
First, run the take after the command:
“first-vue-proj-tutorial” will be the title of our project organizer.
vue create first-vue-proj-tutorial
Then based on our needs, select the features we want:

Next, you can include Vue Router in your project and examine the following code:

At this point, you are ready to configure the remaining parts of your project.

The CLI tool will consequently make a purge venture for you. After the installation is complete, navigate to the project folder by running the cd command.
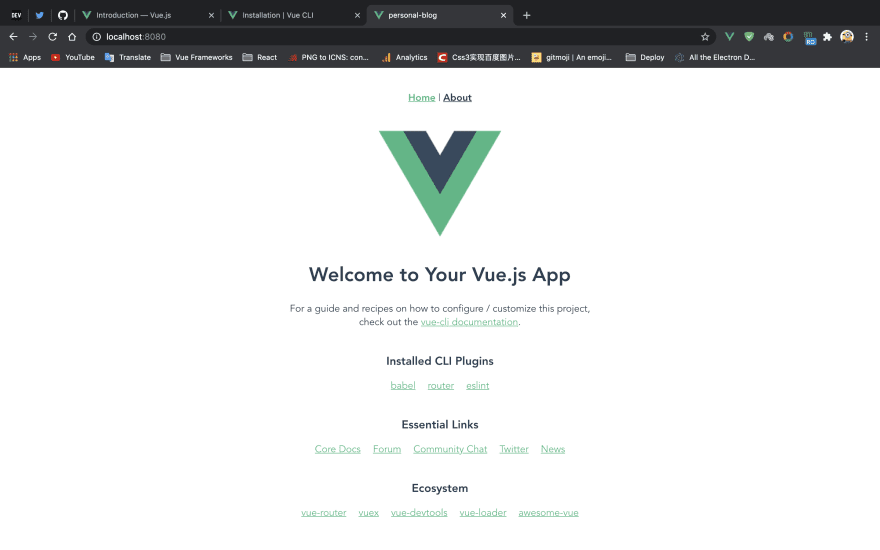
First, run our project to make sure everything is fine with the ‘npm run server’. You will see a page like this:
To define the website’s main design, look and feel, we can certainly write our own CSS and similar styles, but that can be quite complex. Common Vue UI frameworks include Vuetify, which provides a Vue UI system for material design, and Bootstrap-Vue, which combines Vue.js with Bootstrap for an efficient development experience.
Here is an example of a Bootstrap configuration:
To Get Started, Let’s Introduce the Prerequisites:
npn install bootstrap bootstrap-vue
After completing the installation, the next step is to modify the main.js file. In this file, we inform Vue to utilize our newly added Bootstrap and BootstrapVue dependencies.
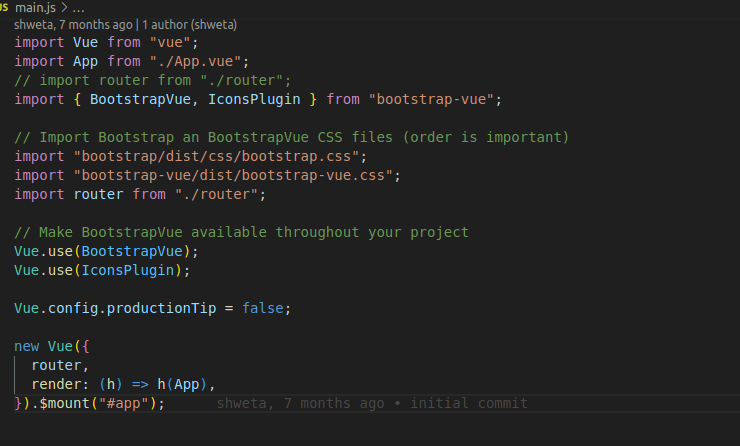
Additionally, we’re including an IconsPlugin, which enables us to leverage Bootstrap icons throughout our entire project.
Vue components are a key feature of Vue.js that allows you to design custom elements that may be reused in HTML. When a component is built, its name becomes a custom item that may be utilized in the newly formed Vue instance item.
Expanding the /src/ directory in the IDE Explorer window reveals a file titled App.vue.
Remove everything from the file before inserting the following code:
<template>
<div id="app"> <h1>{{message}}</h1>
<p> Learn more with the
<a
href="https://v3.vuejs.org/"
target="_blank"
rel="noopener"
>Vue Docs & Resources</a>,
</p>
<button @click="doSomething">Say hello.</button>
</div>
</template>
<!-- Use preprocessors via the lang attribute! e.g. <style lang="scss"> -->
<script>
export default {
data() {
return {
message: 'Welcome to Vue 3!';
},
},
methods: {
doSomething() {
alert('Hello!');
}
}
};
</script>
<style>
#app {
font-family: Avenir, Helvetica, Arial, sans-serif;
text-align: center;
color: #2c3e58;
margin-top: 60px;
}
a,button {
color: #4fc88d;
}
button {
background: none;
}
</style>The result of the above code will look like this:

A click event is generated when a button on the user interface is clicked. Depending on the functionality, clicking the button should trigger a specific action associated with the event. Event handling in Vue 3 enables us to listen to and respond to these events.
In Vue 3, event handlers utilize the v-on directive. We can use this directive to listen for DOM events like a click-and-fire JavaScript code. Event handlers in Vue.js support both inline handlers and method handlers.
1. Management of Inline Event Handling in Vue 3
The most effortless event-dealing approach in Vue 3 is to utilize inline event handlers.
inlineEvent = "";
You can simplify the use of the v-on directive by directly specifying the event, such as v-on:click, to listen for a click event.
<template>
<button type="button"
class="text-white bg-blue-600 hover:bg-blue-800 focus:ring-4 focus:outline-none focus:ring-blue-300 dark:focus:ring-blue-800 font-medium rounded-lg text-sm inline-flex items-center px-5 py-2.5 text-center mr-2"
v-on:click="inlineEvent = 'YES'">Yes</button>
<button type="button"
class="text-white bg-red-600 hover:bg-red-800 focus:ring-4 focus:outline-none focus:ring-red-300 dark:focus:ring-red-800 font-medium rounded-lg text-sm inline-flex items-center px-5 py-2.5 text-center mr-2"
v-on:click="inlineEvent = 'NO'">No</button>
</template>
Fundamentally, inline event handlers are ideal for handling straightforward use cases where we need to execute a single statement in response to an event.
2. Method-based Event Handling in Vue 3
The foremost common approach to handling events in Vue.js 3 is to use strategies as event handlers.
countValue = null;

increaseCount() {
countValue.value++;
},

<button
type="button"
@click="increaseCount()"
class="text-white bg-blue-600 hover:bg-blue-800 focus:ring-4 focus:outline-none focus:ring-blue-300 dark:focus:ring-blue-800 font-medium rounded-lg text-sm inline-flex items-center px-5 py-2.5 text-center mr-2"
>
Count
</button>
In this context, we are associating the method increaseCount() with the click event. A method handler, in turn, receives the local DOM event object as an input parameter. To access the event within the method, you can modify the method handler’s signature as follows:
countValue = 0;

increaseCount(event) {
alert(event?.target?.tagName)
countValue.value++;
},
We can access properties from the event object and perform actions with them within the method as needed. This allows us to work with event-related data and perform specific tasks based on the event’s properties and values.
3. Calling Methods in Inline Event Handlers
Another interesting use case is directly calling event handlers from the DOM element. Using this function, we can supply custom method arguments instead of the normal DOM event.
Certainly, let’s consider the following example:
<button
type="button"
@click="increaseCount(5)"
class="text-white bg-blue-600 hover:bg-blue-800 focus:ring-4 focus:outline-none focus:ring-blue-300 dark:focus:ring-blue-800 font-medium rounded-lg text-sm inline-flex items-center px-5 py-2.5 text-center mr-2"
>
Count
</button>

countValue = 0;

increaseCount(number: Number) {
countValue.value = countValue?.value + number;
},
The number 5 is passed as an argument to the increaseCount() function. Then, within the increaseCount() function body, we can use it as an argument.
4. Event Argument with Inline Handlers in Vue.js
Accessing the original DOM event and passing a special method argument are two other use cases.
<button
type="button"
@click="increaseCount(5, $event)"
class="text-white bg-blue-600 hover:bg-blue-800 focus:ring-4 focus:outline-none focus:ring-blue-300 dark:focus:ring-blue-800 font-medium rounded-lg text-sm inline-flex items-center px-5 py-2.5 text-center mr-2"
>
count
</button>

countValue = 0;

increaseCount(number: Number, event: Event) {
console.log(event?.target?.tagName)
countValue.value = countValue?.value + number;
}
We can respond appropriately to DOM events by using the v-on directive in Vue 3. For simpler tasks, we can use inline handlers within the template itself. However, for more intricate logic and reasoning, we prefer to use method-based event handlers. Depending on the specific requirements, an application will often make use of both types of event handling.

That concludes this part of the tutorial. In this section, we’ve successfully created a simple ‘Hello World’ application with Vue.js. Now, armed with this knowledge, we can proceed to create custom components and configure the application’s structure to meet the specific needs of our project.
Vue.js proves to be a valuable resource for developing progressive web applications (PWAs). It’s essential to note that comprehensive support and assistance are readily available for PWAs, ensuring their stability and enabling the removal of restrictions on both applications and websites.
Additionally, it’s worth highlighting that Vue’s component-based architecture provides ample opportunities to seamlessly incorporate additional functionality into your application as needed.
Leave your competitors behind! Become an EPIC integration pro, and boost your team's efficiency.
Register Here

The Mindbowser team's professionalism consistently impressed me. Their commitment to quality shone through in every aspect of the project. They truly went the extra mile, ensuring they understood our needs perfectly and were always willing to invest the time to...

CTO, New Day Therapeutics
I collaborated with Mindbowser for several years on a complex SaaS platform project. They took over a partially completed project and successfully transformed it into a fully functional and robust platform. Throughout the entire process, the quality of their work...

President, E.B. Carlson
Mindbowser and team are professional, talented and very responsive. They got us through a challenging situation with our IOT product successfully. They will be our go to dev team going forward.
Founder, Cascada
Amazing team to work with. Very responsive and very skilled in both front and backend engineering. Looking forward to our next project together.

Co-Founder, Emerge
The team is great to work with. Very professional, on task, and efficient.

Founder, PeriopMD
I can not express enough how pleased we are with the whole team. From the first call and meeting, they took our vision and ran with it. Communication was easy and everyone was flexible to our schedule. I’m excited to...

Founder, Seeke
Mindbowser has truly been foundational in my journey from concept to design and onto that final launch phase.

CEO, KickSnap
We had very close go live timeline and Mindbowser team got us live a month before.

CEO, BuyNow WorldWide
If you want a team of great developers, I recommend them for the next project.

Founder, Teach Reach
Mindbowser built both iOS and Android apps for Mindworks, that have stood the test of time. 5 years later they still function quite beautifully. Their team always met their objectives and I'm very happy with the end result. Thank you!

Founder, Mindworks
Mindbowser has delivered a much better quality product than our previous tech vendors. Our product is stable and passed Well Architected Framework Review from AWS.

CEO, PurpleAnt
I am happy to share that we got USD 10k in cloud credits courtesy of our friends at Mindbowser. Thank you Pravin and Ayush, this means a lot to us.

CTO, Shortlist
Mindbowser is one of the reasons that our app is successful. These guys have been a great team.

Founder & CEO, MangoMirror
Kudos for all your hard work and diligence on the Telehealth platform project. You made it possible.

CEO, ThriveHealth
Mindbowser helped us build an awesome iOS app to bring balance to people’s lives.

CEO, SMILINGMIND
They were a very responsive team! Extremely easy to communicate and work with!

Founder & CEO, TotTech
We’ve had very little-to-no hiccups at all—it’s been a really pleasurable experience.

Co-Founder, TEAM8s
Mindbowser was very helpful with explaining the development process and started quickly on the project.

Executive Director of Product Development, Innovation Lab
The greatest benefit we got from Mindbowser is the expertise. Their team has developed apps in all different industries with all types of social proofs.

Co-Founder, Vesica
Mindbowser is professional, efficient and thorough.

Consultant, XPRIZE
Very committed, they create beautiful apps and are very benevolent. They have brilliant Ideas.

Founder, S.T.A.R.S of Wellness
Mindbowser was great; they listened to us a lot and helped us hone in on the actual idea of the app. They had put together fantastic wireframes for us.

Co-Founder, Flat Earth
Ayush was responsive and paired me with the best team member possible, to complete my complex vision and project. Could not be happier.

Founder, Child Life On Call
The team from Mindbowser stayed on task, asked the right questions, and completed the required tasks in a timely fashion! Strong work team!

CEO, SDOH2Health LLC
Mindbowser was easy to work with and hit the ground running, immediately feeling like part of our team.

CEO, Stealth Startup
Mindbowser was an excellent partner in developing my fitness app. They were patient, attentive, & understood my business needs. The end product exceeded my expectations. Thrilled to share it globally.

Owner, Phalanx
Mindbowser's expertise in tech, process & mobile development made them our choice for our app. The team was dedicated to the process & delivered high-quality features on time. They also gave valuable industry advice. Highly recommend them for app development...

Co-Founder, Fox&Fork