














 BLOGS
BLOGS  NEWSROOM
  CASE STUDIES
  WEBINARS
  PODCASTS
  ASSET HUB
  EVENT CALENDAR



















TL;DR
- This guide walks through the full technical path for integrating a health app with Epic EHR from registering your app on Epic on FHIR to OAuth 2.0 setup, SMART on FHIR launch methods, access token flow, and calling the FHIR R4 APIs.
- If you are building for one Epic org, the step-by-step below covers everything.
- If you are shipping to multiple health systems, see the ConnectHealth section after Step 5.
The Electronic Health Record (EHR) has transformed how patient information is managed and accessed in healthcare today. EHRs, or Electronic Health Records, are comprehensive digital documents that provide real-time, patient-focused data to authorized users. They streamline the workflow of healthcare providers by consolidating a patient’s medical history, treatment plans, and test results into one easily accessible record, ultimately enhancing communication and coordination within healthcare teams.
Epic EHR, developed by Epic Systems Corporation, stands out as a leading solution in the EHR market. Known for its user-friendly interface and extensive functionality, Epic EHR supports various aspects of healthcare delivery, including patient management, clinical documentation, and billing. With its scalable design, Epic EHR caters to both large health systems and smaller practices, aiming to improve clinical workflows and patient care through effective data management and integration.
What is EHR?
EHR, short for Electronic Health Record, is a digital patient document. An EHR is a real-time, patient-focused record. This gives authorized users immediate and secure access to data. It includes a patient’s medical history, diagnosis, medications, treatment plan, vaccination dates, allergies, radiographs, and laboratory results. EHRs are designed to improve the workflow of healthcare providers and facilitate communication between them. Their goal is to improve patient care by providing comprehensive and accurate information to health professionals at the point of care.
What is Epic EHR?
Epic Systems Corporation is a leading provider of electronic health record (EHR) software. “Epic EHR” refers to the suite of healthcare software solutions developed by Epic Systems. The Epic EHR system is widely used in hospitals. healthcare organization and medical practices throughout the United States and abroad.
Epic EHR offers modules and functionalities to support different aspects of healthcare delivery, including patient management, clinical documentation, order entry, decision support, billing, and revenue cycle management. It allows healthcare providers to store and access patient information electronically, communicate effectively, and collaborate on data management across the organization.
Epic EHR is known for its user interface, collaborative features, and scalability. This makes it ideal for large health systems and smaller practices looking to improve clinical workflows, patient care coordination, and the quality of health services delivered.
How to Integrate Epic EHR in Your WebApp
In this section we will discuss the step-by-step guide for Epic EHR Integration. To get started, you will need to create a free account on Epic on FHIR.
1. Creating Epic Applications.
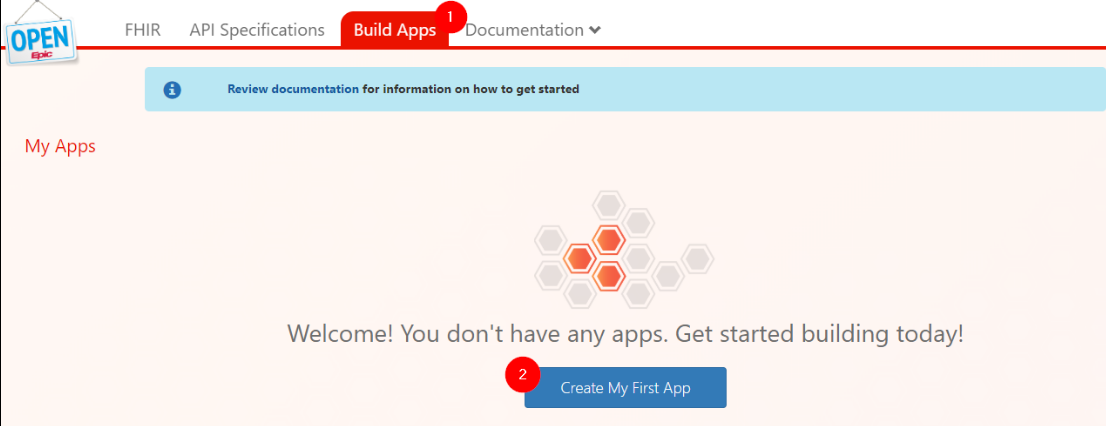
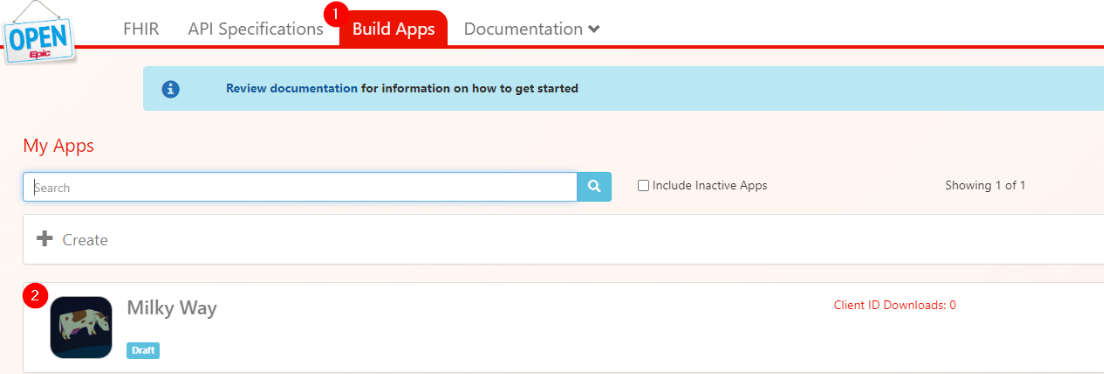
When a developer registers an app, the website creates an app record in the Epic database and assigns the app production and non-production client IDs. The steps for a user to register an app are:
🔺Navigate to the Build Apps Page
🔺Select “Create My First App”
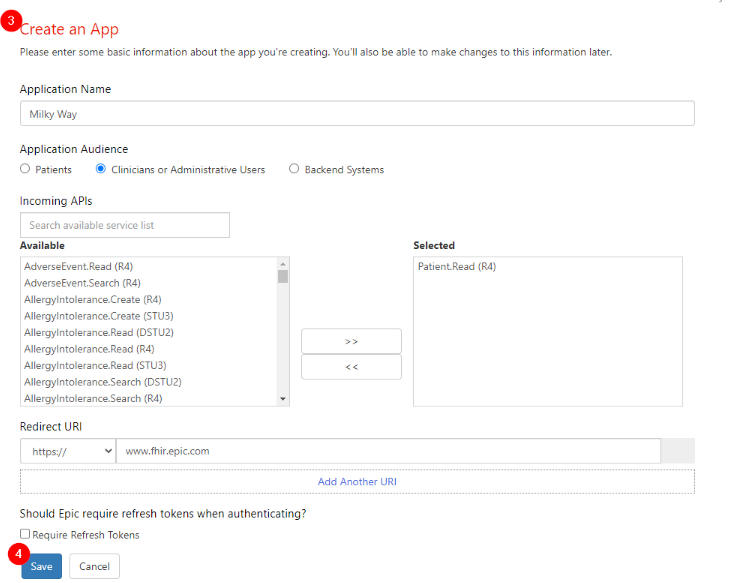
🔺Enter the Following Information and Create an App
- App Name.
- Application audience, in this case, “Patients”.
- APIs, in this case, Patient. Read (R4), Patient. Search (R4), Observation. Read (Labs) (R4), and Observation. Search (Labs) (R4).
- Redirect URI, Which Is the URL Path Where the App Will Be Deployed.
🔺Save.
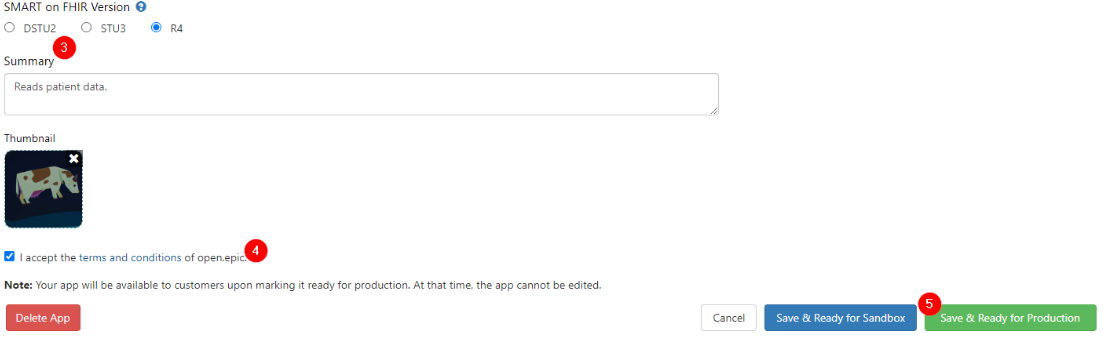
After the developer has completed development and testing, they can mark their app ready for production use. The app cannot be used in any community member environments, either production or non-production until the app has been marked ready for production. The steps for a user to activate an app are:
- Navigate to the Build Apps Page.
- Select the App that will be Activated.
- Finalize Details About the App.
- Check the Box to Confirm Compliance with the Terms and Conditions.
- Save and Mark Ready.
2. Using OAuth 2.0
Applications must secure and protect the privacy of patients and their data. To help meet this objective, Epic supports using the OAuth 2.0 framework to authenticate and authorize applications.
To use OAuth 2.0 to authorize your application’s access to patient information, some information needs to be shared between the authorization server and your application:
- client_id: The client_id identifies your application to authentication servers within the Epic community and allows you to connect to any organization.
- redirect_uri: The redirect_uri confirms your identity and is used to validate and redirect authentication requests that originate from your application. Epic’s implementation allows for multiple redirect_uris. Note that a redirect_uri is not needed for backend services using the client_credentials grant type. An HTTP protocol is required for use in a production environment, but HTTP protocol-based redirect_uris are allowed for development and testing. Registered redirect_uris must not contain anything in the fragment (i.e. anything after #).
- Credentials: Some apps, sometimes referred to as confidential clients, can use credentials registered for a given EHR system to obtain authorization to access the system without a user or a patient implicitly or explicitly authorizing the app.
3. Launch Methods
The app can be launched by any of the following 4 methods:
🔺EHR Launch (SMART on FHIR)
The app is launched by the EHR calling a launch URL specified in the EHR’s configuration. The EHR launches the launch URL and appends a launch token and the FHIR server’s endpoint URL (ISS parameter) in the query string. The app exchanges the launch token, along with the client identification parameters to get an authorization code and eventually the access token.
Related read: Integrating FHIR Resources with Backend Services: A Comprehensive Guide
🔺Standalone Launch
The app launches directly to the authorized endpoint outside of an EHR session and requests context from the EHR’s authorization server.
🔺Backend Services
The app is not authorized by a specific person and likely does not have a user interface, and therefore calls EHR web services with system-level authorization.
🔺Desktop Integrations Through Subspace
The app requests access to APIs directly available on the EHR’s desktop application via a local HTTP server.
Create Your Epic EHR Account and Streamline Your Healthcare Workflow!
4. Standalone Launch
The app launches directly to the authorized endpoint outside of an EHR session and requests context from the EHR’s authorization server. The steps are as follows:
🔺Your Application Requests an Authorization Code
Your application would like to authenticate the user using the OAuth 2.0 workflow. To initiate this process, your app needs to link (using HTTP GET) to the authorized endpoint and append the following query string parameters:
- response_type: This parameter must contain the value “code”.
- client_id: This parameter contains your web application’s client ID issued by Epic.
- redirect_uri: This parameter contains your application’s redirect URI. After the request completes on the Epic server, this URI will be called as a callback. The value of this parameter needs to be URL encoded. This URI must also be registered with the EHR’s authorization server by adding it to your app listing.
- state: This optional parameter is generated by your app and is opaque to the EHR. The EHR’s authorization server will append it to each subsequent exchange in the workflow for you to validate session integrity. While not required, this parameter is recommended to be included and validated with each exchange to increase security.
- scope: This parameter describes the information for which the web application is requesting access. Starting with the November 2019 version of Epic, the “openid” and “fhirUser” OpenID Connect scopes are supported.
- aud: Starting in the August 2021 version of Epic, healthcare organizations can optionally configure their system to require the aud parameter for Standalone and EHR launch workflows if a launch context is included in the scope parameter.
- Starting in the May 2023 version of Epic (2023 R1), the `aud` parameter is required for Standalone and EHR launch workflows when a launch context is included in the scope. The value to use is the base URL of the resource server the application intends to access, which is typically the FHIR server. If your app omits `aud` and the health system runs May 2023 or later, the authorization request will fail.
🔺EHR’s Authorization Server Authenticates the User and Authorizes Access
The EHR’s authorization server reviews the request from your application, authenticates the user (sample credentials found here), and authorizes access. If approved, the authorization server redirects the browser to the redirect URL supplied in the initial request and appends the following query string parameter.
- code: This parameter contains the authorization code generated by Epic, which will be exchanged for the access token in the next step.
- state: This parameter will have the same value as the earlier state parameter.
Here’s an example of what the redirect will look like if Epic’s Authorization Server accepts the request:
🔺Your Application Exchanges the Authorization Code for an Access Token
After receiving the authorization code, your application trades the code for a JSON object containing an access token and contextual information by sending an HTTP POST to the token endpoint using a Content-Type header with a value of “application/x-www-form-urlencoded“.
Access Token Request: If You Are Not Using a Client Secret.
The following parameters are required in the POST body:
- grant_type: For the Standalone launch flow, this should contain the value “authorization_code”.
- code: This parameter contains the authorization code sent from Epic’s authorization server to your application as a querystring parameter on the redirect URI as described above.
- redirect_uri: This parameter must contain the same redirect URI that you provided in the initial access request. The value of this parameter needs to be URL-encoded.
- client_id: This parameter must contain the application’s client ID issued by Epic that you provided in the initial request.
Here’s an example of what an HTTP POST request for an access token might look like:
POST https://fhir.epic.com/interconnect-fhir-oauth/oauth2/token HTTP/1.1
Content-Type: application/x-www-form-urlencoded
grant_type=authorization_code&code=yfNg-rSc1t5O2p6jVAZLyY00uOOte5KM1y3YUxqsJQnBKEMNsYqOPTyVqcCH3YXaPkLztO9Rvf7bhLqQTwALHcHN6raxpTbR1eVgV2QyLA_4K0HrJO92et3qRXiXPkj7&redirect_uri=https%3A%2F%2Ffhir.epic.com%2Ftest%2Fsmart&client_id=d45049c3-3441-40ef-ab4d-b9cd86a17225
The authorization server responds to the HTTP POST request with a JSON object that includes an access token. The response contains the following fields:
- access_token: This parameter contains the access token issued by Epic to your application and is used in future requests.
- token_type: In Epic’s OAuth 2.0 implementation, this parameter always includes the value bearer.
- expires_in: This parameter contains the number of seconds for which the access token is valid.
- scope: This parameter describes the access your application is authorized for.
- id_token: Returned only for applications that have requested an OpenID scope.
- patient: For patient-facing workflows, this parameter identifies the FHIR ID for the patient on whose behalf authorization to the system was granted.
Note that you can pass additional parameters if needed based on the integration configuration. Here’s an example of what a JSON object including an access token might look like:
{
"access_token": "Nxfve4q3H9TKs5F5vf6kRYAZqzK7j9LHvrg1Bw7fU_07_FdV9aRzLCI1GxOn20LuO2Ahl5RkRnz-p8u1MeYWqA85T8s4Ce3LcgQqIwsTkI7wezBsMduPw_xkVtLzLU2O",
"token_type": "bearer",
"expires_in": 3240,
"scope": "Patient.read Patient.search ",
"patient": "T1wI5bk8n1YVgvWk9D05BmRV0Pi3ECImNSK8DKyKltsMB"
}
Calling Epic APIs
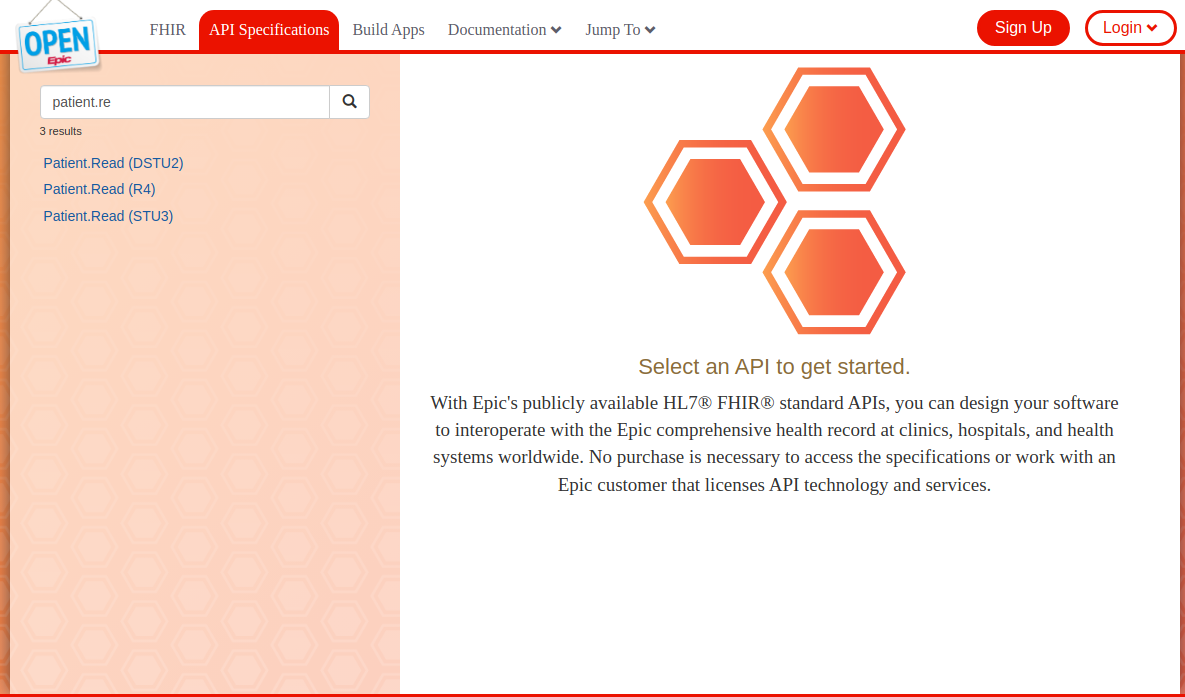
The access token obtained from the standalone launch can now be used to call Epic APIs and retrieve the data.
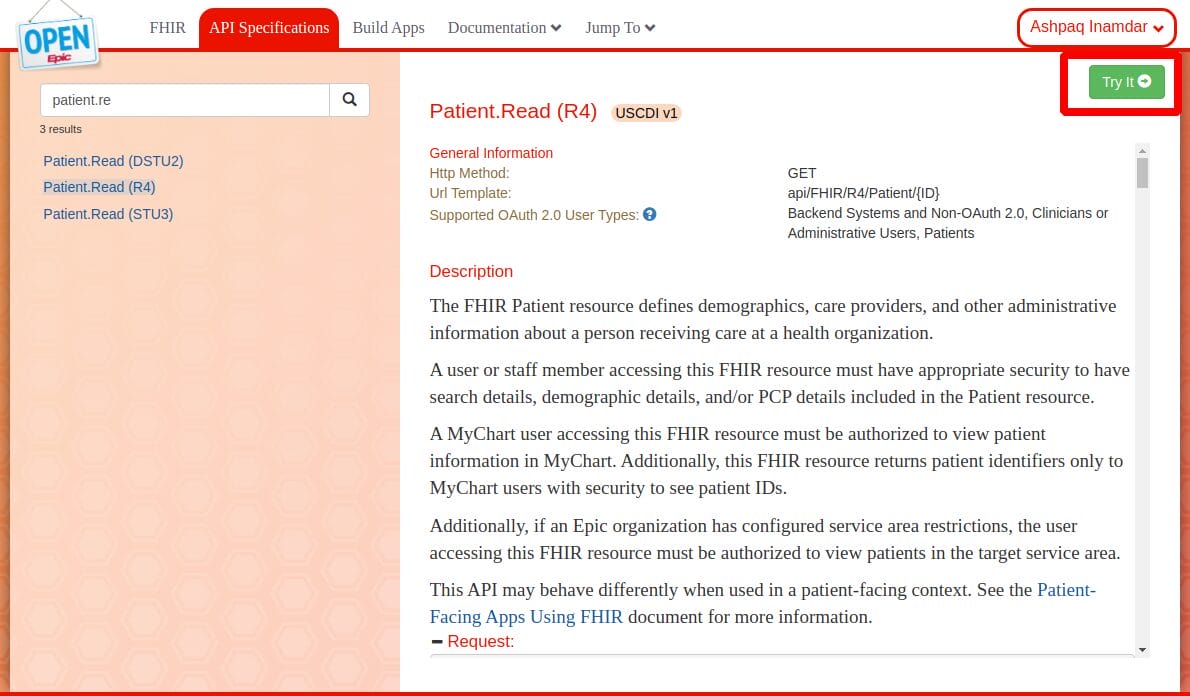
One can also use the “Try it” feature to check the sample response.
When You’d Rather Not Hand-Roll This
Everything above registering the app, managing OAuth 2.0, refreshing tokens, and mapping each FHIR resource is work you maintain forever, per EHR. A platform like ConnectHealth handles the SMART-on-FHIR auth, token lifecycle, and resource mapping for Epic and 20+ other EHRs, and lets you build the workflow in plain English with Helix AI.
If you’re integrating one app with one Epic org, the steps above are enough. If you’re shipping to many health systems, that’s where ConnectHealth pays off: 6 months of this becomes days.
Advantages of Epic EHR Integration
The integration of Epic EHR into a healthcare organization can bring about several benefits, including:
- Streamlined Workflows: Epic EHR integration can improve clinical workflow by providing a centralized platform for managing patient data, appointments, ordering tests, and managing patient data. This can improve the efficiency and effectiveness of healthcare providers.
- Enhanced Patient Care: With access to comprehensive patient information Health care providers can make more informed clinical decisions. This leads to better patient outcomes. Epic EHR facilitates coordinated care by enabling seamless communication and collaboration between healthcare team members.
- Interoperability: Epic EHR offers interoperability features that allow patient data to be exchanged with other healthcare systems and providers. This collaboration promotes continuity of care and allows for better coordination across different care settings.
- Advanced Documentation and Compliance: Epic EHR supports accurate and complete documentation of patient encounters. This is required for regulatory compliance and refunds. The system can help healthcare organizations maintain compliance with relevant regulations and standards.
- Data Analytics and Reporting: Epic EHR has powerful reporting and analysis tools. This enables healthcare organizations to analyze clinical and operational data. This data-driven approach can help identify trends. Track performance and inform decision-making to drive continuous improvement in patient care and organizational performance
Conclusion
Integrating Epic EHR offers numerous benefits and features. This guide has demonstrated how to use OAuth 2.0 for implementing Epic’s authentication and authorization. It also covered various methods for launching an application through Epic and detailed how to retrieve data from Epic endpoints.
Epic’s sandbox (fhir.epic.com) is a fully-functional test environment with synthetic patient data. It uses non-production client IDs. Production requires your app to be marked “Ready for Production” in your Epic on FHIR account and approved through the App Orchard review process. You cannot use sandbox credentials against a live Epic org’s FHIR endpoint.
Epic access tokens expire in 3,600 seconds (one hour) by default. The `expires_in` field in the token response confirms the exact value. Your app must handle token refresh before expiry. Epic does not issue refresh tokens for patient-facing SMART on FHIR flows; the patient must re-authenticate. Backend services using client_credentials can request a new token at any time.
Scopes map directly to the FHIR resources your app reads or writes. For a patient-facing app reading labs and vitals, you would request `Patient.read`, `Observation.read`, and `launch/patient`. Narrow your scopes to exactly what you need. App Orchard reviewers will flag over-broad scope requests. A full list of supported scopes is in Epic’s FHIR documentation at fhir.epic.com under “Authorization.”
Yes. Epic applies rate limiting at the organization level, not globally. Limits vary by customer Epic instance and are configurable by the health system. As a developer, you should implement exponential backoff on 429 responses and avoid polling patterns. Bulk data exports (FHIR $export) have their own separate limits and must be coordinated with the health system’s IT team.
App Orchard certification is required before your app can be deployed in any customer’s production Epic environment. The review covers security, privacy practices, FHIR scope justification, and HIPAA compliance. Internal tools built for a single health system can go through a lighter “community-only” approval directly with that org’s Epic team. Public apps distributed to multiple Epic customers require a full App Orchard listing and review.