Testing is a crucial aspect of software development that ensures the quality of the product and helps to identify bugs and issues in the code. Automated testing is an effective way to test software quickly and efficiently, and it has become increasingly popular in recent years.
In this blog, we will explore the basics of automated testing and discuss its importance in the software development process. We will also take a closer look at unit testing in React.js and the benefits of using Jest, a popular testing library for JavaScript applications. With Jest, we can write unit tests for React components and ensure that our code is working as expected. So, let’s dive in and learn more about unit testing in React.js with Jest.
Before we dive into the details of unit testing in React.js with Jest, it’s important to ensure that we have the necessary prerequisites in place. To get started with Jest, we need to have an understanding of JavaScript, NPM, and React.js. Also, Jest uses Babel to transpile your code, so it is important to have some knowledge of Babel. We also need to have Node.js and NPM (Node Package Manager) installed on our system.
Testing is an important element of the software development process because it ensures that the product works as intended and meets the requirements and standards that were established. Product analysis and testing help in the early detection of defects, errors, and other issues, allowing them to be rectified before the deployment.
Manual testing and automated testing are the two basic methods of testing. Human testers run various test cases to validate the product’s functionality during manual testing. Manual testing can be time-consuming and repetitious.
On the other hand, automated testing uses computer programs to run tests and verify a product’s functionality. Automated testing is more efficient and faster than manual testing, and it can help detect flaws early in the development cycle. Automated testing allows us to test the code frequently and in less time. It helps us to catch the bugs before the deployment and lets us deploy the application with more confidence.
Automated testing has grown in popularity in recent years. The following section will concentrate on automated testing, specifically unit testing with Jest in React.js.
Automated testing is the practice of writing code to test our code and then running those tests in an automated fashion.
Automated testing is frequently used to improve efficiency and accuracy in the testing process. Automated testing can also help to reduce the risk of human error, as it follows predefined steps and criteria, which helps to ensure that each test is performed consistently and objectively.
There are several different types of automated testing, including Unit testing, Integration testing, and End-to-End testing.
Unit testing is a type of testing that focuses on testing individual units or components of the software application without their external dependencies.
It involves testing each unit in isolation to ensure that it is working correctly.
Related Read: Angular Unit Testing: Jasmine & Karma
Integration testing is the process of testing different units or components of the software application with their external dependencies.
It involves testing the interactions between different units to ensure that they are working correctly together.
End-to-end testing is a type of testing that tests the entire software application from start to finish.
It involves testing the software as a complete system to ensure that it is working correctly. In end-to-end tests, we only cover the happy paths and leave the edge cases to unit tests.
The actual ratio between unit, integration, and end-to-end tests depends on your project.
The test pyramid is a conceptual framework that is used to guide the creation of automated testing strategies.
It states that we should test the little sections first, then how they interact with one another, and finally the software as a whole.
This allows us to ensure that the software runs well and detect problems early. It is critical to employ a variety of tests to ensure that nothing is overlooked. In this manner, we can be certain that the application works well and has no hidden flaws.
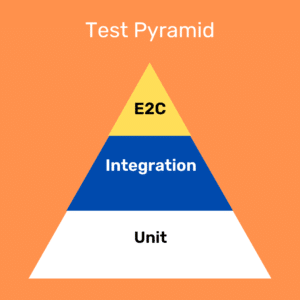
Here are some of my personal takeaways from this test pyramid:
Jest is a well-known JavaScript testing framework created by Facebook. It is intended to be quick and simple to use, while still providing a full testing experience for JavaScript projects such as Node.js apps, React applications, and others.
Jest features utilities for constructing test suites, defining test cases, and asserting anticipated outcomes in a straightforward and clear API for writing tests. It also contains built-in support for mocking, code coverage reporting, and parallel test execution.
Overall, Jest is a robust and frequently used testing tool that may assist developers in ensuring the quality and dependability of their JavaScript code.
Related Read: Jest Tutorial: Writing Test Cases Using Jest
Let’s see the list of available libraries for testing React.js applications.
Below is the list of some popular libraries for testing React.js applications:
Whenever it comes to testing the React.js application the first question that comes to our mind is what to test and what not to test. Let’s see some standard points about it.
To get started with Jest, you need to install all required libraries for implementing Jest using npm. It is important to note that these libraries should be installed as dev dependencies since they are only needed in the development environment, not in production.
The command for installing all the required libraries can be found below. After installation, a folder structure can be created for organizing tests and configuring the Jest environment.
npm i --save-dev jest @testing-library/jest-dom
@testing-library/react @testing-library/user-event
@testing-library/dom
The suggested folder structure for tests in a React project using Jest is often located in a __tests__ directory at the root of the project or in the same directory as the code being tested.
Tests should be grouped into subdirectories within the __tests__ directory to reflect the structure of the code being tested. For example, if your React project has a components directory with many components, you may establish a components directory under __tests__ and write tests for each component in its own file within that directory.
Here is the folder structure that I personally follow:
my-app/
  src/
    components/

       __tests__/
          components/
             Header.test.js
             Button.test.js
             ...
          utils/
             formatNumber.test.js
             ...
      Header.js
      Button.js
      ...
    utils/
      formatNumber.js
      ...
  ...
There is a __tests__ directory in this example, with subdirectories for components and utils. Each test file ends in.test.js tested by the Jest.
This is the one possible folder structure for arranging tests and the particular structure may differ based on your project’s needs.
Every test we write generally involves the following basic steps:
Let’s take one example of a counter component and see how we can write test cases for it:
Here is our counter component:
import React, { useState } from "react";

const Counter = ({ initialValue }) => {
 const [count, setCount] = useState(initialValue);
 const handleIncreament = () => {
   setCount((count) => count + 1);
 };
 const handleDereament = () => {
   setCount((count) => count - 1);
 };
 const handleReset = () => {
   setCount(0);
 };
 const handleSwitchSign = () => {
   setCount((count) => count * -1);
 };
 return (
   <div style={{ textAlign: "center" }}>
     <h1>{count}</h1>
     <div>
       <button onClick={handleIncreament}>Increament</button>
       <button onClick={handleDereament}>Decreament</button>
       <button onClick={handleReset}>Reset</button>
       <button onClick={handleSwitchSign}>Switch Sign</button>
     </div>
   </div>
 );
};

export default Counter;
Here is test file for the upper component:
import React from "react";
import Counter from "../src/components/Counter";
import { render } from "@testing-library/react";
import userEvent from "@testing-library/user-event";
import "@testing-library/jest-dom";

describe("Counter component", () => {
 test("renders initial count", () => {
   const { getByText } = render(<Counter initialValue={0} />);
   const countElement = getByText("0");
   expect(countElement).toBeInTheDocument();
 });

 test("increments count when increment button is clicked", () => {
   const { getByText } = render(<Counter initialValue={0} />);
   const incrementButton = getByText("Increament");
   const countElement = getByText("0");
   userEvent.click(incrementButton);
   expect(countElement).toHaveTextContent("1");
 });

 test("decrements count when decrement button is clicked", () => {
   const { getByText } = render(<Counter initialValue={0} />);
   const decrementButton = getByText("Decreament");
   const countElement = getByText("0");
   userEvent.click(decrementButton);
   expect(countElement).toHaveTextContent("-1");
 });

 test("resets count when reset button is clicked", () => {
   const { getByText } = render(<Counter initialValue={5} />);
   const resetButton = getByText("Reset");
   const countElement = getByText("5");
   userEvent.click(resetButton);
   expect(countElement).toHaveTextContent("0");
 });

 test("switches sign of count when switch sign button is clicked", () => {
   const { getByText } = render(<Counter initialValue={3} />);
   const switchSignButton = getByText("Switch Sign");
   const countElement = getByText("3");
   userEvent.click(switchSignButton);
   expect(countElement).toHaveTextContent("-3");
   userEvent.click(switchSignButton);
   expect(countElement).toHaveTextContent("3");
 });
});
The code defines a Counter component, which takes an initial number as a prop and shows a count on the page. The component has numerous buttons that can be used to increment or decrement the count, reset it to zero, or change the sign of the count.
Here we have used describe keyword which is basically used to group the test cases in Jest. We have imported render from @testing-library/react library for rendering the component. We have also imported for userEvent for performing the user interaction in our case we have used it for clicking the button. And we have imported @testing-library/jest-dom for performing the assertion. Here the expect keyword is used for assertion. And the function which comes after assertion in the matcher function. There are several types of mather functions that we case use according to our needs. You can find more about the matcher function here.
Each test case ensures that the Counter component responds correctly to certain user input, such as hitting the increment button. The test cases employ Jest’s expect assertions to ensure that the count updates appropriately.
For finding elements on the page we use the RTL queries. Let’s see about RTL Queries in detail.
Queries are the methods that the testing library provides to find elements on the page.
To find a single element on the page we have the below queries:
To find multiple elements on the page we have the below queries:
The suffix can be one of the Role, LabelText, PlaceHolder, Text, DisplayValue, AltText, Title and TestId.
queryBy… query returns the matching node. And throws a descriptive error if no elements match or if more than one match is found. Below is an example of getBy… queries:
🟢 getByRole: This query returns elements based on their role attribute, which describes the element’s purpose. A button element, for example, might have the role “button” to indicate that it is a clickable button. Here’s an illustration:
// HTML
<button role="button">Click Me</button>

//Jest Test
const button = getByRole('button');
expect(button).toHaveTextContent('Click Me');
🟢 getByLabelText: This query is used to retrieve form components based on their label text. For example, an input element may be connected with a label element that specifies the purpose of the input. Here’s an illustration:
// HTML
<label htmlFor="name">Name:</label>
<input id="name" type="text" />

// Jest Test
const nameInput = getByLabelText('Name:');
expect(nameInput).toBeInTheDocument();
🟢 getByPlaceholderText: This query retrieves input components based on their placeholder text, which serves as a hint to the user about the expected input. Here’s an illustration:
// HTML
<input type="text" placeholder="Enter your name" />

// Jest Test
const nameInput = getByPlaceholderText('Enter your name');
expect(nameInput).toBeInTheDocument();
🟢 getByAltText: This query is used to get image elements by their alt text, which is used to describe the image to users who cannot see it. Here is an example:
// HTML
<img src="cat.jpg" alt="A cute cat" />

// Jest Test
const catImage = getByAltText('A cute cat');
expect(catImage).toBeInTheDocument();
🟢 getByTitle: This query returns elements based on their title attribute, which is used to display more information about the element when the user hovers over it. Here’s an illustration:
// HTML
<a href="/" title="Go Home">Home</a>

// Jest Test
const homeLink = getByTitle('Go Home');
expect(homeLink).toHaveAttribute('href', '/');
🟢 getByTextId: You can use getByTestId to get elements by a data-testid attribute. Here are examples:
// HTML
<div data-testid="submit-button">Submit</div>

// Jest Test
const submitButton = getByTestId('submit-button');
expect(submitButton).toHaveTextContent('Submit');
The priority of using upper RTL queries depends on the specific use case and the type of elements being tested. However, getByTextId and getByRole are commonly used to test for specific elements and their accessibility roles respectively. getByLabelText is often used to target form elements and getByAltText is used to ensure images have appropriate alt text. Finally, getByPlaceholder can be used to test form placeholders. And at last, if no query works for you, you can use getByTestId.
🟢 queryBy… Query: It returns the matching node for a query, and returns null if no element matches.
It is useful for asserting an element that is not present. It throws an error if more than one match is found. Example:
test("queryByRole example", () => {
const { queryByRole } = render(<MyComponent />);
const button = queryByRole("button");

// Assert
expect(button).toBeInTheDocument();
});
🟢 findlBy… Query: The findBy queries return the first matching node for a specific selector, just like the getBy queries. However, they are asynchronous and wait for the element to appear in the DOM if it is not present at the time of invocation. Example:
test('findByRole example', async () => {

const { getByRole, findByRole, queryByRole } = render(<MyComponent />);
const button = getByRole('button');
expect(button).toBeInTheDocument();
fireEvent.click(button);

// Assert
const modal = await findByRole('dialog');
expect(modal).toBeInTheDocument();
});
For a more comprehensive understanding of the RTL Queries, I suggest referring to the RTL Queries Docs. These docs provide detailed information on how to use RTL Queries to test your React components effectively.
The @testing-library/user-event library is a utility for simulating user events in your tests. It can be used with Jest to simulate user interactions with a component such as clicks, inputs, keyboard events, and more.
For example, to simulate a user clicking a button in your React component, you can use userEvent.click() method provided by this library. Here’s an example:
import React from "react";
import { render } from "@testing-library/react";
import userEvent from "@testing-library/user-event";

import Button from "./Button";

test("Button changes text when clicked", () => {
const { getByText } = render(<Button />);

const buttonElement = getByText("Click me");
userEvent.click(buttonElement);

expect(buttonElement).toHaveTextContent("Clicked");
});
In this example, we are rendering a Button component and using the getByText method from the @testing-library/react library to get the button element. Then we are using userEvent.click() method to simulate a click event on the button. Finally, we are using the toHaveTextContent matcher to assert that the button text has changed to “Clicked” after the click event.
You can learn more about the user-event library here.
Throughout this blog, I have provided an overview of unit testing in React using Jest, focusing on essential topics that will help you get started with testing. I encourage you to continue exploring the official Jest and React Testing Library documentation to gain a deeper understanding of these testing tools and how to use them effectively.
✔️ Testing is essential for software development in order to assure quality and detect errors.
✔️ Automated testing is more efficient than human testing and can detect problems sooner in the development process.
✔️ Jest is a popular JavaScript testing package, particularly for unit testing in React.
✔️ Unit testing is an important section of the testing pyramid since it focuses on evaluating individual components in isolation.
✔️ Jest simplifies unit testing in React by providing a straightforward API, built-in mocking and code coverage reporting, and parallel test execution.

In this blog, I have demonstrated the importance of unit testing and how Jest can be used to test React applications. We have also seen some of the powerful features that Jest offers. By implementing unit tests, developers can ensure that their code is reliable, maintainable, and scalable. In summary, Jest is an essential tool for any developer looking to build high-quality React applications.

How to Effectively Hire and Manage a Remote Team of Developers.

We worked with Mindbowser on a design sprint, and their team did an awesome job. They really helped us shape the look and feel of our web app and gave us a clean, thoughtful design that our build team could...

The team at Mindbowser was highly professional, patient, and collaborative throughout our engagement. They struck the right balance between offering guidance and taking direction, which made the development process smooth. Although our project wasn’t related to healthcare, we clearly benefited...

Founder, Texas Ranch Security
Mindbowser played a crucial role in helping us bring everything together into a unified, cohesive product. Their commitment to industry-standard coding practices made an enormous difference, allowing developers to seamlessly transition in and out of the project without any confusion....

CEO, MarketsAI
I'm thrilled to be partnering with Mindbowser on our journey with TravelRite. The collaboration has been exceptional, and I’m truly grateful for the dedication and expertise the team has brought to the development process. Their commitment to our mission is...

Founder & CEO, TravelRite
The Mindbowser team's professionalism consistently impressed me. Their commitment to quality shone through in every aspect of the project. They truly went the extra mile, ensuring they understood our needs perfectly and were always willing to invest the time to...

CTO, New Day Therapeutics
I collaborated with Mindbowser for several years on a complex SaaS platform project. They took over a partially completed project and successfully transformed it into a fully functional and robust platform. Throughout the entire process, the quality of their work...

President, E.B. Carlson
Mindbowser and team are professional, talented and very responsive. They got us through a challenging situation with our IOT product successfully. They will be our go to dev team going forward.

Founder, Cascada
Amazing team to work with. Very responsive and very skilled in both front and backend engineering. Looking forward to our next project together.

Co-Founder, Emerge
The team is great to work with. Very professional, on task, and efficient.

Founder, PeriopMD
I can not express enough how pleased we are with the whole team. From the first call and meeting, they took our vision and ran with it. Communication was easy and everyone was flexible to our schedule. I’m excited to...

Founder, Seeke
We had very close go live timeline and Mindbowser team got us live a month before.

CEO, BuyNow WorldWide
If you want a team of great developers, I recommend them for the next project.

Founder, Teach Reach
Mindbowser built both iOS and Android apps for Mindworks, that have stood the test of time. 5 years later they still function quite beautifully. Their team always met their objectives and I'm very happy with the end result. Thank you!

Founder, Mindworks
Mindbowser has delivered a much better quality product than our previous tech vendors. Our product is stable and passed Well Architected Framework Review from AWS.

CEO, PurpleAnt
I am happy to share that we got USD 10k in cloud credits courtesy of our friends at Mindbowser. Thank you Pravin and Ayush, this means a lot to us.

CTO, Shortlist
Mindbowser is one of the reasons that our app is successful. These guys have been a great team.

Founder & CEO, MangoMirror
Kudos for all your hard work and diligence on the Telehealth platform project. You made it possible.

CEO, ThriveHealth
Mindbowser helped us build an awesome iOS app to bring balance to people’s lives.

CEO, SMILINGMIND
They were a very responsive team! Extremely easy to communicate and work with!

Founder & CEO, TotTech
We’ve had very little-to-no hiccups at all—it’s been a really pleasurable experience.

Co-Founder, TEAM8s
Mindbowser was very helpful with explaining the development process and started quickly on the project.

Executive Director of Product Development, Innovation Lab
The greatest benefit we got from Mindbowser is the expertise. Their team has developed apps in all different industries with all types of social proofs.

Co-Founder, Vesica
Mindbowser is professional, efficient and thorough.

Consultant, XPRIZE
Very committed, they create beautiful apps and are very benevolent. They have brilliant Ideas.

Founder, S.T.A.R.S of Wellness
Mindbowser was great; they listened to us a lot and helped us hone in on the actual idea of the app. They had put together fantastic wireframes for us.

Co-Founder, Flat Earth
Ayush was responsive and paired me with the best team member possible, to complete my complex vision and project. Could not be happier.

Founder, Child Life On Call
The team from Mindbowser stayed on task, asked the right questions, and completed the required tasks in a timely fashion! Strong work team!

CEO, SDOH2Health LLC
Mindbowser was easy to work with and hit the ground running, immediately feeling like part of our team.

CEO, Stealth Startup
Mindbowser was an excellent partner in developing my fitness app. They were patient, attentive, & understood my business needs. The end product exceeded my expectations. Thrilled to share it globally.

Owner, Phalanx
Mindbowser's expertise in tech, process & mobile development made them our choice for our app. The team was dedicated to the process & delivered high-quality features on time. They also gave valuable industry advice. Highly recommend them for app development...

Co-Founder, Fox&Fork