In this Jest Tutorial, we will be covering the process of writing test cases for your JavaScript code using the popular testing framework Jest. This tutorial will guide you through the basics of setting up your project, writing test cases and running your tests.
By the end of this Jest tutorial, you will have a good understanding of how to use Jest for building reliable and robust JavaScript code. The tutorial is suitable for both beginners and experienced developers. You will learn about the key concepts of Jest and how to implement them in your projects.
Unit testing is a method of software testing in which individual components of the software are tested. The goal of unit testing is to ensure that each component of the software functions as expected. This is done by breaking the software down into smaller, testable parts and then testing each part individually.
By doing this, any mistakes or errors in the code can be uncovered and corrected early on in the development process. This not only helps to improve the overall quality of the software, but it also makes it easier to identify and fix any issues that may arise in the future. Additionally, having a set of unit tests can serve as documentation for new team members, allowing them to understand how the existing code works by reading the tests.
Tools available for testing: A variety of tools are available to test React Native applications, some of which are the following:
1. Whenever we add new features, we can test previous test cases to track whether new features impact previous features.
2. Refactoring gets easier.
3. When we upgrade dependencies configured in the project.
Jest is a JavaScript testing framework that is developed specifically for React applications. Developed and used by Facebook, Jest provides a set of features for organizing and running tests. Its main purpose is to ensure the correctness of any JavaScript codebase.
With Jest, you can test all types of JavaScript code, including React applications. Jest acts as a test runner, finding and running all test files that end with .test.js and are located within the test folder. It will then determine whether the tests have passed or failed and provide a coverage table. In case of failure, Jest will indicate why and where the test failed.
In the next step we will see the process of installing Jest.
1. Starting from react-native version 0.38, By default, a Jest setup is included when running react-native init.
2. The below configuration should get automatically added to your package.json file:

3. Here –coverage returns coverage report of how many parts of the code are covered for testing by test cases
4. For more Jest, CLI option can refer link: Here
5. Run yarn test or npm test to run tests with Jest.
1. Sometimes you need more config by creating a file named jest.config.js|ts|mjs|cjs|json.

2. You can use the –config flag to pass an explicit path to the created config file.

1. In reacts native project while writing test cases in a test file, all the methods and objects from Jest are included in its global environment. You can use them directly without importing them.
2. However, if you prefer explicit imports, you can import from @jest/globals package
import {expect, test, describe} from '@jest/globals.'Mostly used methods from the global box of jest API are as below:
1. afterAll(fn, timeout) :
– This runs a function after completing all the tests defined in the file.
– Optionally, we can provide a timeout (in milliseconds) here to specify how long to wait before aborting. The timeout interval is 5 seconds by default.
– Ex: Can be used to clean up the database.
2. afterEach(fn, timeout):
– This runs a function after each of the tests defined in the file.
– Optionally, we can provide a timeout (in milliseconds) here.
3. beforeAll(fn, timeout):
– This runs a function before completing all the tests defined in the file.
– Optionally, we can provide a timeout.
– Ex: Can be used to set up global states like server setup.
4. describe(name, fn): Used to define a set of tests. Also called a test suite.
5. test(name, fn, timeout): Allows to write a test by specifying test name and actual test written in its callback function. Timeout is optional here.
6. expect(value):
– While writing tests, we often need to check that values meet certain conditions. Expect provides several matcher functions which allow us to validate different conditions.
– The expect function is used when we want to test a value.
– Expect used along with the matcher function to perform assertion.
– This can be used to assert test value with the expected one.
Refer to this link to check more API.
Ex: test(‘two plus two is four’, () => {
expect(2 + 2).toBe(4);
});
Refer to this link to check more matcher functions.
Jest is recommended by React testing lib. React testing lib with Jest provides a certain set of practices. I have described testing lib in more detail below.
React Testing Library is a lightweight testing library that allows you to test React components. It provides a set of tools and a virtual DOM to make it easier to test your components. This library provides a set of functions which help to find and interact with specific DOM nodes from within the component that needs to be tested.
React Testing Library helps with the process of rendering the component into a virtual DOM using the “Render” method. It also makes it easy to search and interact with the virtual DOM. One of the most important benefits of using this library is that it provides utility functions on top of react-test-renderer, which encourage better testing practices and more robust test suites.
A mock function is a function that defines a fake or mocked implementation of code that replaces the actual performance. By using mock functions, we can know the result returned by the function, the number of times the function was called, and the arguments used when calling the function.
This helps to test the code in isolation and makes the testing process more predictable. Mock functions are particularly useful for testing, as they allow us to override the actual behavior of a function with custom mock implementations.
With these mock implementations, we can control the return values of a function, making it easier to write tests. Jest provides a utility function, jest.spyOn(), which can be used to create a mock function. Using this function, you can track the calls, arguments and return values of a function, and even change the behavior of a function on the fly to test different scenarios.
The Mock Function provides features to:
A mock function instance is created with jest.fn()

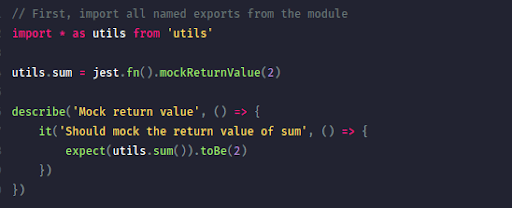
Mocking return values: To mock a function’s return value in Jest, First, you need to import all named exports from a module, then you can define mockReturnValue on the imported function.
If you want to mock the return value of a function differently based on consecutive calls of the defined returned value, you can use a define as a chain of mockReturnValueOnce.

The mockImplementation call to mock the return value of your function is another way to mock the return value. However, unlike mockReturnValue, this can mock the entire implementation of your mock functions, not just their return values.

Note that jest. fn(implementation) is shorthand for mockImplementation. Therefore the functionality remains the same. Lastly, mockImplementationOnce can also be used to mock the return value differently for each consecutive call, just like mockReturnValueOnce.

Jest.spyOn() method also can be used to create a functioning mock. Same as a jest.fn(), it makes a controlled mock. The main key difference is the fact that by default, jest.spyOn() calls the original implementation.
By using jest.spyOn(), the original implementation is stored in memory so that it can be restored. The initial implementation can be fixed using the mockRestore() method, which can not be done using jest. fn(). There is one more type of testing I am going to explain in brief, which can be done to test UI.
Snapshot tests are a useful tool that helps ensure your UI does not change unintentionally or unexpectedly. A snapshot test case renders a UI component, takes a snapshot then compares it with a snapshot file stored along with the test as its reference. The test will fail if two snapshots do not match.
The main purpose of snapshot testing is to ensure that an application’s user interface (UI) should not get changed unexpectedly or unintentionally, which captures the screenshot at a specific moment in time so that it can be compared in the future. Snapshot testing allows you to verify that the structure of your components has not changed by catching unintended change
Eg Home-test.js

From the above example, We import the renderer from the react-test-renderer package. This package can render react components to pure js objects without depending on the DOM or native mobile environment. This package makes it easy to grab a snapshot of the platform view hierarchy rendered by a React DOM or React native component without using a js dom.
In the above example, In the body of the test, we render the Intro component and convert it to JSON, Then compare it with the previously saved snapshot file. The following commands are used to run snapshot test cases.
Run command: npm test
The snapshot folder is auto-generated using the above command.
Run command: npm test – -u (to update screenshot)
To write test cases using Jest in react native first import render function from @testing-library/react library. It will be used to render the component you want to test. Then, render provides various methods to perform assertions about the component’s behavior.
For example, You could use any render method to check the component’s specific action, like suppose the getByText process to check that the button component has text rendered which is correct or the click method to test some steps.
You can use the jest command in the terminal to run the test. Jest, by default, will search test files and run any files which end with .test.js and matches patterns __test__/*.

In conclusion, this Jest tutorial has provided an overview of how to use Jest and the testing library to write test cases for React Native applications. Developers can now implement Jest and testing library in their own projects to ensure their code is working as expected and to catch any bugs before they are released to users.
By using Jest and testing library, developers can also feel confident in the reliability and stability of their code, giving them peace of mind and a greater ability to focus on new features and improvements. With Jest and testing library, developers can ensure that their code is of high quality and that it is functioning correctly, making it a powerful tool for any React Native developer.

We worked with Mindbowser on a design sprint, and their team did an awesome job. They really helped us shape the look and feel of our web app and gave us a clean, thoughtful design that our build team could...

The team at Mindbowser was highly professional, patient, and collaborative throughout our engagement. They struck the right balance between offering guidance and taking direction, which made the development process smooth. Although our project wasn’t related to healthcare, we clearly benefited...

Founder, Texas Ranch Security
Mindbowser played a crucial role in helping us bring everything together into a unified, cohesive product. Their commitment to industry-standard coding practices made an enormous difference, allowing developers to seamlessly transition in and out of the project without any confusion....

CEO, MarketsAI
I'm thrilled to be partnering with Mindbowser on our journey with TravelRite. The collaboration has been exceptional, and I’m truly grateful for the dedication and expertise the team has brought to the development process. Their commitment to our mission is...

Founder & CEO, TravelRite
The Mindbowser team's professionalism consistently impressed me. Their commitment to quality shone through in every aspect of the project. They truly went the extra mile, ensuring they understood our needs perfectly and were always willing to invest the time to...

CTO, New Day Therapeutics
I collaborated with Mindbowser for several years on a complex SaaS platform project. They took over a partially completed project and successfully transformed it into a fully functional and robust platform. Throughout the entire process, the quality of their work...

President, E.B. Carlson
Mindbowser and team are professional, talented and very responsive. They got us through a challenging situation with our IOT product successfully. They will be our go to dev team going forward.

Founder, Cascada
Amazing team to work with. Very responsive and very skilled in both front and backend engineering. Looking forward to our next project together.

Co-Founder, Emerge
The team is great to work with. Very professional, on task, and efficient.

Founder, PeriopMD
I can not express enough how pleased we are with the whole team. From the first call and meeting, they took our vision and ran with it. Communication was easy and everyone was flexible to our schedule. I’m excited to...

Founder, Seeke
We had very close go live timeline and Mindbowser team got us live a month before.

CEO, BuyNow WorldWide
If you want a team of great developers, I recommend them for the next project.

Founder, Teach Reach
Mindbowser built both iOS and Android apps for Mindworks, that have stood the test of time. 5 years later they still function quite beautifully. Their team always met their objectives and I'm very happy with the end result. Thank you!

Founder, Mindworks
Mindbowser has delivered a much better quality product than our previous tech vendors. Our product is stable and passed Well Architected Framework Review from AWS.

CEO, PurpleAnt
I am happy to share that we got USD 10k in cloud credits courtesy of our friends at Mindbowser. Thank you Pravin and Ayush, this means a lot to us.

CTO, Shortlist
Mindbowser is one of the reasons that our app is successful. These guys have been a great team.

Founder & CEO, MangoMirror
Kudos for all your hard work and diligence on the Telehealth platform project. You made it possible.

CEO, ThriveHealth
Mindbowser helped us build an awesome iOS app to bring balance to people’s lives.

CEO, SMILINGMIND
They were a very responsive team! Extremely easy to communicate and work with!

Founder & CEO, TotTech
We’ve had very little-to-no hiccups at all—it’s been a really pleasurable experience.

Co-Founder, TEAM8s
Mindbowser was very helpful with explaining the development process and started quickly on the project.

Executive Director of Product Development, Innovation Lab
The greatest benefit we got from Mindbowser is the expertise. Their team has developed apps in all different industries with all types of social proofs.

Co-Founder, Vesica
Mindbowser is professional, efficient and thorough.

Consultant, XPRIZE
Very committed, they create beautiful apps and are very benevolent. They have brilliant Ideas.

Founder, S.T.A.R.S of Wellness
Mindbowser was great; they listened to us a lot and helped us hone in on the actual idea of the app. They had put together fantastic wireframes for us.

Co-Founder, Flat Earth
Ayush was responsive and paired me with the best team member possible, to complete my complex vision and project. Could not be happier.

Founder, Child Life On Call
The team from Mindbowser stayed on task, asked the right questions, and completed the required tasks in a timely fashion! Strong work team!

CEO, SDOH2Health LLC
Mindbowser was easy to work with and hit the ground running, immediately feeling like part of our team.

CEO, Stealth Startup
Mindbowser was an excellent partner in developing my fitness app. They were patient, attentive, & understood my business needs. The end product exceeded my expectations. Thrilled to share it globally.

Owner, Phalanx
Mindbowser's expertise in tech, process & mobile development made them our choice for our app. The team was dedicated to the process & delivered high-quality features on time. They also gave valuable industry advice. Highly recommend them for app development...

Co-Founder, Fox&Fork