In this blog, we will see Firebase push notifications, focusing on their integration within React applications. We’ll cover the essentials of setting up and sending notifications, with ensuring cross-browser compatibility, including the often tricky Safari browser.
Before proceeding, please ensure that you have the following prerequisites installed:
🔸 Basic Knowledge of React: Familiarity with React fundamentals is necessary as we will be implementing notifications in a React app.
🔸 Firebase Account: Access to Firebase, as we will be using Firebase services for push notifications.
🔸 Web Browser for Testing: Chrome, Firefox, and Safari for testing cross-browser compatibility.
Firebase push notifications are a feature of Google’s Firebase Cloud Messaging (FCM), a free service that allows app developers to send notifications and messages to users across multiple platforms, including Android, iOS, and the web. These notifications are highly effective for personalized user engagement because they can be tailored and sent to individual users.
Create a React Application with the CRA Command:
Create a new React app with Create React App, a tool that creates a new React project with a reasonable default setup.
npx create-react-app auth-goal-fe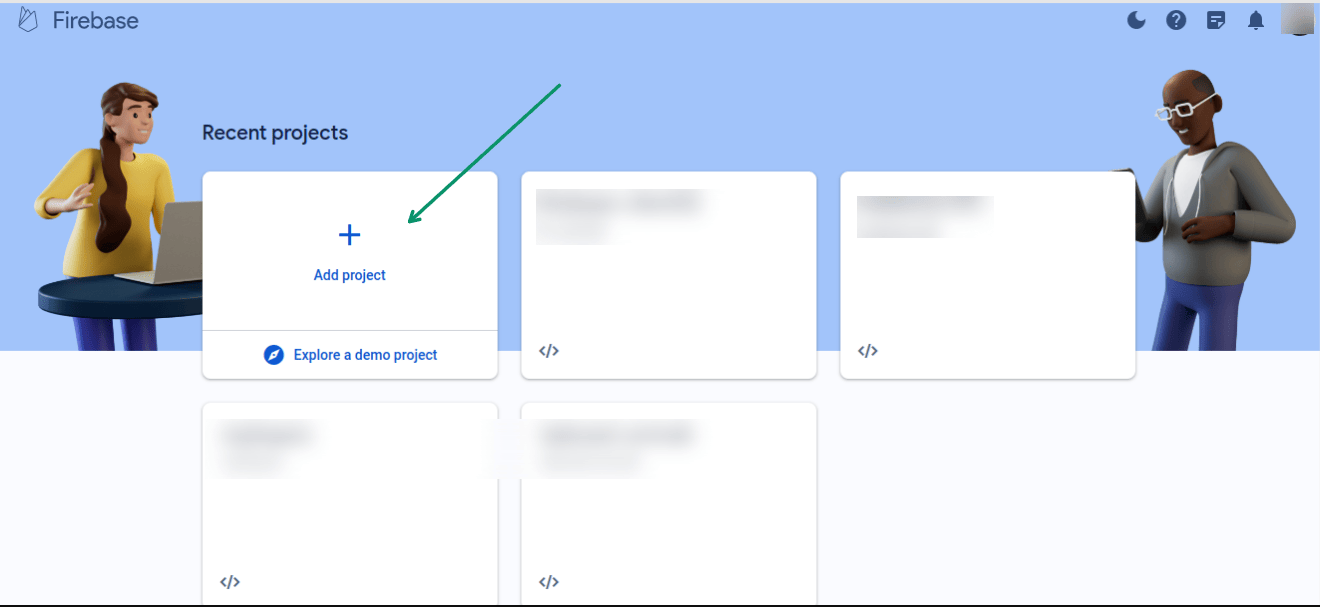
cd auth-goal-fe➡️ Go to the Firebase dashboard and after login create a new project by clicking on Add Project.
➡️ Then follow the Firebase project setup which is straightforward and guides you through the necessary steps
➡️ Once the project setup is done you will be redirected to your project dashboard
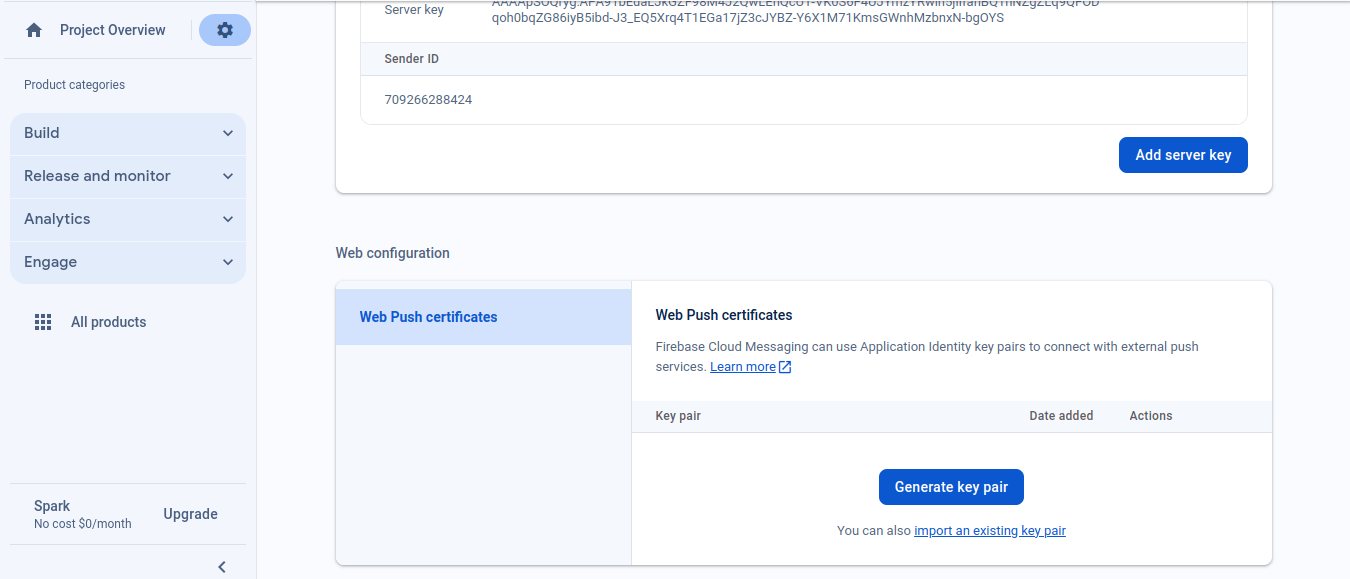
➡️ Then click on the settings. And go to the cloud messaging tab

➡️ Under this section, You should see an option “Generate Key Pair”. Click on this button. This action will create a unique pair of public and private keys that are essential for securely sending notifications to your web application. With your web push certificates in hand, you’re now ready to proceed with integrating push notifications into your React application.
Import Necessary Module in React Application:
npm i firebase react-toastify
Firebase: This package allows your application to interact seamlessly with Firebase services, including the push notification feature.
React-Toastify: A highly customizable and easy-to-use package for adding notifications, alerts, or toasts within your React application.
➡️ Inside your source directory create firebase.json file
➡️ Then go to the firebase dashboard inside settings > general. Create a web app by clicking on the add app button. And copy all the configurations.
➡️ You can also initialize all these definitions in env and use them wherever you want. It depends on personal preference.
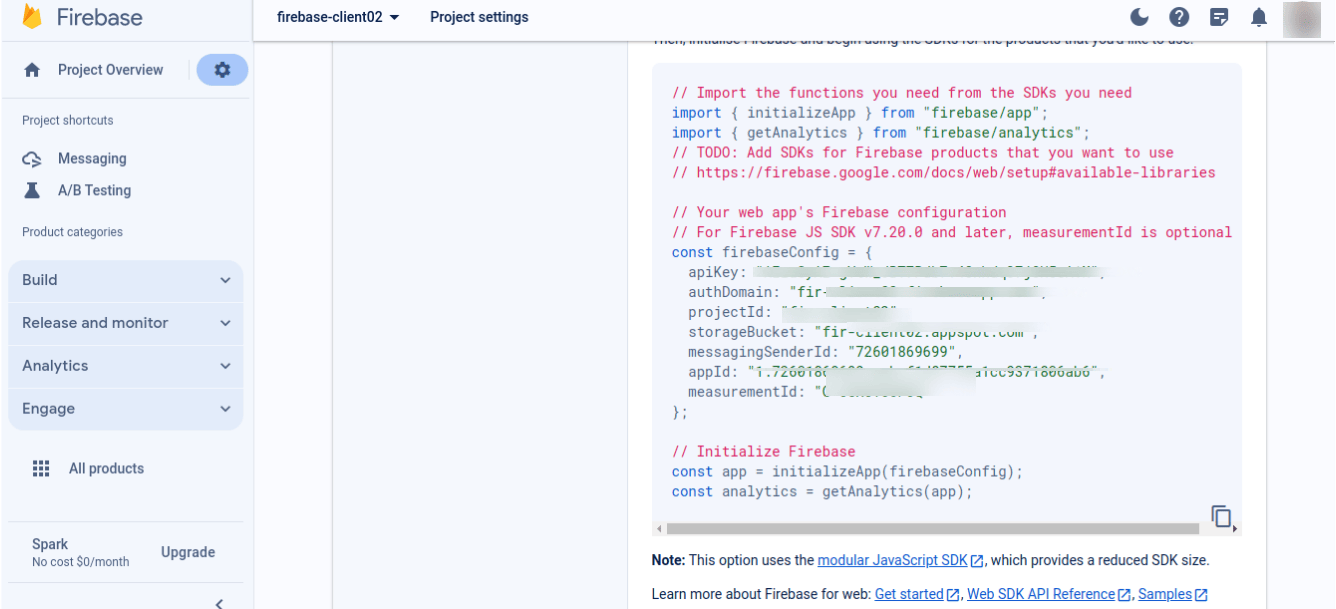
➡️ For configuration refer to the below code.
import { initializeApp } from "firebase/app";
import { getMessaging, getToken, onMessage } from "firebase/messaging";
import { toastMessage } from "./components/ToastMessage";
import { getAnalytics } from "firebase/analytics";
const firebaseConfig = {
apiKey: "********************",
authDomain: "********************",
projectId: "********************",
storageBucket: "********************",
messagingSenderId: "********************",
appId: "********************",
measurementId: "********************",
};

export const onMessageListener = () =>
new Promise((resolve) => {
onMessage(messaging, (payload) => {
resolve(payload);
});
});

initializeApp(firebaseConfig);
export const getMessagingToken = (setTokenFound) => {
return getToken(messaging, {
vapidKey:"unique_pair_of_public_and_private_keys ",
})
.then((currentToken) => {
if (currentToken) {
console.log("current token for client: ", currentToken);
setTokenFound(true);
// Track the token -> client mapping, by sending to backend server
// show on the UI that permission is secured
} else {
console.log(
"No registration token available. Request permission to generate one."
);
setTokenFound(false);
// shows on the UI that permission is required
}
})
.catch((err) => {
console.log("An error occurred while retrieving token. ", err);
// catch error while creating client token
});
};

const firebaseApp = initializeApp(firebaseConfig);
const analytics = getAnalytics(firebaseApp);
const messaging = getMessaging(firebaseApp);This function tries to obtain a messaging token, essential for sending Firebase push notifications to the client. If successful, it sets a flag (setTokenFound) indicating that the token is available. If the browser does not allow notification permission, this function first asks for notification permission and then generates the FCM (Firebase cloud messaging) token.
VapidKey:
The vapidKey used here is the unique key pair generated earlier in your Firebase project settings under the Web Push Certificates section. This key is essential for securing and authenticating communication between your web app and Firebase’s servers. By adding this key to your Firebase messaging setup, you create a trusted channel for sending and receiving Firebase push notifications, ensuring that these notifications come from your server and are securely delivered to the recipients.
Here We Have Some Scenarios to Understand:
If notification permission is not given then it will ask for permission suppose the user allows the permission then you will get the FCM token successfully.
If the user dont allow the permission and blocks it instead. In that case, you will not get the FCM token that is required for sending the notification.
The onMessageListener function in your React app is crucial for managing real-time Firebase push notifications. When the app is active, it exports a promise that listens for incoming Firebase messages. When a message arrives, Firebase’s onMessage function is called, passing along the notification’s details (payload). This configuration ensures that any notifications sent while the app is in the foreground are received and processed immediately.
The payload, which contains information such as the title and body of the notification, is logged for debugging and then resolved, indicating the successful completion of this asynchronous operation. This function is important for the seamless and interactive user experience that keeps users engaged with real-time updates.
Here we can simply handle the foreground notification in our app.js file inside the src folder.
Refer the Below Code:
import { useState } from "react";
import { getMessagingToken, onMessageListener } from "./firebase";
import { ToastContainer, toast } from "react-toastify";
import "react-toastify/dist/ReactToastify.css";
import { toastMessage } from "./components/ToastMessage";

function App() {
const [isTokenFound, setTokenFound] = useState(false);
getMessagingToken(setTokenFound);

onMessageListener()
.then((payload) => {
console.log(payload, "<<");
toast.success(
<div>
<p>{payload.data.title}</p>
<p style={{ marginTop: "4px" }}>{payload.data.body}</p>
</div>,
{
position: toast.POSITION.TOP_RIGHT,
}
);
})
.catch((err) => console.log("failed: ", err));

return (
<div className="App">
<ToastContainer
hideProgressBar={true}
newestOnTop={false}
limit={1}
autoClose={3000}
/>
<h1>
{isTokenFound && " Notification permission enabled 👍🏻 "}
{!isTokenFound && " Need notification permission ❗️ "}
</h1>
</div>
);
}

export default App;
In the code above, we utilize the onMessageListener function to handle foreground notifications within the App.js file, which serves as the root component of our React application. This function returns a promise, and we handle this promise in App.js to display Firebase push notification messages. To present these notifications in a user-friendly manner, we use the react-toastify library, which allows us to show elegant toast notifications.
We’re also using the previously defined getMessagingToken function in the provided snippet. This function is crucial in configuring Firebase push notification permissions. We first declare a state variable isTokenFound with React’s useState hook and initializing it to false. The function getMessagingToken is then called with the argument setTokenFound, which is a function to update the state.
We dynamically display messages in our UI based on the state of isTokenFound: if isTokenFound is true, it indicates that notification permissions have been granted, displaying “Notification permission enabled.” If isTokenFound is false, it indicates that the notification permission has not yet been obtained, displaying “Need notification permission”. This method effectively informs users in real time about the status of notification permissions.
Background notifications are messages received by a mobile or web application while it is not actively in use, which are typically delivered to the device’s notification centre for later user attention.
For getting background notification we need a service worker file that in present inside a public folder of the react project. Your service worfile name conversion should be firebase-messaging-sw.js.
For service Workers Refer to Below Code:
// Scripts for firebase and firebase messaging
importScripts(
"https://www.gstatic.com/firebasejs/9.0.0/firebase-app-compat.js"
);
importScripts(
"https://www.gstatic.com/firebasejs/9.0.0/firebase-messaging-compat.js"
);

// Initialize the Firebase app in the service worker by passing the generated config
var firebaseConfig = {
apiKey: "***********",
authDomain: "***********",
projectId: "***********",
storageBucket: "***********",
messagingSenderId: "***********",
appId: "***********",
};

firebase.initializeApp(firebaseConfig);

// Retrieve firebase messaging
const messaging = firebase.messaging();

messaging.onBackgroundMessage(function (payload) {
console.log("Received background message ", payload);
const notificationTitle = payload.notification.title;
const notificationOptions = {
body: payload.notification.body,
icon: "https://freeiconshop.com/wp-content/uploads/edd/notification-flat.png",
};

self.registration.showNotification(notificationTitle, notificationOptions);

self.addEventListener("notificationclick", function (event) {
console.log("clicked on notification", payload);
const notification = payload?.data;
event.notification.close();
event.waitUntil(clients.openWindow("/example.com"));
});
});
In our Firebase service worker script, first we import the Firebase app and messaging libraries required for Firebase push notification integration. The script uses firebase.initializeApp(firebaseConfig) to initialize Firebase with our project’s specific configuration details, establishing a connection to Firebase services. Then, with const messaging = firebase.messaging(), we create a Firebase messaging instance, which is required for handling push notifications. The core functionality is contained in messaging.onBackgroundMessage, which is called when a background notification is received.
This function processes the payload, which contains information such as the notification’s title and body, as well as possibly additional custom data. Using this information, we configure and display the notification via self.registration.showNotification(notificationTitle, notificationOptions), ensuring that users receive timely updates even when the web app is not active. A notificationclick event listener is also added to define actions when the notification is clicked. Clicking on the notification, such as opening a specific URL, increases user engagement.
For receiving push notification in safari you just have to do some extra things.
{ "display": "standalone" } // or {"display": "fullscreen"}🔸 Update your web application’s manifest.json file to ensure that your app can be added to the Home Screen on Safari. Set the “display” property to either “standalone” or “fullscreen”. This can be done by including a line like { “display”: “standalone” } or { “display”: “fullscreen” } in your manifest.json. This step is crucial for making your web app feel more like a native application on iOS devices, and it paves the way for smoother notification handling.
// Example: wrapping permission request call inside a button click
const myButton = document.querySelector("button");
myButton.addEventListener("click", async () => {
let permission = await Notification.requestPermission();
if (permission === "granted") {
console.log("Notification permission granted. Requesting for token.");
let token = await messaging.getToken({
vapidKey: "<YOUR_PUBLIC_VAPID_KEY_HERE>",
});
// do something with the FCM token
} else {
console.log("Notification permission denied");
// Handle denied permission
}
});
🔶 With your app’s display settings configured, the next step is to initialize Firebase Cloud Messaging. This process involves requesting notification permission from the user and then obtaining the FCM token if permission is granted. You can wrap this in an interactive element, such as a button-click event.
Related read: Firebase Cloud Messaging Integration: Enabling Push Notifications in Spring Server
Here’s a basic outline of what the code would look like:
🔹 First, select a button element using const myButton = document.querySelector(“button”);.
🔹 Add an event listener to this button: myButton.addEventListener(“click”, async () => {…});.
🔹 Inside the event listener, request notification permission using let permission = await Notification.requestPermission();.
🔹 If the permission is granted (if (permission === “granted”)), log the success message and request the FCM token by calling messaging.getToken({ vapidKey: “<YOUR_PUBLIC_VAPID_KEY_HERE>” }).
🔹 Handle the scenario where permission is denied by logging an appropriate message.

Integrating Firebase push notification Cloud Messaging into a React application enables efficient and effective handling of both foreground and background alerts. We’ve looked at how to configure the Firebase Cloud Messaging in React JS, manage token permissions, and handle notifications in various states in different browsers including Safari. Implementing these features improves user engagement through timely and appropriate alerts.
Join us for “Your 24/7 Clinical Knowledge Partner – The AI Companion” Webinar on Thursday, 30th July 2025 at 11:00 AM EDT
Register Now

We worked with Mindbowser on a design sprint, and their team did an awesome job. They really helped us shape the look and feel of our web app and gave us a clean, thoughtful design that our build team could...

The team at Mindbowser was highly professional, patient, and collaborative throughout our engagement. They struck the right balance between offering guidance and taking direction, which made the development process smooth. Although our project wasn’t related to healthcare, we clearly benefited...

Founder, Texas Ranch Security
Mindbowser played a crucial role in helping us bring everything together into a unified, cohesive product. Their commitment to industry-standard coding practices made an enormous difference, allowing developers to seamlessly transition in and out of the project without any confusion....

CEO, MarketsAI
I'm thrilled to be partnering with Mindbowser on our journey with TravelRite. The collaboration has been exceptional, and I’m truly grateful for the dedication and expertise the team has brought to the development process. Their commitment to our mission is...

Founder & CEO, TravelRite
The Mindbowser team's professionalism consistently impressed me. Their commitment to quality shone through in every aspect of the project. They truly went the extra mile, ensuring they understood our needs perfectly and were always willing to invest the time to...

CTO, New Day Therapeutics
I collaborated with Mindbowser for several years on a complex SaaS platform project. They took over a partially completed project and successfully transformed it into a fully functional and robust platform. Throughout the entire process, the quality of their work...

President, E.B. Carlson
Mindbowser and team are professional, talented and very responsive. They got us through a challenging situation with our IOT product successfully. They will be our go to dev team going forward.

Founder, Cascada
Amazing team to work with. Very responsive and very skilled in both front and backend engineering. Looking forward to our next project together.

Co-Founder, Emerge
The team is great to work with. Very professional, on task, and efficient.

Founder, PeriopMD
I can not express enough how pleased we are with the whole team. From the first call and meeting, they took our vision and ran with it. Communication was easy and everyone was flexible to our schedule. I’m excited to...

Founder, Seeke
We had very close go live timeline and Mindbowser team got us live a month before.

CEO, BuyNow WorldWide
Mindbowser brought in a team of skilled developers who were easy to work with and deeply committed to the project. If you're looking for reliable, high-quality development support, I’d absolutely recommend them.

Founder, Teach Reach
Mindbowser built both iOS and Android apps for Mindworks, that have stood the test of time. 5 years later they still function quite beautifully. Their team always met their objectives and I'm very happy with the end result. Thank you!

Founder, Mindworks
Mindbowser has delivered a much better quality product than our previous tech vendors. Our product is stable and passed Well Architected Framework Review from AWS.

CEO, PurpleAnt
I am happy to share that we got USD 10k in cloud credits courtesy of our friends at Mindbowser. Thank you Pravin and Ayush, this means a lot to us.

CTO, Shortlist
Mindbowser is one of the reasons that our app is successful. These guys have been a great team.

Founder & CEO, MangoMirror
Kudos for all your hard work and diligence on the Telehealth platform project. You made it possible.

CEO, ThriveHealth
Mindbowser helped us build an awesome iOS app to bring balance to people’s lives.

CEO, SMILINGMIND
They were a very responsive team! Extremely easy to communicate and work with!

Founder & CEO, TotTech
We’ve had very little-to-no hiccups at all—it’s been a really pleasurable experience.

Co-Founder, TEAM8s
Mindbowser was very helpful with explaining the development process and started quickly on the project.

Executive Director of Product Development, Innovation Lab
The greatest benefit we got from Mindbowser is the expertise. Their team has developed apps in all different industries with all types of social proofs.

Co-Founder, Vesica
Mindbowser is professional, efficient and thorough.

Consultant, XPRIZE
Very committed, they create beautiful apps and are very benevolent. They have brilliant Ideas.

Founder, S.T.A.R.S of Wellness
Mindbowser was great; they listened to us a lot and helped us hone in on the actual idea of the app. They had put together fantastic wireframes for us.

Co-Founder, Flat Earth
Mindbowser was incredibly responsive and understood exactly what I needed. They matched me with the perfect team member who not only grasped my vision but executed it flawlessly. The entire experience felt collaborative, efficient, and truly aligned with my goals.

Founder, Child Life On Call
The team from Mindbowser stayed on task, asked the right questions, and completed the required tasks in a timely fashion! Strong work team!

CEO, SDOH2Health LLC
Mindbowser was easy to work with and hit the ground running, immediately feeling like part of our team.

CEO, Stealth Startup
Mindbowser was an excellent partner in developing my fitness app. They were patient, attentive, & understood my business needs. The end product exceeded my expectations. Thrilled to share it globally.

Owner, Phalanx
Mindbowser's expertise in tech, process & mobile development made them our choice for our app. The team was dedicated to the process & delivered high-quality features on time. They also gave valuable industry advice. Highly recommend them for app development...

Co-Founder, Fox&Fork