


 BLOGS
BLOGS  NEWSROOM
  CASE STUDIES
  WEBINARS
  PODCASTS
  ASSET HUB
  EVENT CALENDAR


Hey Guys, I recently integrated FCM( Firebase Cloud Messaging) with one of my spring boot applications. So I would like to share my experience with you.
In this article, I’ll be sharing my insights on how to successfully send push notifications to mobile applications using Google’s Firebase Cloud Messaging.
Firebase is a backend stage for building web, Android, and iOS applications. It offers a continuous database and APIs. Firebase can control your application’s backend, including information, and client confirmation. Assemble cross-stage local portable and web applications with our Android, iOS, and JavaScript SDKs.
What is Firebase Cloud Messaging(FCM)?
Firebase Cloud Messaging, or FCM for short, is a cloud-based messaging service. Firebase Cloud Messaging (FCM) is a platform that allows you to send messages and notifications to client apps. It’s a cross-platform messaging solution that enables the reliable delivery of messages at scale. FCM provides the following capabilities:
✔️ Reliably send messages to mobile or web applications, referred here forth as “clients”
✔️ Send messages to all or specific clients using topic or subscription-based addressing
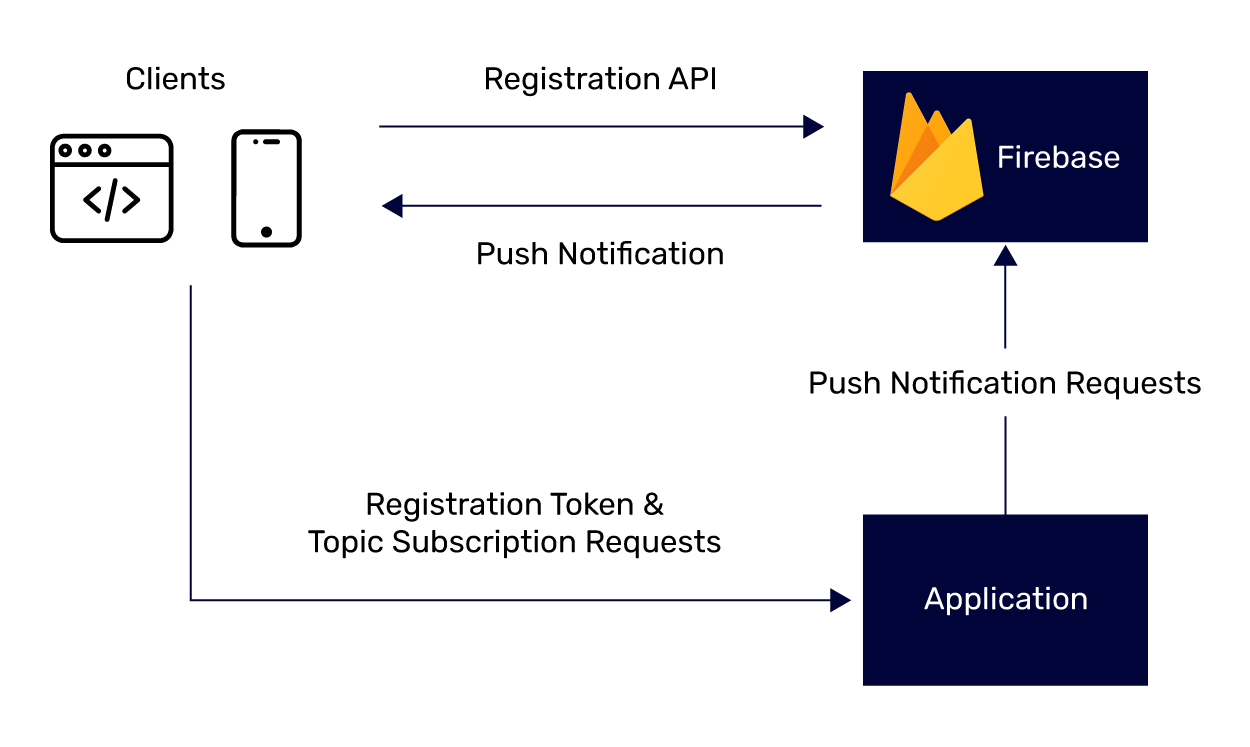
Application Architecture
The typical architecture of an FCM-based application consists of a server, clients, and FCM itself:
Implementation
1. Setup Firebase Messaging Dependency
To include the Firebase-SDK, you must add the following maven dependency to your project.
<dependency>
<groupId>com.google.firebase</groupId>
<artifactId>firebase-admin</artifactId>
<version>7.0.0</version>
</dependency>
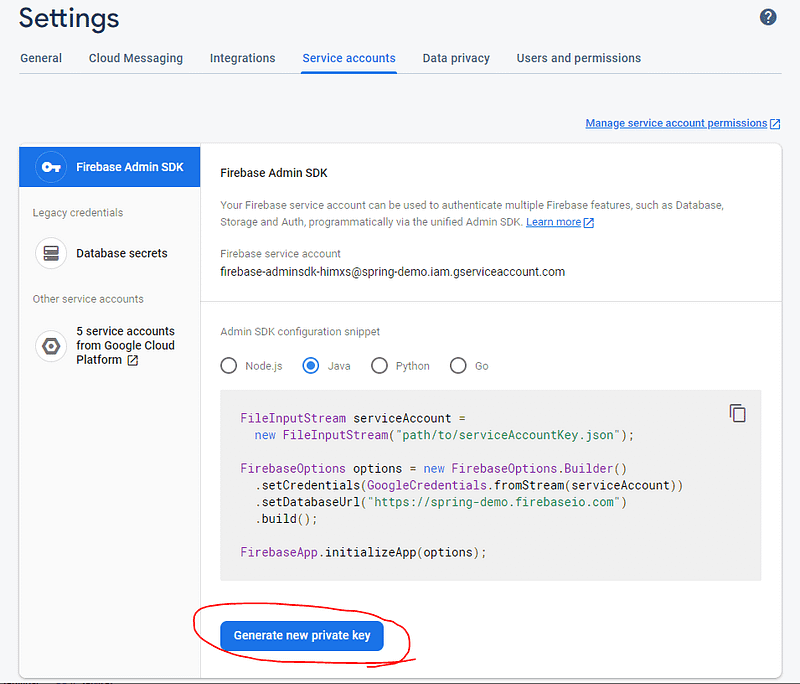
2. Get the Service Account Private Key from FCM Console
The next thing you have to do is to generate a service-account.json. For this open the service accounts in the FCM console and click Generate Private Key.
Got to the Firebase console
- Create a new project
- Generate new private key (Project settings -> Service accounts -> Generate new private key)
This will download a file in the form of
<firebase-project>-firebase-adminsdk-<hash>.json
Below type of keys will be present in the file. Save this file in src/java/resources as firebase-service-account.json.
{
"type": "REPLACE WITH VALID TYPE",
"project_id": "REPLACE WITH VALID PROJECT ID",
"private_key_id": "REPLACE WITH VALID PRIVATE KEY ID",
"private_key": "REPLACE WITH VALID PRIVATE KEY",
"client_email": "REPLACE WITH VALID CLIENT EMAIL",
"client_id": "REPLACE WITH VALID CLIENT ID",
"auth_uri": "REPLACE WITH VALID AUTH URI",
"token_uri": "REPLACE WITH VALID TOKEN URI",
"auth_provider_x509_cert_url": "REPLACE WITH VALID AUTH PROVIDER URI",
"client_x509_cert_url": "REPLACE WITH VALID CLIENT URI"
}
3. Firebase Messaging Configuration
Now we have to initialize our Firebase application. This is the time to use our app. firebase-configuration-file. I used @Value annotation to inject the path value to the String field. The initialize() method is being called we need to use @PostConstruct annotation.
So firebase.configuration.file is read from the application.properties files.
firebase.configuration.file=profiles/local/firebase-config.json
According to your profiles, you can set the path of it. For example. profiles/dev/firebase-config.json
@Service
@PropertySources(value = {
            @PropertySource("classpath:message.properties"),
@PropertySource("classpath:message.properties"),
 @PropertySource("classpath:profiles/${spring.profiles.active}/application.properties") })

public class FireBaseInitializer {

private static final Logger LOGGER = LoggerFactory.getLogger(FireBaseInitializer.class);

@Value("${firebase.configuration.file}")
private String firebaseConfigPath;

@PostConstruct
private void createConnection() throws CustomException {

 try {
  FirebaseOptions firebaseOptions = new FirebaseOptions.Builder()
    .setCredentials(
      GoogleCredentials.fromStream(new ClassPathResource(firebaseConfigPath).getInputStream()))
    .build();
  System.out.println(firebaseOptions);
  if (FirebaseApp.getApps().isEmpty()) {
   FirebaseApp.initializeApp(firebaseOptions);
  }

  } catch (Exception e) {
   LOGGER.error(e.getMessage());
   throw new CustomException(e.getMessage());
  }

}
}
4. Sending Push Notifications
The next step is to prepare our push notifications service class. Sending push notification without data payload example from FCMService class:
@Service
public class PushNotificationService {
private static final Logger LOGGER = LoggerFactory.getLogger(PushNotificationService.class);

public void sendPersonalMessage(PushNotificationRequest pushNotificationRequest) {
Notification notification = Notification.builder().setTitle(pushNotificationRequest.getTitle())
.setBody(pushNotificationRequest.getBody()).build();

Message message = Message.builder().setToken(pushNotificationRequest.getToken()).setNotification(notification)
.putAllData(pushNotificationRequest.getData()).setApnsConfig(getApnsConfig()).build();

sendNotification(message);
}

private void sendNotification(Message message) {
try {
FirebaseMessaging.getInstance().send(message);
} catch (FirebaseMessagingException e) {
LOGGER.error(e.getMessage());
}
}

private AndroidConfig getAndroidConfig() {
return AndroidConfig.builder().setTtl(Duration.ofMinutes(2).toMillis()).setPriority(AndroidConfig.Priority.HIGH)
.setNotification(AndroidNotification.builder().setSound(NotificationParameter.SOUND.getValue())
.setColor(NotificationParameter.COLOR.getValue()).build())
.build();
}

private ApnsConfig getApnsConfig(Integer count) {
return ApnsConfig.builder().setAps(Aps.builder().setSound(NotificationParameter.SOUND.getValue()).build())
.setAps(Aps.builder().setBadge(count).build()).build();
}

}- The Notification object captures what Title and Body are to show on the mobile notification.
- Here, the message is an instance of the Message class containing the notification payload and the recipient’s FCM registration token.
- The Message object has multiple builder methods to deal with various scenarios.
Customize options specific to Android, iOS, and web clients using the builder methods below.- setAndroidConfig()
- setApnsConfig()
- setWebpushConfig()
Related read: Firebase Push Notifications in React: A Complete Guide
5. Sending Messages to Specific Clients
Once you have created a message object with appropriate values, you can sendPersonalMessage.send(Message) to submit the request. The method will return a String which represents the message ID that was sent during the API call.
Conclusion
This insightful blog post delved into the fascinating world of application architecture, with a particular focus on integrating Firebase Cloud Messaging (FCM) to enable Push Notifications in the Spring Server.
The blog provided a comprehensive exploration of how these two crucial elements come together to enhance the notification capabilities of the Spring Server. By seamlessly integrating FCM, developers gain a reliable and efficient way to send push notifications to client apps, thereby enriching user engagement and interaction.
Throughout the post, we were guided through the steps and best practices required to successfully implement this integration, making it an invaluable resource for those seeking to optimize their notification systems and deliver exceptional user experiences.
