BLOGS
BLOGS  NEWSROOM
  CASE STUDIES
  WEBINARS
  PODCASTS
  ASSET HUB
  EVENT CALENDAR


Now take an example as we have an online store where people buy products. Just like in a physical store, in which many departments need to work together to complete the requirements of an order. For example, when a customer buys any item, the sales department processes the order, the warehouse checks the inventory, the finance department works on the payment, and the logistics team handles shipping. If these departments do not communicate well, the order can be delayed, missed, or even canceled.
In an Ecommerce application, a similar relationship is required between various software components to handle orders smoothly. These components include the order processing system, inventory management system, payment gateway, and shipping service. Making sure that these systems communicate effectively is crucial for the smooth functioning of the online store.
This is where Spring Integration becomes important. Spring Integration is a powerful framework that allows different parts of your application to talk to each other correctly. It acts like a glue that binds various components together, enabling them to work in the correct direction. With Spring Integration, you can design your application to automatically handle the complex interactions between different services, ensuring that data flows efficiently from one part to another.
What is Spring Integration?
Spring Integration is a tool/library that enables different parts of spring applications to stay connected with each other using messages. It works like a bridge between different services, making sure that data flows correctly from one part to another. For example, when a customer makes an order in an eCommerce application, Spring Integration can help correctly handle understanding between the order service, inventory service, payment service, and shipping service in one place.
Use Cases
Example 1: Ecommerce Application
Consider an eCommerce application. When a customer makes an order, some steps will happen:
- Order Service: Gets the order and saves it to the database.
- Inventory Service: Checks that the items are in stock.
- Payment Service: Processes the payment.
- Shipping Service: Shipping-related services.
Example 2: Customer Notification
An Ecommerce application also needs to send customers notifications about their order status.
Order Confirmation Service: Sends an email to the customer confirming that their order has been received.
- Inventory Alert Service: Notifies the customer that any item in their order is out of stock.
- Payment Confirmation Service: Sends a notification to the customer confirming that their payment has been successfully processed.
- Shipping Notification Service: sends a notification to the customer with shipping details and tracking information.
Example 3: Financial Application
In a financial application, transactions need to be processed as per its types:
- Transaction Service: Receives the transaction and validates it.
- Domestic Transactions: Processed directly with basic validation and completion notification.
- International Transactions: Require additional checks, currency conversion, and detailed processing.
- Notification Service: Sends a completed notification to the user.
Example 4: Splitter and Aggregator in an Email Application
In an email application, messages might need to be separated into single parts for processing, like recipients, subject, and body. Then, these parts will be collected to make the email.
Scenario:
- Email Reception: Incoming emails are received by the application.
- Splitter: The email is divided into separate parts, such as recipients, subject, and body.
- Processing: Each part is started individually (e.g., recipient validation, subject formatting, body parsing).
- Aggregator: All parts are added again to make the complete email.
- Delivery: The complete email is delivered to the recipient.
Example 5: Service Activator in a Notification System
In a notification system, when an event happens, like a new message or system update, related actions have to be taken, such as sending notifications to users or updating user preferences.
Scenario:
- Event Reception: Incoming events are received by the application.
- Event Handler: The event is processed by a service activator, which fires the right action.
- Notification Service: After receiving an event, the notification service sends related notifications to users.
- Preference Update Service: Then, the preference update service might be called to adjust user preferences based on the event.
How Does Spring Integration Work?
Spring Integration enables communication between different components of your application by creating messaging channels and integration patterns. Following are a step-by-step guide to its working:
1. Messaging Channels:
Spring Integration defines message channels, which are like a pathway for messages to flow between different parts of your application. These channels can be configured to support various communication methods, like point-to-point or publish-subscribe.
2. Message Endpoints:
Components in your application, called message endpoints, interact with message channels to send or receive messages. These endpoints can be configured to perform specific tasks when messages are received, such as processing orders, checking inventory, or handling payments.
3. Message Transformers:
Spring Integration provides message transformers, which convert messages from one format to another as they pass through the integration flow. This allows components to communicate effectively even if they use different data formats or protocols.
4. Integration Patterns:
Spring Integration supports different integration patterns, such as message routing, filtering, and aggregation, which help orchestrate the flow of messages between different components. These patterns allow you to define complex working flows and ensure that messages are processed correctly.
Dependencies for Spring Integration
For Maven:
<dependency>
          <groupId>org.springframework.boot</groupId>
          <artifactId>spring-boot-starter-integration</artifactId>
</dependency>
For Gradle:
dependencies { implementation 'org.springframework.boot:spring-boot-starter-integration' }Let’s Understand with a Basic Ecommerce Application Example
Overview:
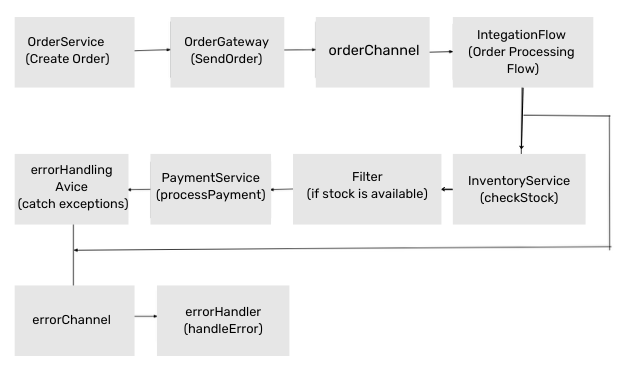
In this example, we are setting up a Spring Integration flow to process orders. It has checking inventory, processing payments, and handling errors if they occur. Here’s a breakdown of each component and how they work together.
Step 1: Define Configuration Class
We create a configuration class IntegrationConfig using annotations @Configuration and @IntegrationComponentScan. This class contains beans and integration flows.
Step 2: Define Message Channels
We define two message channels:
- orderChannel: This channel is used to send orders for processing.
- errorChannel: This channel is used to handle errors.
@Configuration
@IntegrationComponentScan
public class IntegrationConfig {

        @Bean
         public MessageChannel orderChannel() {
            return MessageChannels.direct().getObject();
         }

        @Bean
         public MessageChannel errorChannel() {
            return MessageChannels.direct().getObject();
         }
}
Step 3: Define Integration Flows
We define two integration flows:
🔺Order Processing Flow: This flow processes the order by checking stock and processing payment. It uses orderChannel as an input channel.
@Bean
    public IntegrationFlow orderFlow() {
       return IntegrationFlow.from("orderChannel")
               .handle("inventoryService", "checkStock", e ->
e.advice(errorHandlingAdvice()))
               .filter(Boolean.class, isSuccess -> isSuccess)
               .handle("paymentService", "processPayment", e ->
e.advice(errorHandlingAdvice()))
               .get();
}🔺Error Handling Flow: This flow handles any errors that occur during order processing. It uses errorChannel as the input channel.
@Bean
    public IntegrationFlow errorHandler() {
        return IntegrationFlow.from("errorChannel")
                .handle("errorHandler", "handleError")
                .get();
}
Step 4: Define Error Handling Advice
We define error handling advice to handle exceptions during message processing and move them to errorChannel.
@Bean
     public ExpressionEvaluatingRequestHandlerAdvice errorHandlingAdvice() {
         ExpressionEvaluatingRequestHandlerAdvice advice = new
ExpressionEvaluatingRequestHandlerAdvice();
         advice.setFailureChannel(errorChannel());
         advice.setTrapException(true);
         return advice;
}
Step 5: Define Messaging Gateway
We define messaging gateway interface OrderGateway with the default request channel orderChannel. This gateway is used to send orders to the integration flow.
@MessagingGateway(defaultRequestChannel = "orderChannel")
    public interface OrderGateway {
        void sendOrder(Order order);
}
Step 6: Implement Service Layer
🔺OrderService: This service is responsible for creating orders and sending it to OrderGateway for processing.
@Service
@RequiredArgsConstructor
public class OrderService {

    private final OrderGateway orderGateway;

    private final OrderRepository orderRepository;

    public Order createOrder(Order order) {
        order.setStatus("PENDING");
        Order createdOrder = orderRepository.save(order);
        orderGateway.sendOrder(createdOrder);
        return createdOrder;
    }
}🔺PaymentService: This service handles payment processing.
@Service
public class PaymentService {
   private static final Logger logger =
LoggerFactory.getLogger(PaymentService.class);

   public void processPayment(Boolean isSuccess) {
       logger.info("Processing payment with success status: {}", isSuccess);

   }
}🔺InventoryService: This service handles inventory checking and stock reduction.
@Service
public class InventoryService {
    private static final Logger logger =
LoggerFactory.getLogger(InventoryService.class);

    public Boolean checkStock(Order order) {
        logger.info("Checking stock for order: {}", order);

        return true;
    }
}
Putting It All Together
- Creating an Order: An order is created with a status of “PENDING” and saved in the repository.
- Sending the Order: The order is sent to orderChannel for processing via the OrderGateway.
- Processing the Order: Integration flow checks the stock using InventoryService.checkStock. If successful, it proceeds to PaymentService.processPayment.
- Error Handling: If any exception occurs, it is moved to the errorChannel, and the errorHandler handles it.
Related read: Building A Scalable Ecommerce App That Supports 1 Billion Users
Hire Our Developers to Use Spring Integration for Your Applications.
Some More Examples of How We Could Use Integration Flow
Message Transformation
We can use transformers to convert messages from one format to another.
@Bean
   public IntegrationFlow orderFlow() {
        return IntegrationFlow.from("orderChannel")
                .handle("inventoryService", "checkStock", e ->
e.advice(errorHandlingAdvice()))
              .filter(Boolean.class, isSuccess -> isSuccess)
              .transform(Order.class, order -> {
                  order.setProcessedTimestamp(Instant.now());
                  return order;
              })
              .handle("paymentService", "processPayment", e ->
e.advice(errorHandlingAdvice()))
               .get();
   }
Routing and Conditional Processing
We can use routers to route messages to different channels based on conditions.
@Bean
    public IntegrationFlow orderFlow() {
        return IntegrationFlow.from("orderChannel")
                .handle("inventoryService", "checkStock", e ->
e.advice(errorHandlingAdvice()))
                .filter(Boolean.class, isSuccess -> isSuccess)
                .route(Order.class,
                        order -> Boolean.TRUE.equals(order.getIsPriority()) ?
"priorityChannel" : "normalChannel")
               .get();
   }
Splitter and Aggregator
We can split a message into multiple messages and then aggregate the results.
@Bean
   public IntegrationFlow orderFlow() {
       return IntegrationFlow.from("orderChannel")
                .handle("inventoryService", "checkStock", e ->
e.advice(errorHandlingAdvice()))
              .filter(Boolean.class, isSuccess -> isSuccess)
              .split(Order.class, Order::getItems)
              .handle("itemService", "processItem")
              .aggregate()
              .handle("paymentService", "processPayment", e ->
e.advice(errorHandlingAdvice()))
              .get();
   }
Polling and Scheduling
We can set up polling or scheduling to periodically fetch or process messages.
@Bean
   public IntegrationFlow pollingFlow() {
       return IntegrationFlow.from(() -> new GenericMessage<>("Fetch Orders"),
               e -> e.poller(poller()))
               .handle("orderService", "fetchAndProcessOrders")
               .get();
   }
Service Activator
Service activators invoke a method on a Spring-managed bean when a message arrives.
@Bean
   public IntegrationFlow orderFlow() {
       return IntegrationFlow.from("orderChannel")
               .handle("inventoryService", "checkStock", e ->
e.advice(errorHandlingAdvice()))
               .filter(Boolean.class, isSuccess -> isSuccess)
               .handle("orderService", "processOrder")
               .handle("paymentService", "processPayment", e ->
e.advice(errorHandlingAdvice()))
               .get();
   }
Advantages and Disadvantages
Modular Architecture
- Advantage: Spring Integration enables independent service operation and interaction, making simpler management.
- Disadvantage: Tight coupling without it makes it difficult to update or scale.
Efficient Communication
- Advantage: Services communicate via message channels, ensuring consistently good quality updates and notifications.
- Disadvantage: Direct calls increase complexity, with failures a strong effect on other services.
Centralized Processing Logic
- Advantage: Message endpoints allow specific actions, increasing flexibility.
- Disadvantage: Manual processing leads to duplicate code or something else.
Data Transformation
- Advantage: Message transformers convert formats, decreasing errors.
- Disadvantage: Individual conversion increases error.
Asynchronous Processing
- Advantage: Enables handling tasks without blocking the main application flow.
- Disadvantage: Lack of it slows down the system, causing fast-reacting issues.
Error Handling and Monitoring
- Advantage: Built-in error handling and monitoring facilitate quick issue detection and resolution, maintaining a system consistently good in quality.
- Disadvantage: Manual implementation increases difficulty and error.
Limitations
Spring Integration is strong but may not be needed for small apps. It works best for medium to large apps where different services need to talk efficiently. For small apps, the extra complexity might not be worth it. Also, learning Spring Integration can be hard for new developers.
Comparison with Other Similar Libraries
🔺Comparison with Kafka
Spring Integration focuses on the integration of various services within an application. In contrast, Kafka is a distributed streaming platform used for building real-time data pipelines. While both can be used for inter-service communication, Spring Integration is more used for internal service orchestration, on the other hand, Kafka is used for handling big data streams and events.
🔺Comparison with RabbitMQ
Spring Integration, like RabbitMQ, puts inter-service communication within an application. However, there are notable differences in their main functionalities and use cases. RabbitMQ is a message broker that implements the Advanced Message Queuing Protocol (AMQP) and supports many messaging patterns like point-to-point, publish-subscribe, and request-response.
It is superior at reliable message delivery, message queuing, and load balancing on multiple consumers. RabbitMQ is suited for areas requiring high throughput, low latency, and guaranteed message delivery.
Conclusion
Spring Integration is a powerful framework that helps different parts of your application communicate seamlessly. In an eCommerce application, it ensures that the order, inventory, payment, and shipping services work together smoothly. By using Spring Integration, you can build a scalable and maintainable, and efficient application.