CleverTap is a platform for customer engagement and user retention that helps brands to increase user engagement in their application. CleverTap is basically an analytical platform that helps track user actions to understand how users use the product.
In this article, we will focus on CleverTap Features and will also learn CleverTap integration with react native.
Related Read: A Complete Guide To Build The First React Native App
Watch Our CleverTap Workshop Below 👇
We will use clevertap-react-native library for CleverTap integration in React Native.
npm install --save clevertap-react-native

Cd ios && pod install   //for ios
For configuration please visit react-native-quick-start-guide
First import CleverTap:
To create a user profile we will use the CleverTap.profileSet() function. This function helps you create a user profile on CleverTap. This user profile is a very initial and important step as other core features like events, segments and campaigns depend on user creation on the dashboard. If no user profile is created we cannot send events to that particular user hence we cannot analyze user engagement in segments and can’t send campaigns (notifications/messages) to the particular user.
You can use this function on your signup or login screen to collect user information like name, mobile number, email etc and send it to CleverTap for profile creation.
Before creating a profile if you search your profile using email/CleverTapId you will get the below result. Which means your user is not created.
After creating your profile successfully you can see your profile and the properties which you sent while creating the profile like name, email, dob etc, The DOB field calculates the age of the user.
CleverTap Id you can see under the user name. This CleverTap id is created when the user profile is created and you can use this CleverTap id to search the user profile once his profile is created.
Other than creating profiles we can also use CleverTap.profileSet() function to update the user properties. For example, we will update/change the birthdate of the user as below:
Note: While updating the user properties Email is the main key with which you can update properties for that particular user. If you update the main key which is Email then a new profile will get created with a new CleverTap id while the existing profile will remain the same with the old mail id but no new events will be logged there.
Once a profile is created, the user can visit various sections in your application that he/she may be interested in or perform various actions like login, signup, button clicks, etc. We can capture the actions with events for analyzing user engagement, tracking user actions and knowing his interesting areas. This may help you understand user interests to improve your application and make it more user likable.
We can create user events using the CleverTap.recordEvent() function. You can add custom names and fields in the recordEvent function. For example “Login” is the name of the event and “Name, Email, Device, Country, DOB, etc” are fields of that event.
We can create various events based on user actions such as,
Above sent events and profile creation can be seen in Segments. This segment helps us understand the events and profile properties of particular users. We can create a report for user engagement analysis. With segments, we can match multiple users having the same properties and filter them for campaigns.
User Profile:
User Events:
We can save this segment and also we can view his profile by clicking on sample people at the bottom. By saving the segment you can search it by name and view it anytime in the segments.
In the above part, we saw three core concepts (User profile, Events and Segments) of CleverTap in detail. Now let’s see the other two core concepts, Campaigns and Reports, in detail.
Campaigns are nothing but a marketing channel for sending deep link push notifications to users. Deeplink allows push notifications to redirect users to specific pages inside the app. Using campaigns, we can make users aware of new feature launches in the application and directly redirect them to that particular page.
Campaigns can help you engage by sending them notifications for new features, new posts or any update in the application. Deeplink is the perfect tool for driving user engagement and landing directly to a specific point in the app.
Here we will use universal links(http/https urls) for deep link notifications.
https://<BASE_URL>/<ROUTENAME>?<PARAMS>=<param_value>
For Configuration please follow react-native-push-notification. Here syntax for createNotificationChannel is,
cleverTapAPI.createNotificationChannel(getApplicationContext(),"YourChannelId","Your Channel Name","Your Channel Description",NotificationManager.IMPORTANCE_MAX,true);
Note:You have to place this CleverTapAPI.createNotificationChannel() function in your android MainActivity.java file under setInitialUrl() function.
App in foreground
The foreground state is when the user actively uses the app and gets the notification. The app is already open in this case, and the Linking event is fired. To handle this event we use
Linking.addEventListener('url', callback)
App in the background
In this state, the app is not already open. In this case, we use CleverTap.getInitialUrl() function, and url is passed as the initial url. This function returns a promise that resolves to the url.
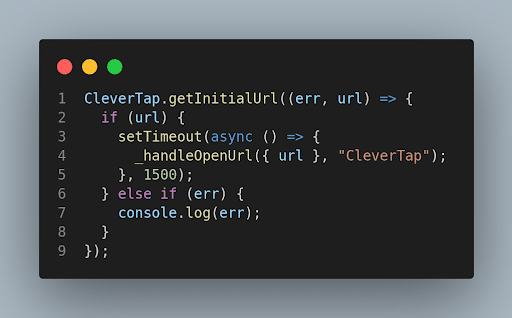
We will send the url to getUrl() function and check for a particular string if it exists in the url and redirect it accordingly. For example, if the url is https://domain-name/Activity we are checking for the “Activity” keyword, and if it includes it, we will navigate it to the activity screen as follows.
Note: You can place this code just after your App.js file which means the screen in which you hide your splash screen.
In the CleverTap dashboard, go to Campaigns from the left-hand menu and click on “+ Campaigns” button.
Then select mobile push
Then select notification behavior like one time, recurring etc. We will select one-time notification. You can choose according to your requirement.
Then select the time to send the notification that is sent it now or schedule it for later. For testing, we will select send notification now. And click on the Continue button.
Now you have to select the segment/User to whom you want to send the notification or if you have not created/saved any segment you can create one by clicking on “+ Create an ad-hoc segment” button at the top. And click on continue.
Select Segment/User and can filter it using user properties. For example, to send a notification to a particular user you can select the email property and type the email to which you want to send the notification. And for multiple users like sending notifications to people in the same age group you can select age property. And click on the Continue button.
Then select a single message button to send the same message to all the users.
Then on the next screen add the title, and message and check advance checkout. In advance switch deep link toggle to ON state and paste deep link redirection url. For example https://domain-name/Activity.
Now select the notification channel, the one which we had set in the MainActivity.java file while configuration. And click on the “send a test push notification” button.
Now type your email and search the user. Once found click on Add button and check the checkout for the particular user and send a notification.
Finally, test the notification on your mobile device and click to redirect.
CleverTap allows you to build reports for understanding campaigns’ effect on users. This report is used to analyze user engagement.
For more details, you can visit Reports

In this article, we saw what is CleverTap, its features & CleverTap integration with react native. We also saw other core concepts in detail like campaigns and reports.

We worked with Mindbowser on a design sprint, and their team did an awesome job. They really helped us shape the look and feel of our web app and gave us a clean, thoughtful design that our build team could...


The team at Mindbowser was highly professional, patient, and collaborative throughout our engagement. They struck the right balance between offering guidance and taking direction, which made the development process smooth. Although our project wasn’t related to healthcare, we clearly benefited...

Founder, Texas Ranch Security

Mindbowser played a crucial role in helping us bring everything together into a unified, cohesive product. Their commitment to industry-standard coding practices made an enormous difference, allowing developers to seamlessly transition in and out of the project without any confusion....

CEO, MarketsAI

I'm thrilled to be partnering with Mindbowser on our journey with TravelRite. The collaboration has been exceptional, and I’m truly grateful for the dedication and expertise the team has brought to the development process. Their commitment to our mission is...

Founder & CEO, TravelRite

The Mindbowser team's professionalism consistently impressed me. Their commitment to quality shone through in every aspect of the project. They truly went the extra mile, ensuring they understood our needs perfectly and were always willing to invest the time to...

CTO, New Day Therapeutics

I collaborated with Mindbowser for several years on a complex SaaS platform project. They took over a partially completed project and successfully transformed it into a fully functional and robust platform. Throughout the entire process, the quality of their work...

President, E.B. Carlson

Mindbowser and team are professional, talented and very responsive. They got us through a challenging situation with our IOT product successfully. They will be our go to dev team going forward.

Founder, Cascada

Amazing team to work with. Very responsive and very skilled in both front and backend engineering. Looking forward to our next project together.

Co-Founder, Emerge

The team is great to work with. Very professional, on task, and efficient.

Founder, PeriopMD

I can not express enough how pleased we are with the whole team. From the first call and meeting, they took our vision and ran with it. Communication was easy and everyone was flexible to our schedule. I’m excited to...

Founder, Seeke

We had very close go live timeline and Mindbowser team got us live a month before.

CEO, BuyNow WorldWide

If you want a team of great developers, I recommend them for the next project.

Founder, Teach Reach

Mindbowser built both iOS and Android apps for Mindworks, that have stood the test of time. 5 years later they still function quite beautifully. Their team always met their objectives and I'm very happy with the end result. Thank you!

Founder, Mindworks

Mindbowser has delivered a much better quality product than our previous tech vendors. Our product is stable and passed Well Architected Framework Review from AWS.

CEO, PurpleAnt

I am happy to share that we got USD 10k in cloud credits courtesy of our friends at Mindbowser. Thank you Pravin and Ayush, this means a lot to us.

CTO, Shortlist

Mindbowser is one of the reasons that our app is successful. These guys have been a great team.

Founder & CEO, MangoMirror

Kudos for all your hard work and diligence on the Telehealth platform project. You made it possible.

CEO, ThriveHealth

Mindbowser helped us build an awesome iOS app to bring balance to people’s lives.

CEO, SMILINGMIND

They were a very responsive team! Extremely easy to communicate and work with!

Founder & CEO, TotTech

We’ve had very little-to-no hiccups at all—it’s been a really pleasurable experience.

Co-Founder, TEAM8s

Mindbowser was very helpful with explaining the development process and started quickly on the project.

Executive Director of Product Development, Innovation Lab

The greatest benefit we got from Mindbowser is the expertise. Their team has developed apps in all different industries with all types of social proofs.

Co-Founder, Vesica

Mindbowser is professional, efficient and thorough.

Consultant, XPRIZE

Very committed, they create beautiful apps and are very benevolent. They have brilliant Ideas.

Founder, S.T.A.R.S of Wellness

Mindbowser was great; they listened to us a lot and helped us hone in on the actual idea of the app. They had put together fantastic wireframes for us.

Co-Founder, Flat Earth

Ayush was responsive and paired me with the best team member possible, to complete my complex vision and project. Could not be happier.

Founder, Child Life On Call

The team from Mindbowser stayed on task, asked the right questions, and completed the required tasks in a timely fashion! Strong work team!

CEO, SDOH2Health LLC

Mindbowser was easy to work with and hit the ground running, immediately feeling like part of our team.

CEO, Stealth Startup

Mindbowser was an excellent partner in developing my fitness app. They were patient, attentive, & understood my business needs. The end product exceeded my expectations. Thrilled to share it globally.

Owner, Phalanx

Mindbowser's expertise in tech, process & mobile development made them our choice for our app. The team was dedicated to the process & delivered high-quality features on time. They also gave valuable industry advice. Highly recommend them for app development...

Co-Founder, Fox&Fork
