So you wake up in the morning with a brilliant idea for a mobile app– you can explain it, you know it’s the most amazing idea ever, and you know your app idea can amaze many people- So what next?
Well, the good thing is yes, it’s a good start. The bad part, though, is that very few apps are really successful. So what divides the good and the bad- Some luck? Yes, and a lot of right steps. While you can earn luck, We are sharing here the right steps to build your app.
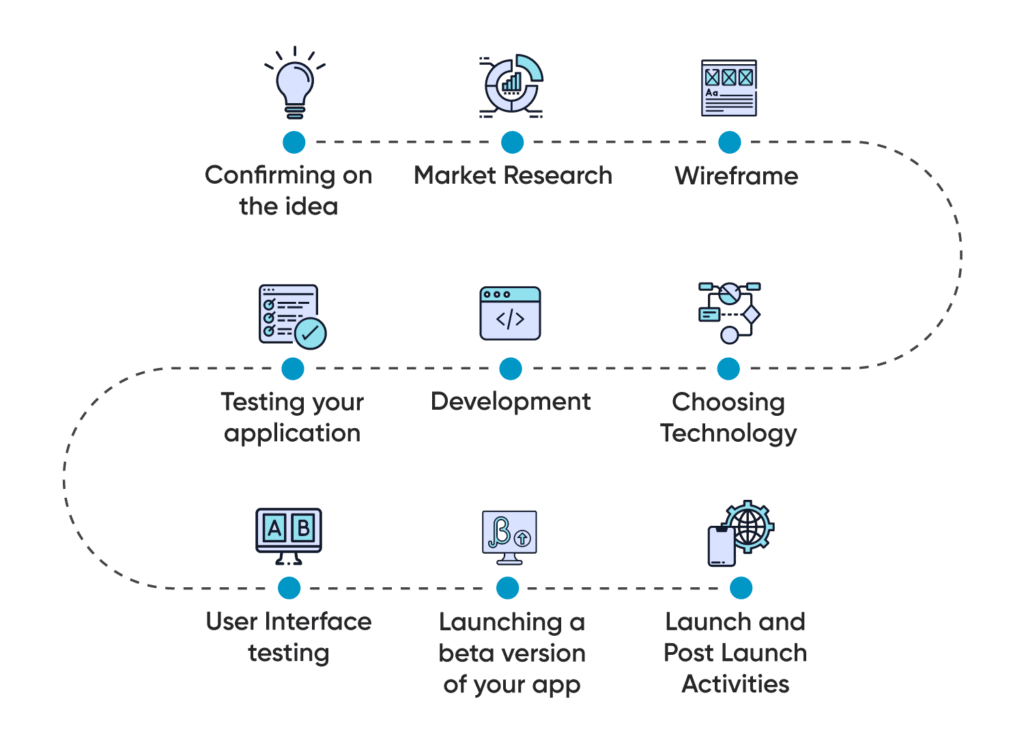
If you’re contemplating developing a mobile application, Let’s explore our comprehensive guide on mobile app development process. To make it understandable for you, we have broken down the complete guide to mobile app development process into nine key steps.
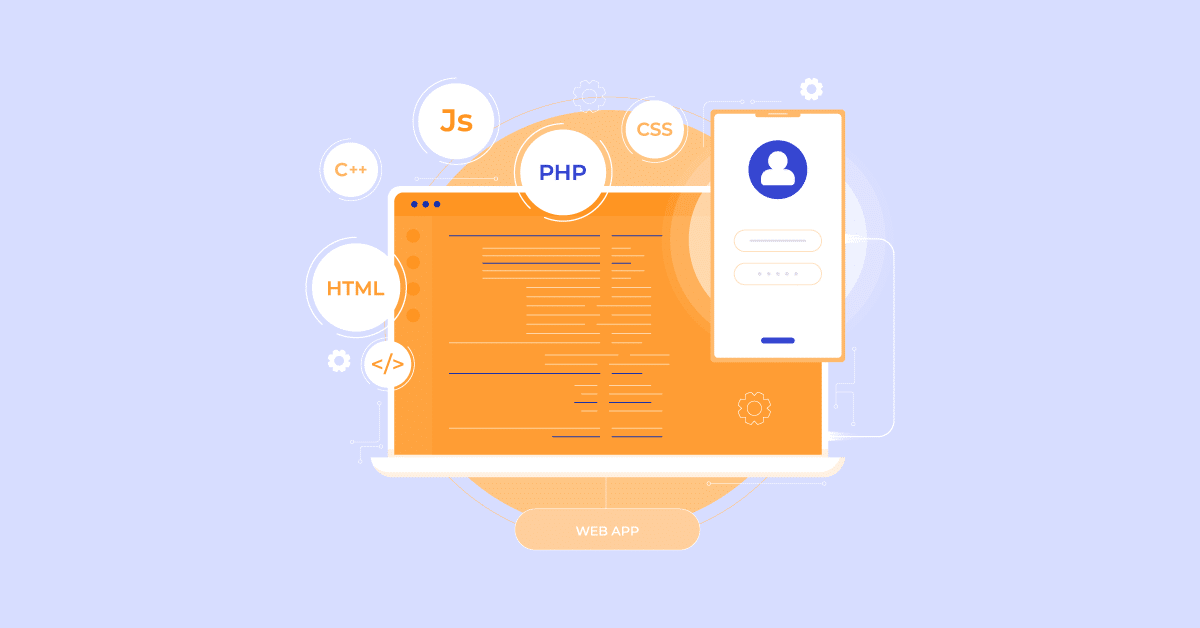
Mobile app development refers to the process of creating software applications specifically designed to run on mobile devices such as smartphones and tablets. It involves a series of steps, including idea conceptualization, market research, design, development, testing, and deployment, to bring a functional and user-friendly application to the mobile platform. Mobile app development can be done for various operating systems, including Android and iOS, and it covers a wide range of applications, from games and productivity tools to social networking and e-commerce apps.
Before planning to proceed, you need to answer the following questions to make sure that you are not marrying the wrong idea, and the idea is worth investing time and effort.
Now is the time to do the most important part of your journey. Market research shows you the real demand or interest of the market; accordingly, you can modify your idea, and the research can give you a clear list of requirements that can help you prioritize the work. Here the question, of course, is how to do market research the right way? Check the step by step market research process here:
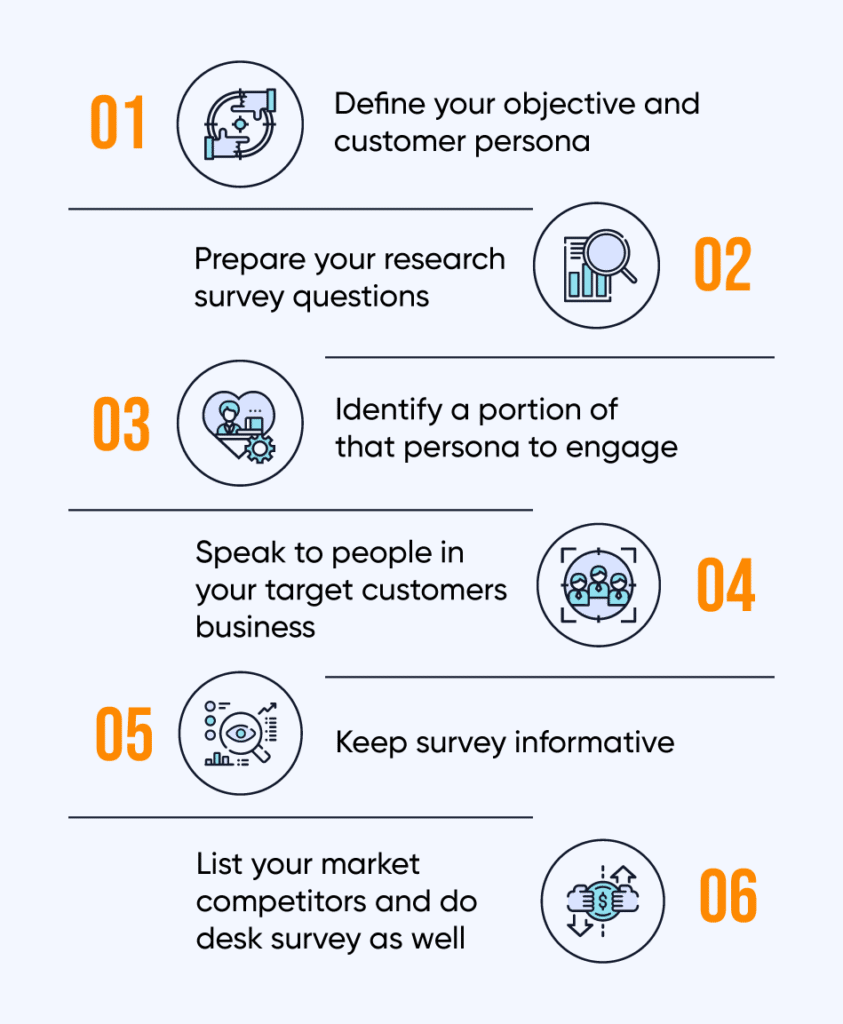
Here are some more advantages to doing market research:
Once your idea list is ready, it’s time to put a shape to your idea- Wireframes. You can consider a wireframe as a blueprint of your application. It will display the design of your app and functionality. Also, it will help you understand the look and the work of the application.
Mainly app wireframe gives articulation to the theory for the team to follow. Also, it helps developers as a reference or you can say as a guide book.
If you need suggestions for building your app’s wireframe, here are some steps
In the beginning, the user flow map is essential because these steps are a necessary aspect for your app to achieve a specific goal. I know you want to know all the steps, right? Let’s check them:
It is better to select a frame that has the dimensions of the actual device that you design. Firstly, the frame should act as a natural constraint, it will avert you from adding too many elements to one screen. Secondly, a frame should be generating an illusion of actual frame design.
We would like to recommend starting with a mid-screen size device. For example, as an iOS app development company, we use the XS framework of the iPhone.
 Fig: Set a mobile frame
Familiarity is the most important aspect of UX design. When users see familiar User Interface elements in a new product, they can rely on their past experience when interacting with this new product. Both iOS and Android have native design patterns that can simplify the design processes of developing a familiar experience for the designers. Design patterns can act as a reusable content block; it is possible to use to resolve common issues.
Will your screen design look good on an iPhone XS? That’s great! But will also look great in all the screen sizes. If your screen design looks great on a medium-size phone screen like iPhone XS, it doesn’t mean that the iPhone 5 and iPhone XS Max users will have the same experience. While it is fine to start with middle screen size when wireframing, it is also important to check how your content looks on the different screen sizes and adjust it according to the size.
 Fig: Screen sizes
If you are looking for help to build your mobile app’s wireframe then check out the trending wireframe tools:
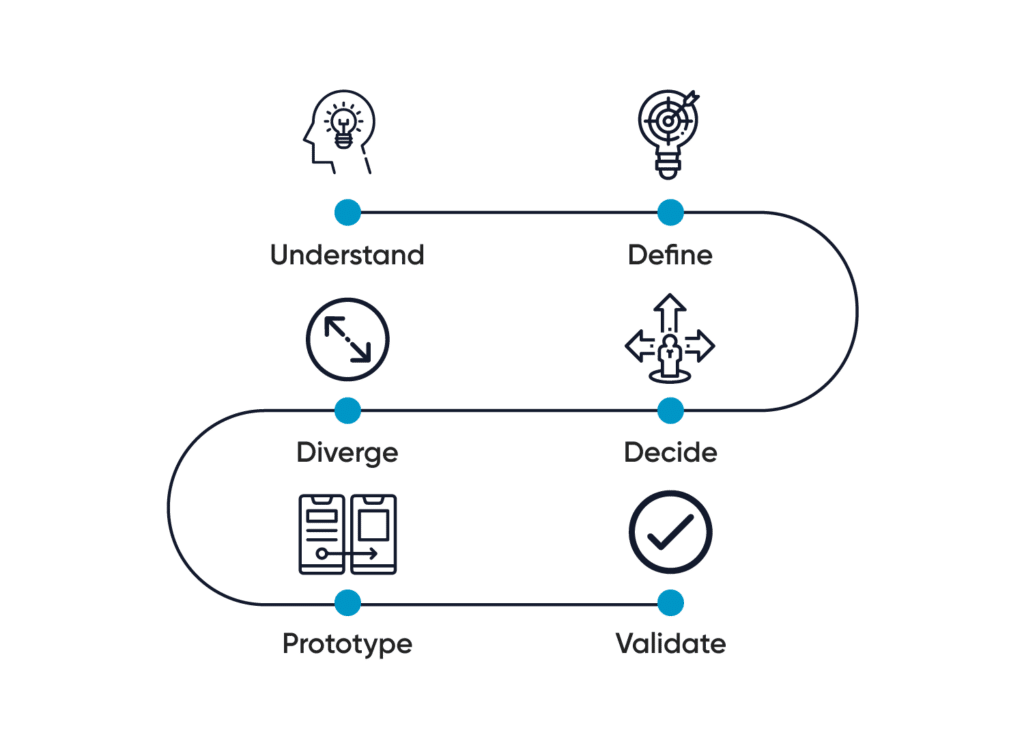
During wireframing, you will be confused about whether you are making the right design decisions or not. Maybe one layout IOS better than another, or perhaps some xx feature should be added. A Design Sprint is a proven, scientific process of collaborative brainstorming which helps in assessing which features to build first and which ones to eliminate. It helps in saving development time and money by solidifying concepts and building the groundwork for wireframing and designing.
Importance Of Design Sprint
Design sprints are useful in every stage of the project. Let’s explore:
To provide you in-depth knowledge in design sprint we are going to highlight its significant steps, let’s explore them:
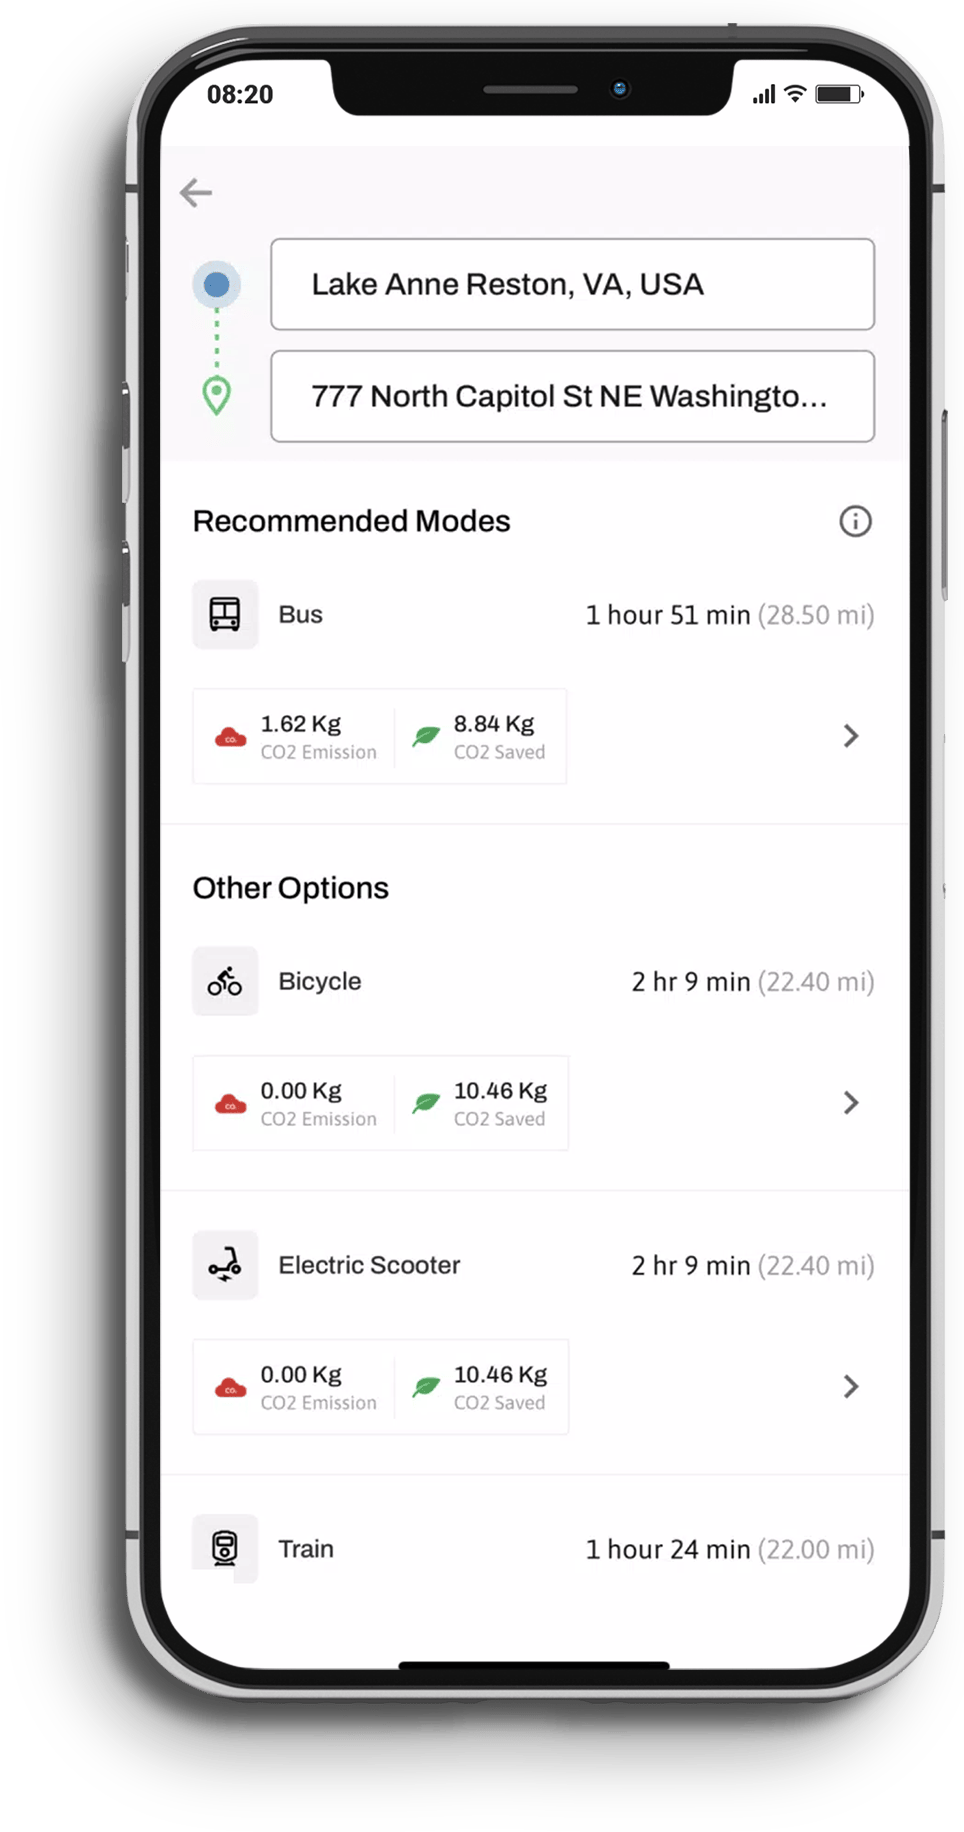
We have created a platform committed to pioneering sustainability, empowering individuals to make environmentally conscious choices. Collaborating with Mindbowser, this innovative mobile application enables users to directly impact their carbon footprints.
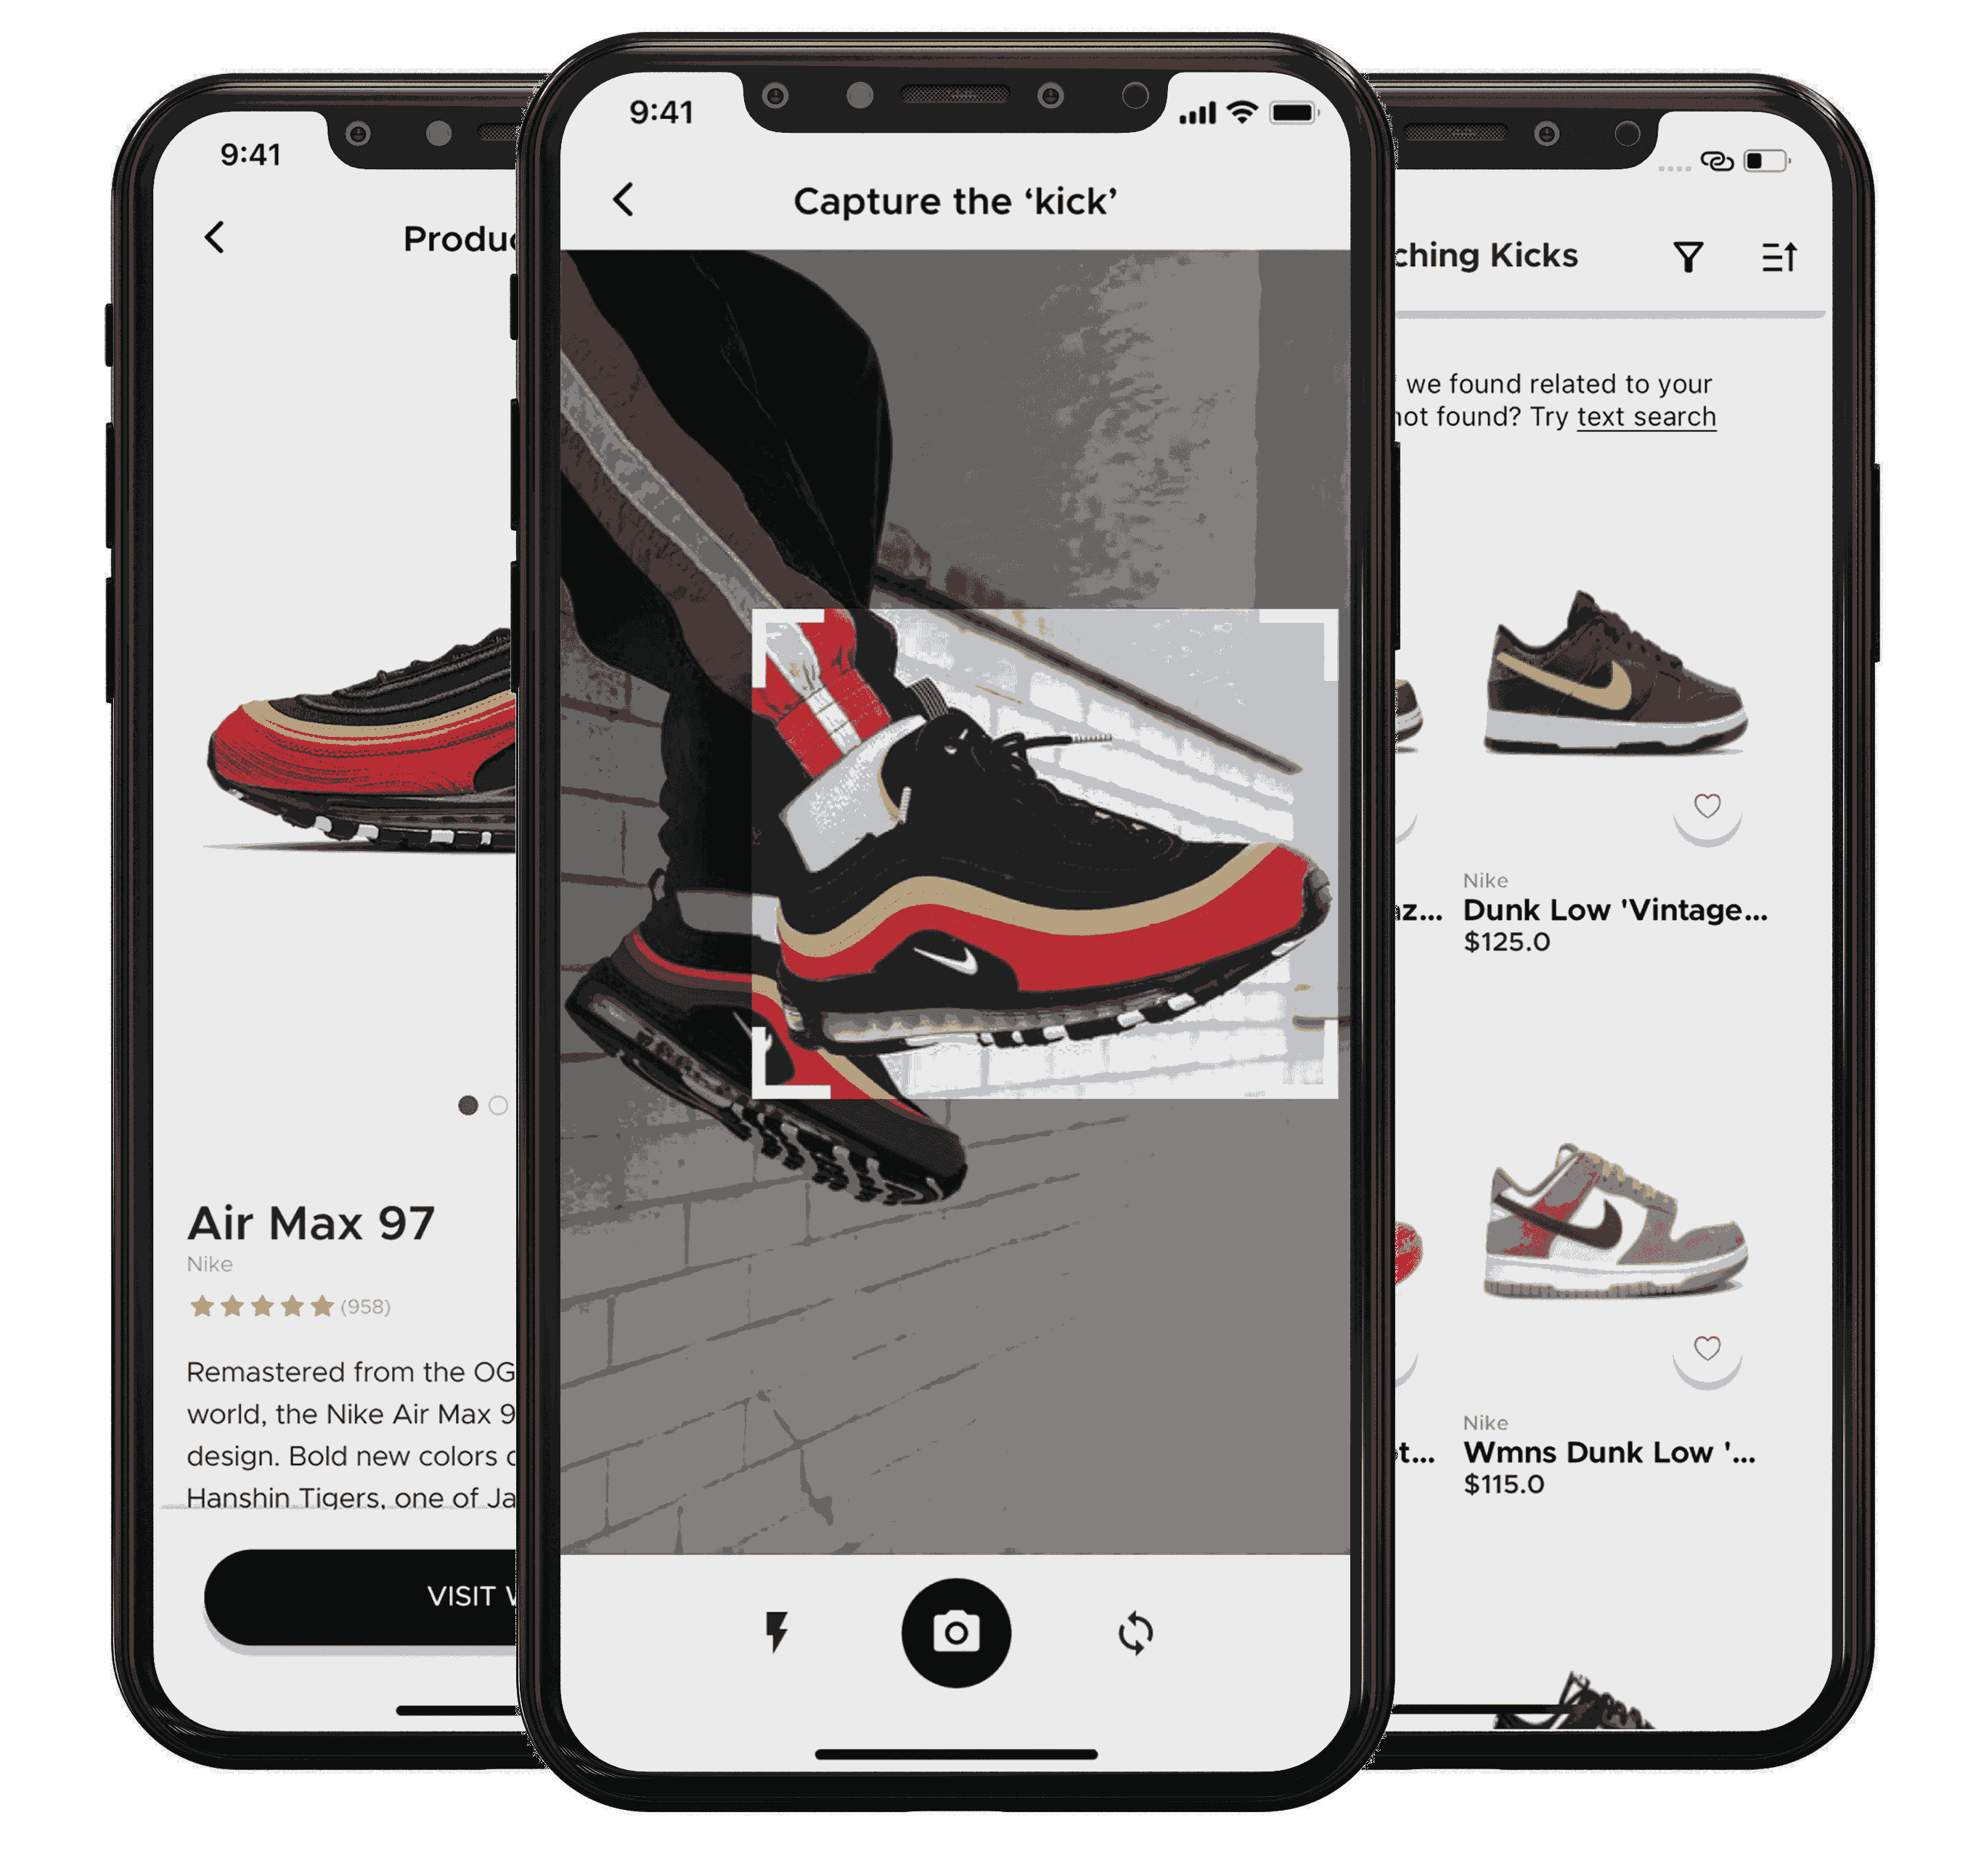
Discover how an e-commerce brand aims to completely change the way you shop for sneakers. We developed an application that utilizes machine learning algorithms to help you find the exact sneaker you were dreaming of. The intuitive interface enriched the powerful search algorithms and set a new standard in sneaker shopping.
Now we are going to help you make the right decision among all the platforms of mobile app development phases. Three options are available in the sector of development:
With the support of development language and tools developers can develop an application in specific platforms like Android, iOS.
Single mobile application built on HTML5 and can be run on multiple platforms. They’re downloaded from all the app stores like native applications.
It is actually optimized mobile websites that appear to be like a native application and run on the mobile browser. This web application is platform-independent and lags to have a superior user experience and functionality. Most useful to be built for cases where either the application is not allowed by respective app stores or end users are not expected to be motivated to download the app.
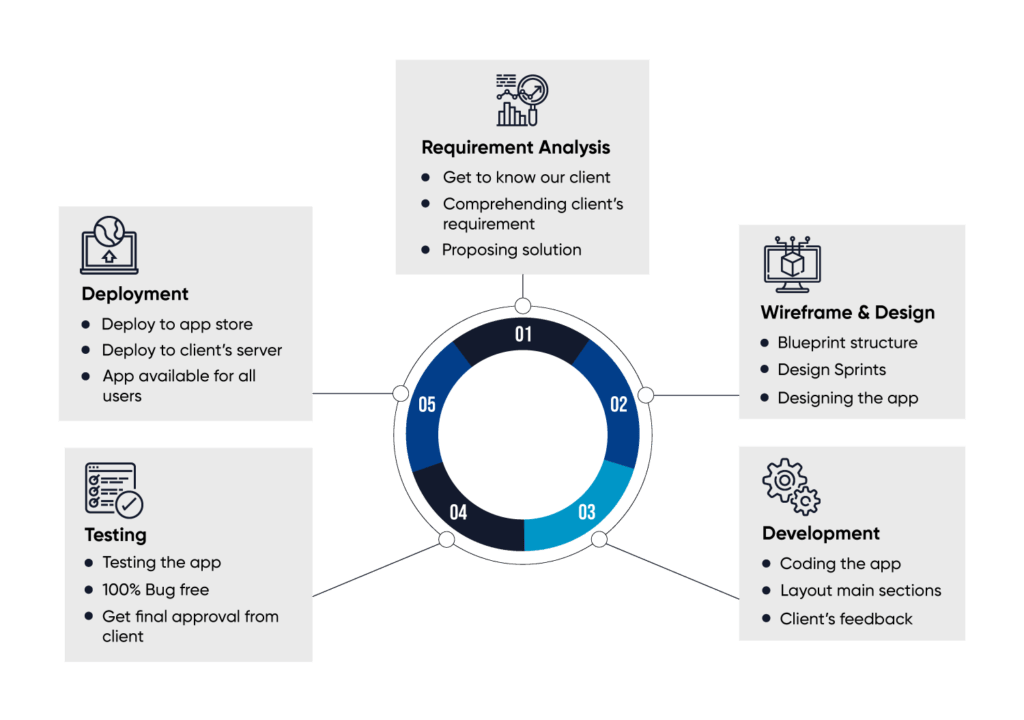
If your mobile app design passes the test of usability, it is time to give a proper structure to your dream project. This process covers the If your mobile app design passes the test of usability, it is time to give a proper structure to your dream project. This process covers the coding part and the actual realization of your application. The mobile app development stages incorporate multiple activities like establishing the appropriate development environment, developing different parts of the code, preliminary testing, and creating the mobile application that can be installed and tested. Android okhttp interceptor can be used centrally during development to rewrite and retry the network calls.
One development project would require programming and configuring the development environment. Usually, there are three aspects of any app- back-end, APIs, and the app front-end. Development is usually done in stages and you can expect your developer to provide interim builds that you will be able to run on your device itself.
Database and server-side objects become imperative for supporting functions of your mobile app by connecting to a network. Configurations and changes could be needed to support the desired mobile app functionality if you are using an existing backend platform. The server-side objects developed during this stage must be configured and tested with the other components of the app.
An API is a set of practices, protocols, and tools for developing software applications. It specifies how software components interact. Additionally, this programming interface is used when programming GUI components.
The front-end called “client-side” programming is what your app users interact with. It implements the required structure, design, animation and behavior that you can see on the screen when you open up the websites, web applications, or mobile apps.
Various tutorials are available that can help you to develop your app without experts. Or else you can simply hand over the design to an android app development company or a freelance developer.
Here are different ways to build a startup.
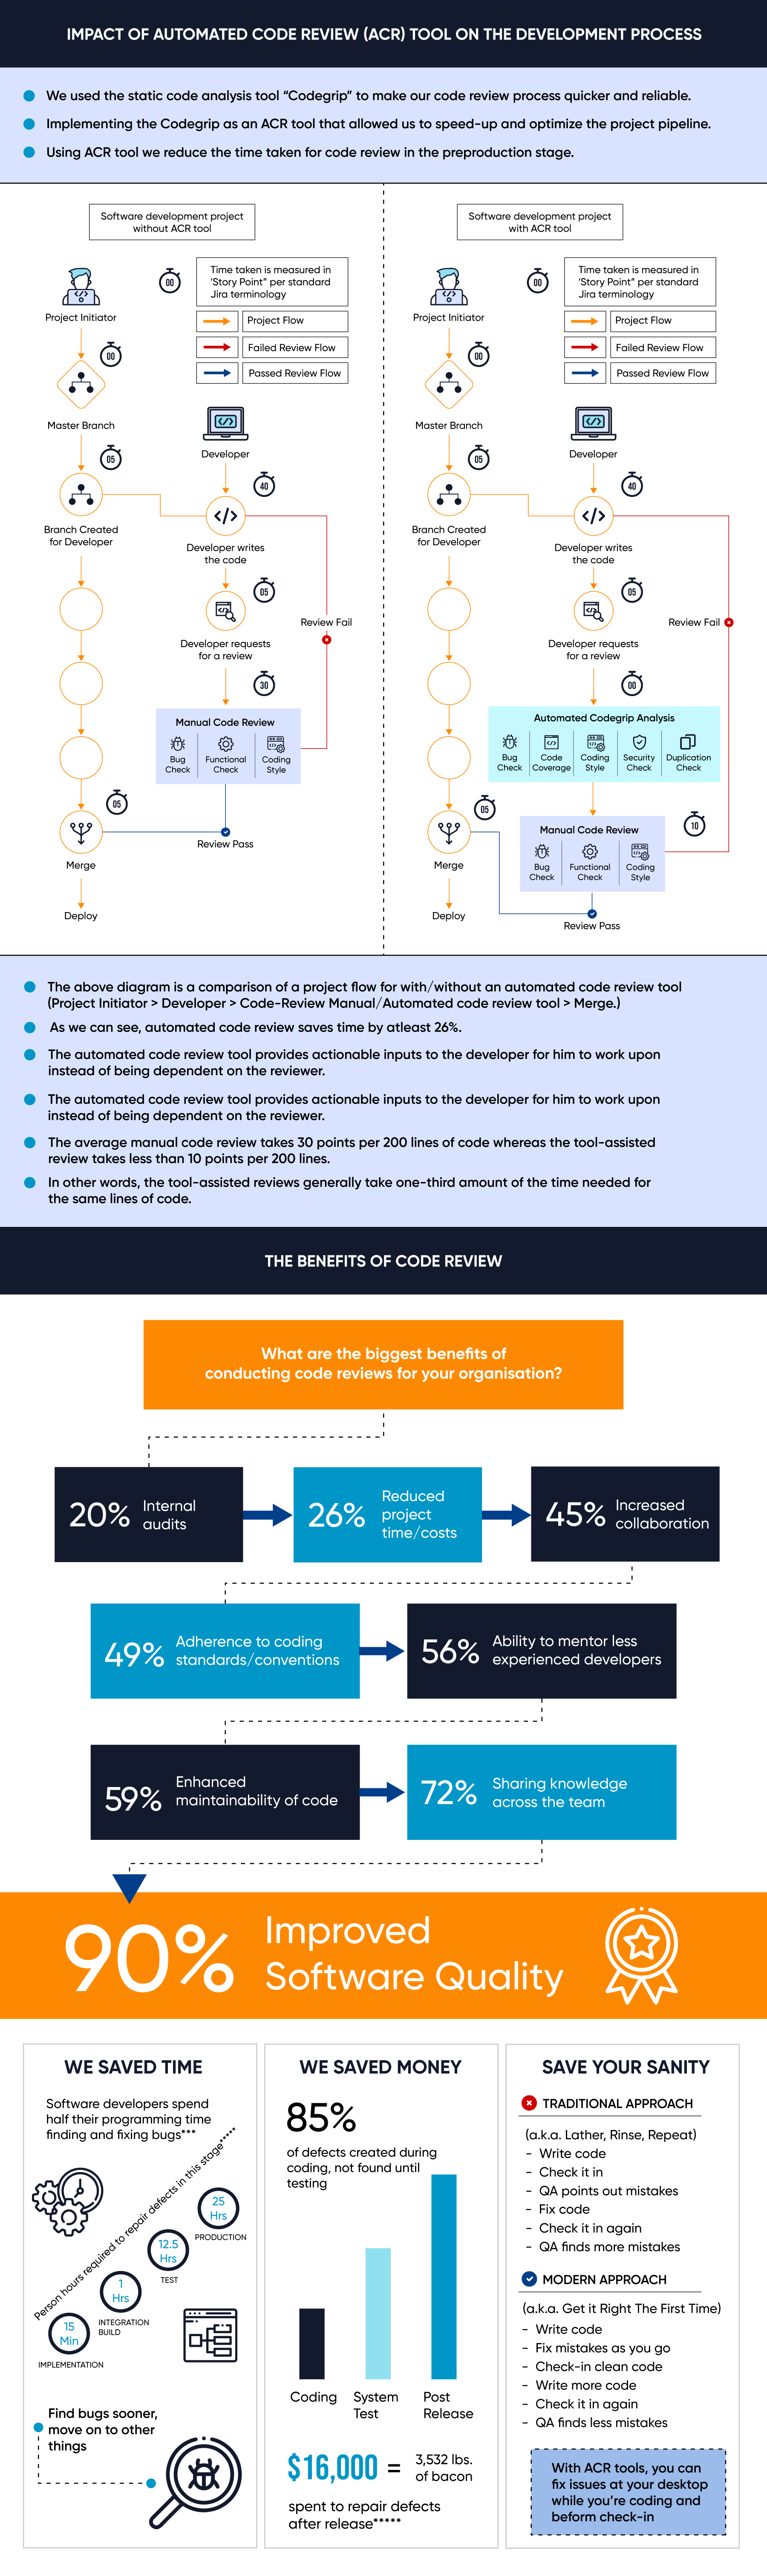
Running a code review process during development helps in making sure that there are no major bugs left at the end to solve. Here is our development process aligned with code review as part of everyday code.
Once you have a visually appealing and fully functional application, it’s time to conduct a final test of usability with other colleagues. In this process, you may find out bugs that you overlooked, but here you can apply the last tweaks to your product.
Learn about various mobile app testing stages with us. Here goes the list:
Let’s Check Popular Mobile Application Testing Tools:
A beta version of any application can attract early adopters, which is an important step in taking your mobile app mainstream. Early adopters provide a lot of beneficial feedback about your application’s pros and cons. And their experience and rating can help you to understand the acceptance of the app and the demand as well. This type of word-of-mouth marketing for your mobile app will bolster its reputation, and help the admin to acquire even more users.
You have designed the structure, tested, and developed your application. Now it is time to launch it in the Google Play Store or Apple store.
To provide you an idea about the Apple Store submission processes, we are going to highlight some basic submission processes.
Let’s get an idea about the submission process of the Google Play Store:
After launching your mobile app, the next and crucial step is marketing it. If people don’t get to know about your app, then there is no chance of downloading it. To spread your app and convince people to explore it, consider making attractive and informative videos that can show your app’s functionality. And do not forget the potential of social media, use all digital platforms to reach every corner of the world. It will deliver people a glimpse of your app and highlight the key features that can simplify the need for life.

The mobile application development stages are quite overwhelming and tedious. But, it is a rewarding process as well if you do it in the right manner. We have discussed here a chronological step-by-step process to mobile app development that can be applied to both startup clients and enterprises. Hope our guide to mobile app development helps you understand all the aspects.
If you have any doubt or question that you want to know in detail, get in touch.
Good luck, Keep building!

Mindbowser and team are professional, talented and very responsive. They got us through a challenging situation with our IOT product successfully. They will be our go to dev team going forward.
Founder, Cascada

Co-Founder, Emerge
The team is great to work with. Very professional, on task, and efficient.

Founder, PeriopMD
I can not express enough how pleased we are with the whole team. From the first call and meeting, they took our vision and ran with it. Communication was easy and everyone was flexible to our schedule. I’m excited to...

Founder, SafeZone Safety Systems
Mindbowser has truly been foundational in my journey from concept to design and onto that final launch phase.

CEO, KickSnap
We had very close go live timeline and MindBowser team got us live a month before.

CEO, BuyNow WorldWide
If you want a team of great developers, I recommend them for the next project.

Founder, Teach Reach
Mindbowser built both iOS and Android apps for Mindworks, that have stood the test of time. 5 years later they still function quite beautifully. Their team always met their objectives and I'm very happy with the end result. Thank you!

Founder, Mindworks
Our CISO was extremely impressed by Mindbowser’s work. It is pretty rare to see this kind of clean security report so early in the company’s journey. Huge Thank you for the disciplined approach here.

Founder, TrestleIQ
Mindbowser has delivered a much better quality product than our previous tech vendors. Our product is stable and passed Well Architected Framework Review from AWS.

CEO, PurpleAnt
The flexibility and capacity of the Mindbower staff has been impressive.

CEO, ProofPilot
I am happy to share that we got USD 10k in cloud credits courtesy of our friends at Mindbowser. Thank you Pravin and Ayush, this means a lot to us.

CTO, Shortlist
Mindbowser is one of the reasons that our app is successful. These guys have been a great team.

Founder & CEO, MangoMirror
Kudos for all your hard work and diligence on the Telehealth platform project. You made it possible.

CEO, ThriveHealth
Mindbowser helped us build an awesome iOS app to bring balance to people’s lives.

CEO, SMILINGMIND
They were a very responsive team! Extremely easy to communicate and work with!

Founder & CEO, TotTech
We’ve had very little-to-no hiccups at all—it’s been a really pleasurable experience.

Co-Founder, TEAM8s
Mindbowser was very helpful with explaining the development process and started quickly on the project.

Executive Director of Product Development, Innovation Lab
The greatest benefit we got from Mindbowser is the expertise. Their team has developed apps in all different industries with all types of social proofs.

Co-Founder, Vesica
Mindbowser is professional, efficient and thorough.

Consultant, XPRIZE
Very committed, they create beautiful apps and are very benevolent. They have brilliant Ideas.

Founder, S.T.A.R.S of Wellness
MindBowser was great; they listened to us a lot and helped us hone in on the actual idea of the app. They had put together fantastic wireframes for us.

Co-Founder, Flat Earth
Ayush was responsive and paired me with the best team member possible, to complete my complex vision and project. Could not be happier.

Founder, Child Life On Call
As a founder of a budding start-up, it has been a great experience working with Mindbower Inc under Ayush's leadership for our online digital platform design and development activity.

Founder, Courtyardly
The team from Mindbowser stayed on task, asked the right questions, and completed the required tasks in a timely fashion! Strong work team!

CEO, SDOH2Health LLC
Mindbowser was easy to work with and hit the ground running, immediately feeling like part of our team.

CEO, Stealth Startup
Mindbowser was an excellent partner in developing my fitness app. They were patient, attentive, & understood my business needs. The end product exceeded my expectations. Thrilled to share it globally.

Owner, Phalanx
Mindbowser's expertise in tech, process & mobile development made them our choice for our app. The team was dedicated to the process & delivered high-quality features on time. They also gave valuable industry advice. Highly recommend them for app development...

Co-Founder, Fox&Fork